Helix Stadium s as a UsSB, multi-input/output, 24-bit, audio interface for macOS and Windows® computers and mobile devices, compatible with all major DAW software.*
*For USB Audio Operation
-
USB audio functionality is available via Helix Stadium’s USB-C® port only.
-
For Windows® computers, it is necessary to download and install the Line 6 Helix Stadium ASIO® driver for low-latency, 8-in/out functionality with DAW host applications. Note that a restart of your computer will be required for the driver installation.
-
For macOS computers, no driver installation is necessary.
-
For Apple or Android™ mobile devices, no driver installation is required.
-
For Apple iOS, iPadOS, and Android devices that do not include a USB-C connection, a USB adapter is required (sold separately):
-
For iOS and iPadOS devices, a USB-to-Lightning (Camera Kit) adapter is required.
-
For Android devices, a USB OTG (On-The-Go) adapter is required.
-
-
Please refer to Helix Stadium firmware Release Notes for driver support specific to the latest Windows and macOS operating systems.
Using USB Audio
With the Helix Stadium’s default Input and Output settings, you’ll automatically hear audio software playback on USB 1/2 routed directly to the Stadium XLR, 1/4", and Phones outputs. This lets you jam along with YouTube™, iTunes, or your DAW tracks without hearing them processed by the current preset’s amp and effect blocks.
Tip! Alternatively, you can stream music playback from your mobile device or music player to Helix Stadium using Bluetooth—see the Bluetooth Connectivity section.
If you set your DAW software track to record from Stadium’s USB 1/2 output, you’ll capture your Stadium-processed signal in the DAW track—with zero-latency monitoring since your input signal is heard from the Stadium hardware outputs before it is routed through your software. The Helix Stadium signal path that is heard on USB Out 1/2 is also determined by the Global Settings > Ins/Outs > USB Out 1-2 settings (Direct Out, or the Matrix Mixer for the 1/4”, XLR, or Phones outputs).
The additional Stadium USB audio inputs and outputs are available as selectable options for the Input and Output blocks, as well as within your DAW software’s track menus. You can utilize these USB ins and outs for numerous routing configurations, all without patching extra cables—see the following recording and Re-amping section examples.
ASIO Driver Settings (Windows)
When using Stadium as an audio interface with Windows DAW applications, it is highly recommended to configure the software to use the Line 6 Helix Stadium ASIO driver (available for free download from line6.com/software). The Line 6 ASIO driver delivers low-latency audio performance required for DAW recording on Windows systems, operating at sample rates of 44.1kHz, 48kHz, 88kHz, or 96kHz with ASIO - Windows audio applications. Driver selection is typically found in your DAW software’s Preferences or Options dialog—see your software’s documentation.
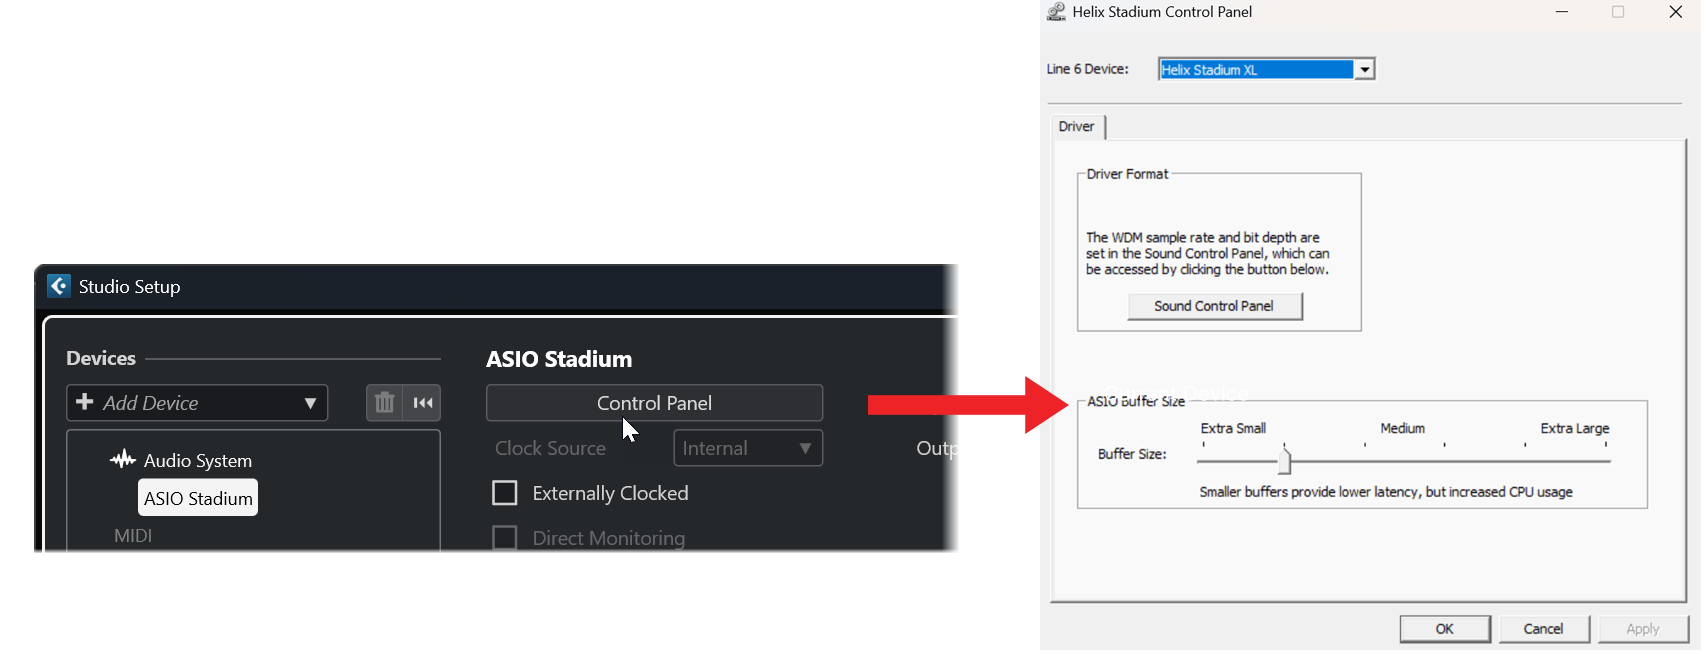
Once you’ve selected Helix Stadium as the ASIO device within your DAW software’s audio device settings, you’ll also see a button in its settings for “ASIO Control Panel” (or with a similar title). Press this button to launch the Line 6 Driver Control Panel.
-
ASIO Buffer Size: The goal is to set the optimal Buffer Size to achieve the lowest possible latency in your DAW software while maintaining glitch-free audio performance. Smaller buffer sizes result in lower latency; however, they also increase the processing demands on your computer, which can cause clicks, pops, or other audio artifacts. Set the panel’s ASIO Buffer Size slider to the left to start with a lower value, and click Apply. If you encounter audio performance issues in your DAW, return to this panel and adjust the slider to the right to increase the value; this typically resolves the problem. Please also refer to your DAW host application’s documentation for more information about its own specific audio device, buffer, and project settings.
-
Driver Format - Sound Control Panel: Windows multimedia applications, such as Windows Media Player, iTunes, web browser apps, use the included WDM driver for playback and recording. You can optionally set Helix Stadium as your “default” USB audio interface for these multimedia applications using the built-in Windows Sound control panel options, which you can access via the Driver Format -

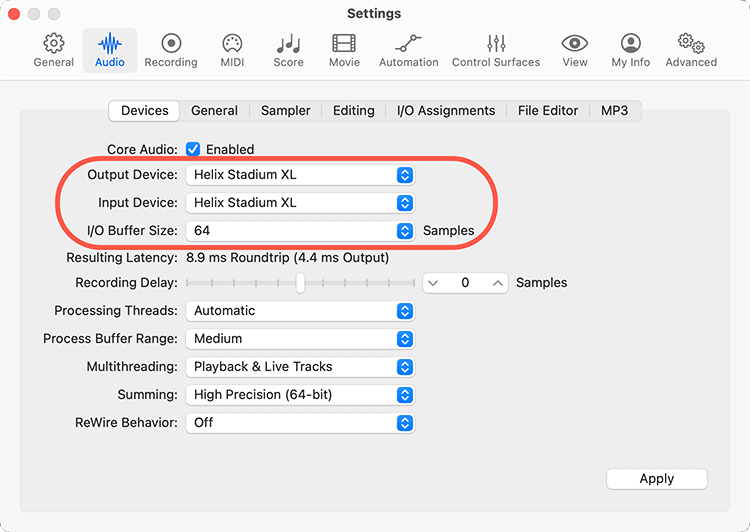
Core Audio Driver Settings (macOS)
No additional drivers are required to use Helix Stadium as an audio interface for macOS applications. Helix Stadium automatically uses the Mac computer's Core Audio USB driver when you connect to its USB port, offering low-latency, 48kHz native sample rate, 24-bit operation. Helix Stadium will appear as a selectable Core Audio device in the Mac Utilities > Audio MIDI Setup panel and/or directly within your macOS DAW host and other multimedia applications.
Hardware Monitoring vs. Software Monitoring
Helix Stadium provides “hardware monitoring,” which allows you to hear your live input signal at all times, independent of your Digital Audio Workstation (DAW) software’s monitor settings. Hardware monitoring can be desirable since it allows you to hear your live guitar with processing added and essentially “latency-free” since the monitor signal is not routed through your DAW software.
In some DAW recording scenarios, it may be preferable to utilize your recording application’s “input monitoring” (or, sometimes called “software monitoring”) feature, which routes your live input signal through the software’s armed recording track, thus allowing you to monitor the input processed by any plugins you may have inserted on the track. However, one downside of DAW software monitoring is that your live input signal will be slightly delayed as it is routed through the software and back to Stadium’s outputs, which is referred to as “latency.” Helix Stadium devices are designed to provide low-latency operation. For additional information and settings, see the preceding ASIO Driver Settings (Windows) section.
When a DAW track’s software monitoring is active, you’ll likely not want to hear the Stadium hardware monitoring signal simultaneously. To achieve this, set the Stadium Output block to USB Out 3/4 or 5/6. These Output block options will route your Stadium-processed, stereo signal to your DAW software without providing the Stadium hardware monitoring to USB 1/2. Then set your DAW track to receive the signal from the same selected Stadium USB Out, allowing you to record the Stadium-processed signal into the track. Alternatively, you can set the DAW track input to Stadium USB 7 or USB 8 to record a dry DI signal—see the next section.
DI Recording and Re-amping
A common DAW recording technique is to record a dry DI (Direct Input) signal, such as the unprocessed signal from your guitar, bass, or mic, along with your miced or processed tone. This allows you to process the DI track later with plugins and/or “Re-amplify” the DI track through an amp or other outboard gear. Helix Stadium has handy options built right in for recording DI tracks and for easy “Re-amping” of DI tracks back through your own Stadium tones, all without extra hardware or cabling!
Helix Stadium offers two special DI outputs, USB Outs 7 and 8, which appear as available options within your DAW software track input menus. These two dedicated USB Outs are tapped directly from your choice of Helix Stadium input sources. To configure the Stadium input source for each, go to Global Settings > Ins/Outs > Re-amp Src (USB 7) and Re-amp Src (USB 8), where you can select your preferred Instrument, Mic, or other source for each.

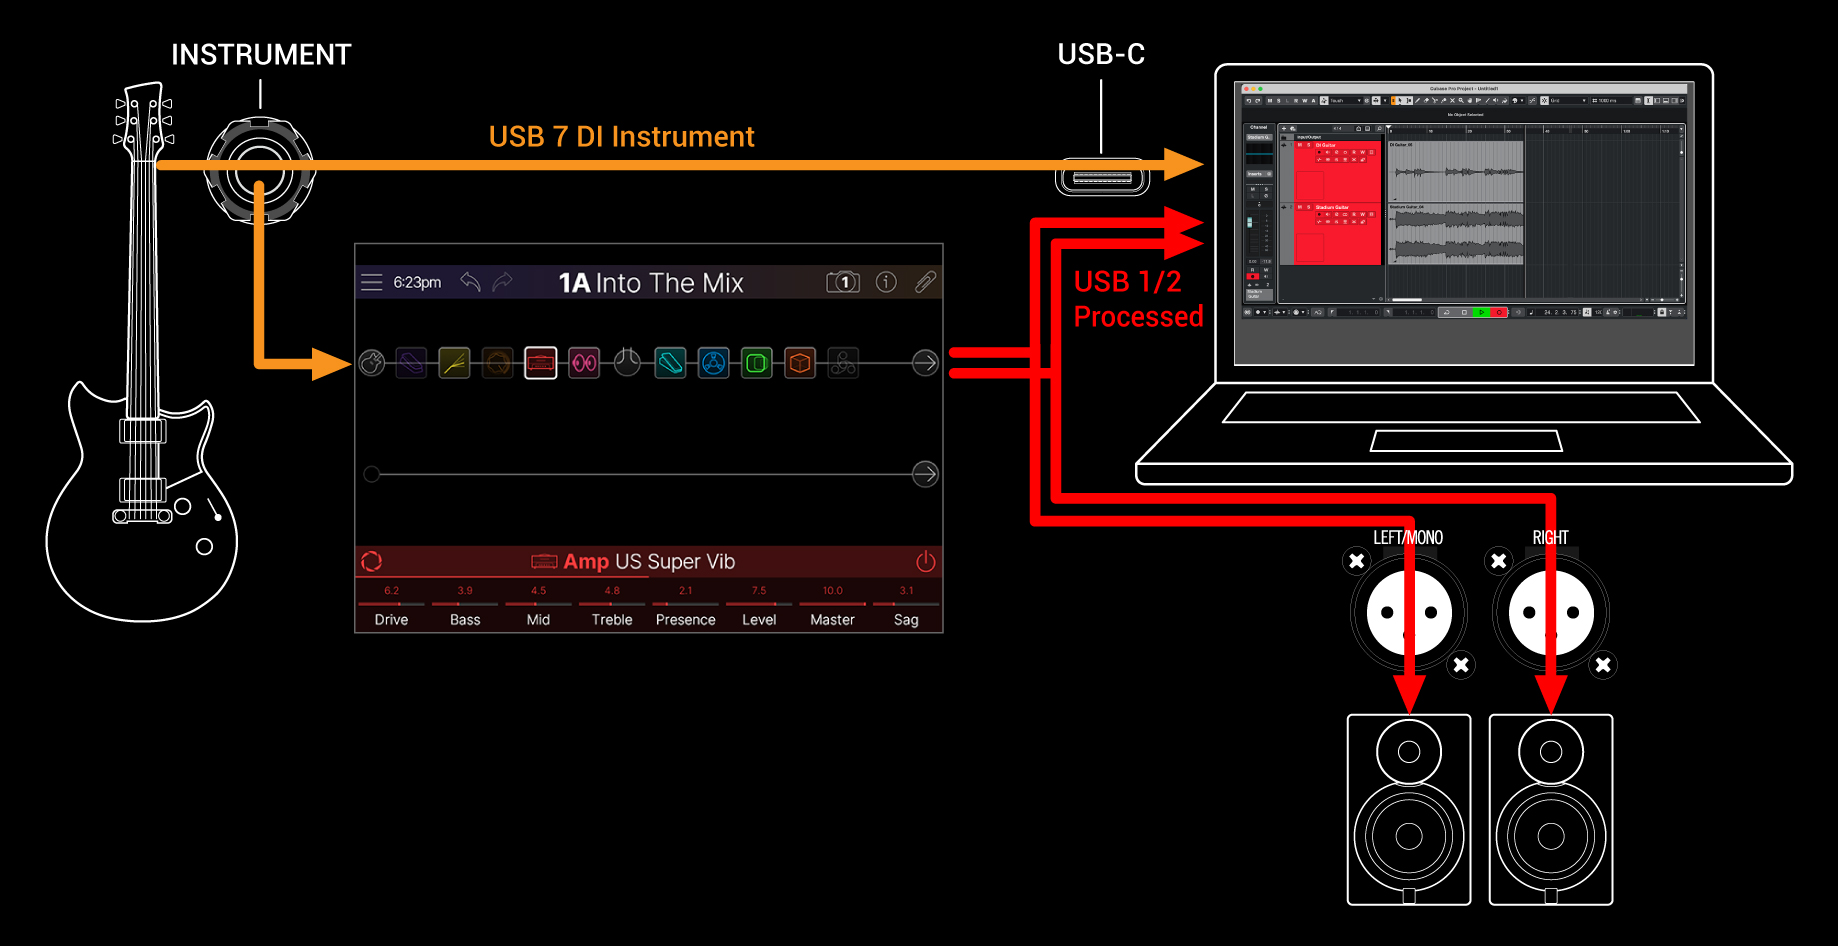
Recording a Dry DI Track
For this example, we’ll record guitar into two DAW tracks simultaneously, with one capturing the unprocessed DI guitar and the other the Helix Stadium-processed tone.
![]()
![]()
![]()
-
Create one mono-input track to record the dry DI guitar, and set the track’s input to Stadium’s USB 7.
-
Create one stereo-input track to record your full, stereo Stadium-processed tone and set the track’s input to USB 1/2.
![]()
Note: Setting the stereo track’s output to Stadium’s USB Out 1/2 allows you to hear your Stadium-processed tone via the Stadium hardware monitoring while recording. For this configuration, disable software monitoring on all DAW tracks.
![]()
Now, you have your Stadium-processed track to mix with the project, and a separate DI track to experiment with further using DAW plugins and/or Re-amping (see the next section).
Re-amping Through Helix Stadium
If your DAW software offers options for routing individual audio tracks to outputs other than the main Stadium USB Out 1/2, you can use these steps to Re-amp a dry recorded DI track.
![]()
![]()
Note: In some DAW software, activating the software monitoring feature on this “Re-amped” track may also be necessary to monitor the Stadium-processed signal when playing back your project. See your software’s documentation.
![]()

![]()
![]()
Allow the DI track to play to the end, stop recording, and you’ve created your new Re-amped guitar track!
Tip: Note that you still have your original Guitar DI recording. You can repeat this process to create additional Re-amped tracks with different Stadium Amps & Effects, add plugins, blend with your original guitar track, and more.