Helix Stadium can be used in a variety of setups with your other gear, for live performance, rehearsal, recording, and more. Please refer to the following setup examples for a few common configurations.
Caution - It might get loud! Always turn the Volume for the respective output(s) counterclockwise to minimum before making connections to external gear and headphones to avoid encountering loud bursts of audio 🤯. Exposure to high volume levels can potentially cause hearing damage or harm to your equipment.
Tip: Several Preset Templates are included, allowing you to easily create a new preset with specific signal path routing and input/output configurations. Please refer to the Creating a New Preset section for additional details.
Stage Setup
A common configuration for a live stage performance is to connect to an active guitar speaker (or two for stereo), such as the Line 6 Powercab family of active guitar speaker systems, and direct out to the Front of House mixer. All connections can be made directly from Helix Stadium.

-
Instrument Input: Connect your guitar, bass, or other instrument to the Instrument input.
-

-
Use shielded, 1/4” Tip-Sleeve (TS) instrument cables for connecting your instruments.
-
-
XLR Output: Connect from the XLR L/MONO output to the input of a Front Of House mixing console. Optionally, also connect the XLR RIGHT output to a second mixing console input for stereo. If only the XLR L/MONO output is connected, Helix Stadium merges the stereo XLR output signal to mono.
-
Use balanced XLR audio cables for your XLR output connections.
-
-
1/4” Output: Connect from the 1/4” L/MONO output to the input of an active guitar speaker, a Full Range Flat Response (FRFR) type amplifier, or into the FX Loop Return or Power Amp In of a guitar amplifier for personal monitoring on stage. Optionally, also connect the 1/4” RIGHT output to a second amplifier for stereo. If only the 1/4” L/MONO output is connected, Helix Stadium merges its stereo 1/4” output signal to mono.
-
Helix Stadium’s 1/4” outputs are balanced/unbalanced; that is, they can accommodate both balanced TRS (Tip-Ring-Sleeve) and unbalanced TS (Tip-Sleeve) cables.
-
Tip: Optionally, add additional effects and control to your stage setup by utilizing Stadium’s FX Loop, MIDI, and Control features. See the following Additional Connections section.
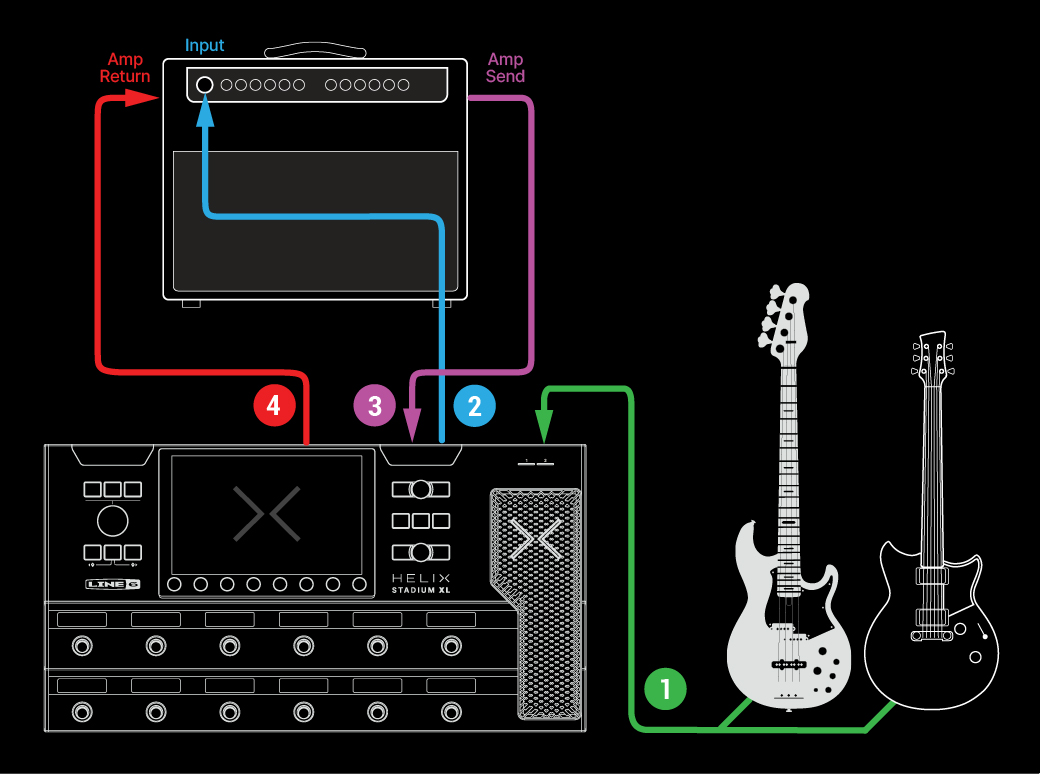
4-Cable Method Setup
“4-Cable Method” is a popular and flexible setup, allowing you to route some Stadium effect blocks (most often drives, distortions, wahs, and compressors) before your external amplifier's preamp, and other effects blocks (often time-based effects like delays and reverbs) within the amplifier’s effects loop. Create a new Helix Stadium preset using the provided “4-Cable Method” Preset Template, then make your cable connections as described in the following steps.* Use shielded, 1/4” Tip-Sleeve (TS) instrument cables for all connections.
*Note: The “4-Cable Method” preset template already includes an enabled FX Loop block. You won’t hear any signal with this preset unless you make the cable connections with an external amplifier and its FX Loop as described below.
-
Instrument Input: Connect your guitar, bass, or other instrument to Helix Stadium’s Instrument input.
-
Stadium FX Loop 1 > Send Output: Connect to the front 1/4” input of your external amplifier.
-
Amplifier FX Loop > Send Output: Connect to the Stadium FX Loop 1 > Return input.
-
Stadium 1/4” L/MONO Output: Connect to the amplifier’s FX Loop > Return input.
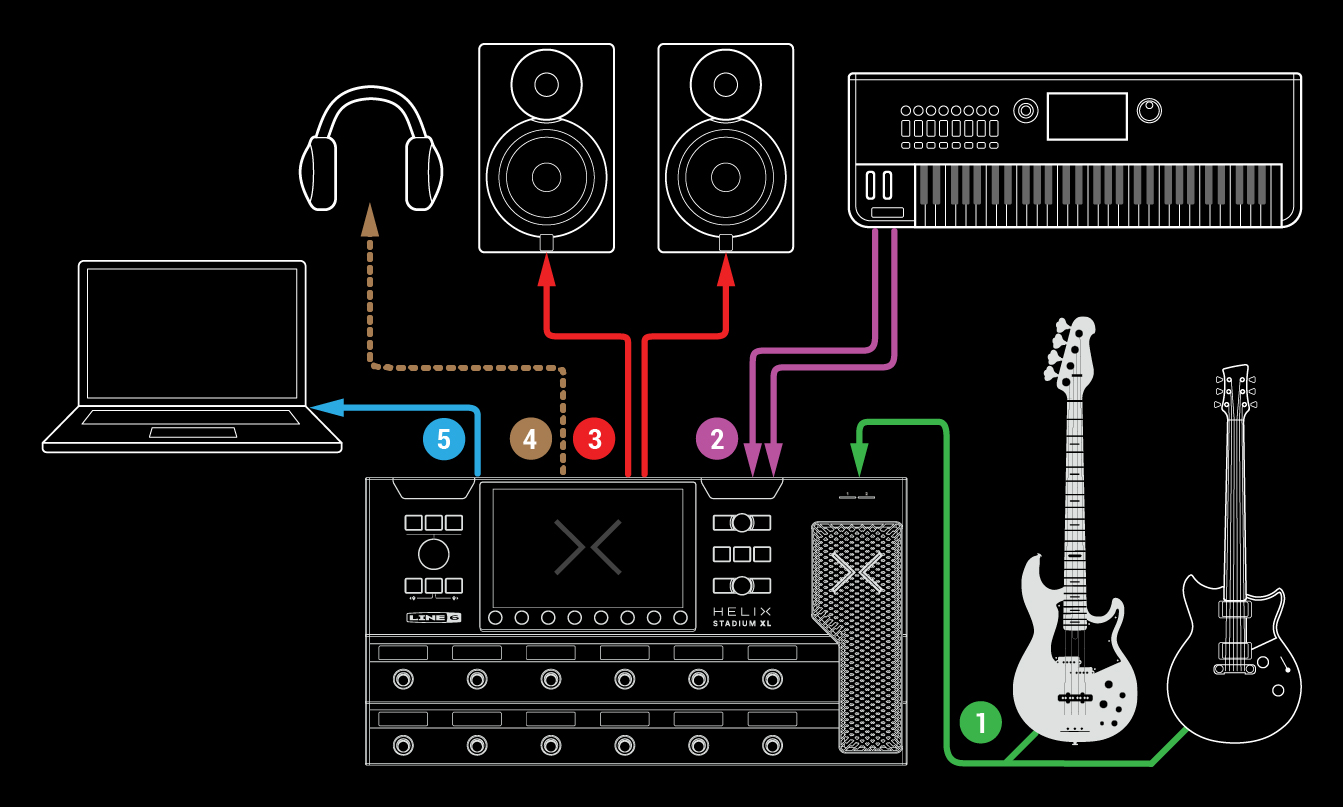
Home Studio - USB Recording Setup
Helix Stadium also functions as a high-quality, 24-bit, multi-channel USB-C® audio interface with all major macOS and Windows® DAW host applications. Use this configuration to put Stadium to work in the studio for recording, re-amping, and mixing. Please refer to the USB Audio page for additional details.
-
Instrument Input: Connect your guitar, bass, or other instrument to Helix Stadium’s Instrument input, or to
-
Return Input: For additional inputs, connect instruments or other audio sources, such as a synth or drum machine, to Stadium’s Return input (use two Returns for stereo input). Returns can be selected as input sources within your preset’s Input blocks.
-
XLR Outputs: Connect from the L/MONO and RIGHT XLR balanced outputs to your left and right powered studio monitors. Press the Stadium XLR Output button

-
Phones Out: Optionally, connect stereo headphones for monitoring.
-
USB-C: Connect directly to your computer’s USB-C port; it is not recommended to connect using a USB hub.
Optionally, use Stadium’s MIDI ports or USB-C MIDI to send and receive control commands and MIDI Clock—see the next section.
Tip: You can optionally use Stadium to record a dry, D.I. signal into your DAW software and apply your presets to “re-amp” your D.I. tracks. This can be accomplished simply by changing the current preset’s Input and Output block settings. Please see DI Recording and Re-Amping.
Additional Connections
The above setup examples are just the beginning. You can also connect to MIDI devices, effects, controllers, and other external gear, as described below.
MIDI Connections
Use Stadium’s 5-pin MIDI IN and MIDI OUT/THRU ports to connect to external MIDI gear for numerous functions:* See MIDI for details.
*Note: Stadium’s USB-C port also supports MIDI IN and OUT.
-
Receive commands from a MIDI controller to remotely control Stadium’s preset parameters, footswitches, knobs, and other functions.
-
From the Command Center screen, send MIDI commands to control external gear.
-
Send or receive MIDI Clock to sync tempo with your other MIDI devices.
FX Loop Connections
Stadium’s FX Loop, Send, and Return blocks are most often used to patch external pedals or rack effects directly into your presets, and you can position them anywhere within your signal chain. FX Loop blocks can be mono (one Send and Return) or stereo (two adjacent Sends and Returns). See FX Loop, Send & Return Blocks for details.
Control A/B and C/D Connections
Stadium’s Control A/B (and ![]()
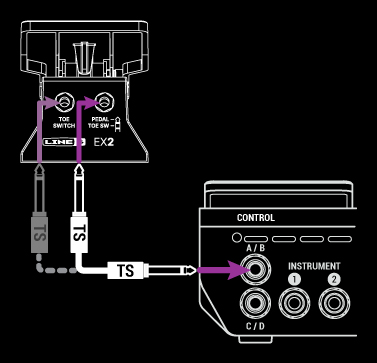
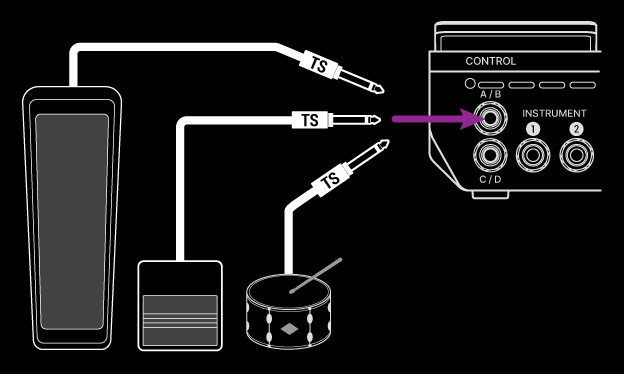
External Amp Switching
Stadium’s Control A/B (and ![]()