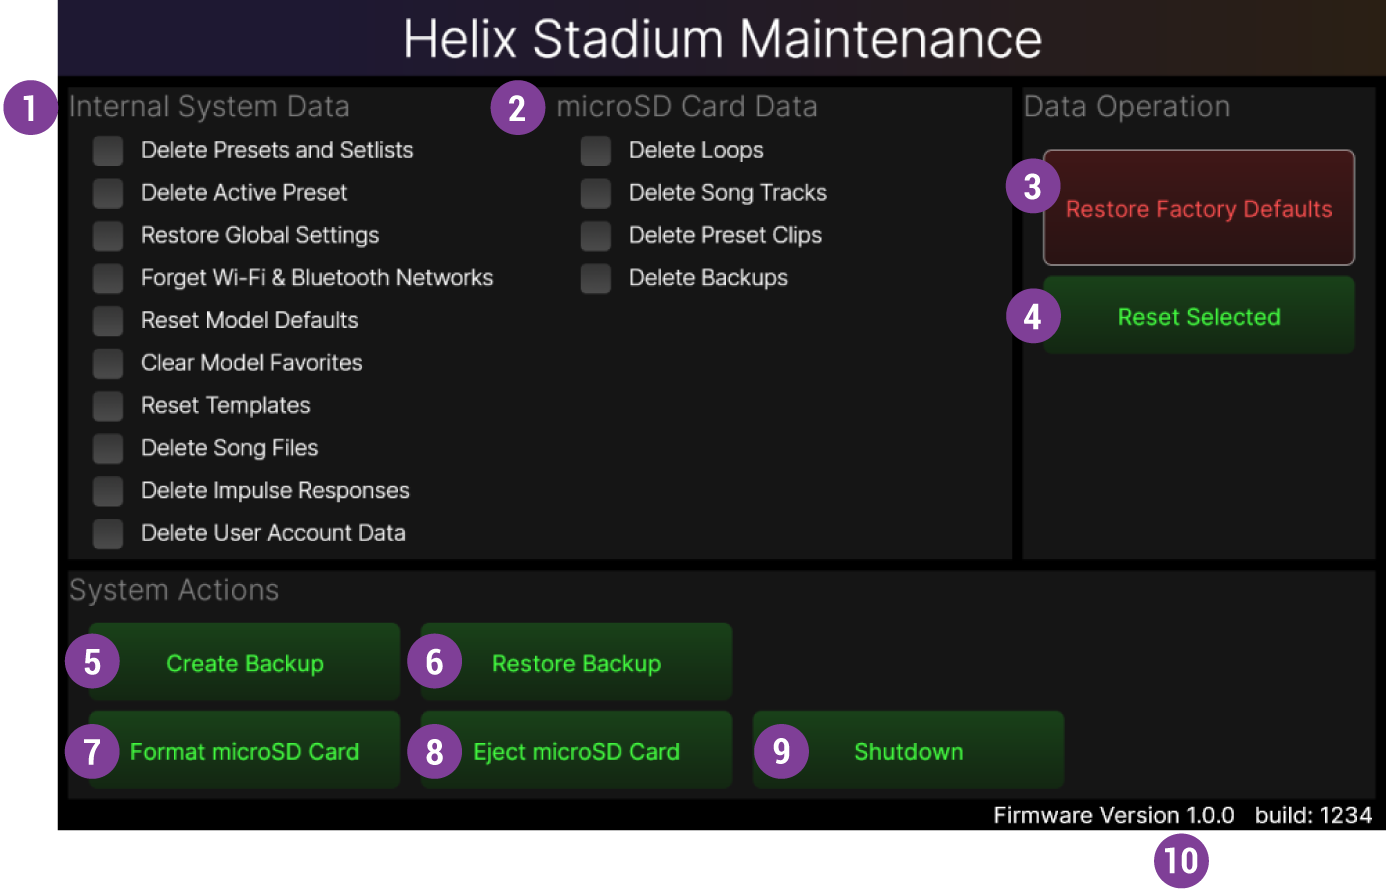
The Helix Stadium Maintenance screen offers several features to keep your device in optimal working order, including creating and restoring backups, formatting a microSD™ card, performing a factory reset, and more. This page covers using the Maintenance screen features to complete these tasks.
Looking to do a firmware update? 🤔 You can check for and install the latest Heix Stadium family device firmware update by either using the Concierge Screen or by tapping the Main Menu button 

The Helix Stadium Maintenance Screen
Note that it is necessary to power on your Helix Stadium device using the following procedure to enter the Maintenance screen:
With your Helix Stadium device powered Off, press and hold both the Home ![]()
![]()
![]()
![]()
Important! Note that these actions will permanently delete or reset the selected data from your device. If you wish to retain your current Stadium device’s internal data, first follow the steps on this page for Creating a Backup.
![]()
![]()
Important! Note that these actions will permanently delete the selected data from your microSD card.
![]()
Important! Note that these actions will permanently delete all user-created data and reset all settings to their factory defaults. If you wish to retain a copy of your current Stadium device’s internal data and settings, first follow the steps on this page for Creating a Backup.
![]()
![]()
![]()
![]()
![]()
![]()
![]()
![]()
![]()
Creating a Backup
A backup will automatically include the complete set of all User presets, Setlists, settings, and all other user data from your Helix Stadium device’s internal memory, storing it all in a single backup file on your microSD card. If not already, insert the microSD card that came with your Helix Stadium device into the microSD slot, and then proceed to the following steps to create or restore a backup.
-
With the included microSD card inserted, tap the Maintenance screen’s


-
Wait for the status dialog to complete—do not adjust any controls or power off your Stadium device during this process. Tap
Note: Your included microSD card initially comes with ample storage space to create and store multiple backups. However, if your current card no longer offers sufficient storage capacity, an alert will be presented. You’ll need to either free up space on the card by using the Maintenance screen’s Delete Backups option to remove saved backups from your microSD card (see the ![]()
-
To exit the Maintenance screen:
-
Tap the

-
Tap

-
You can now power your Helix Stadium device back on normally and resume using it.
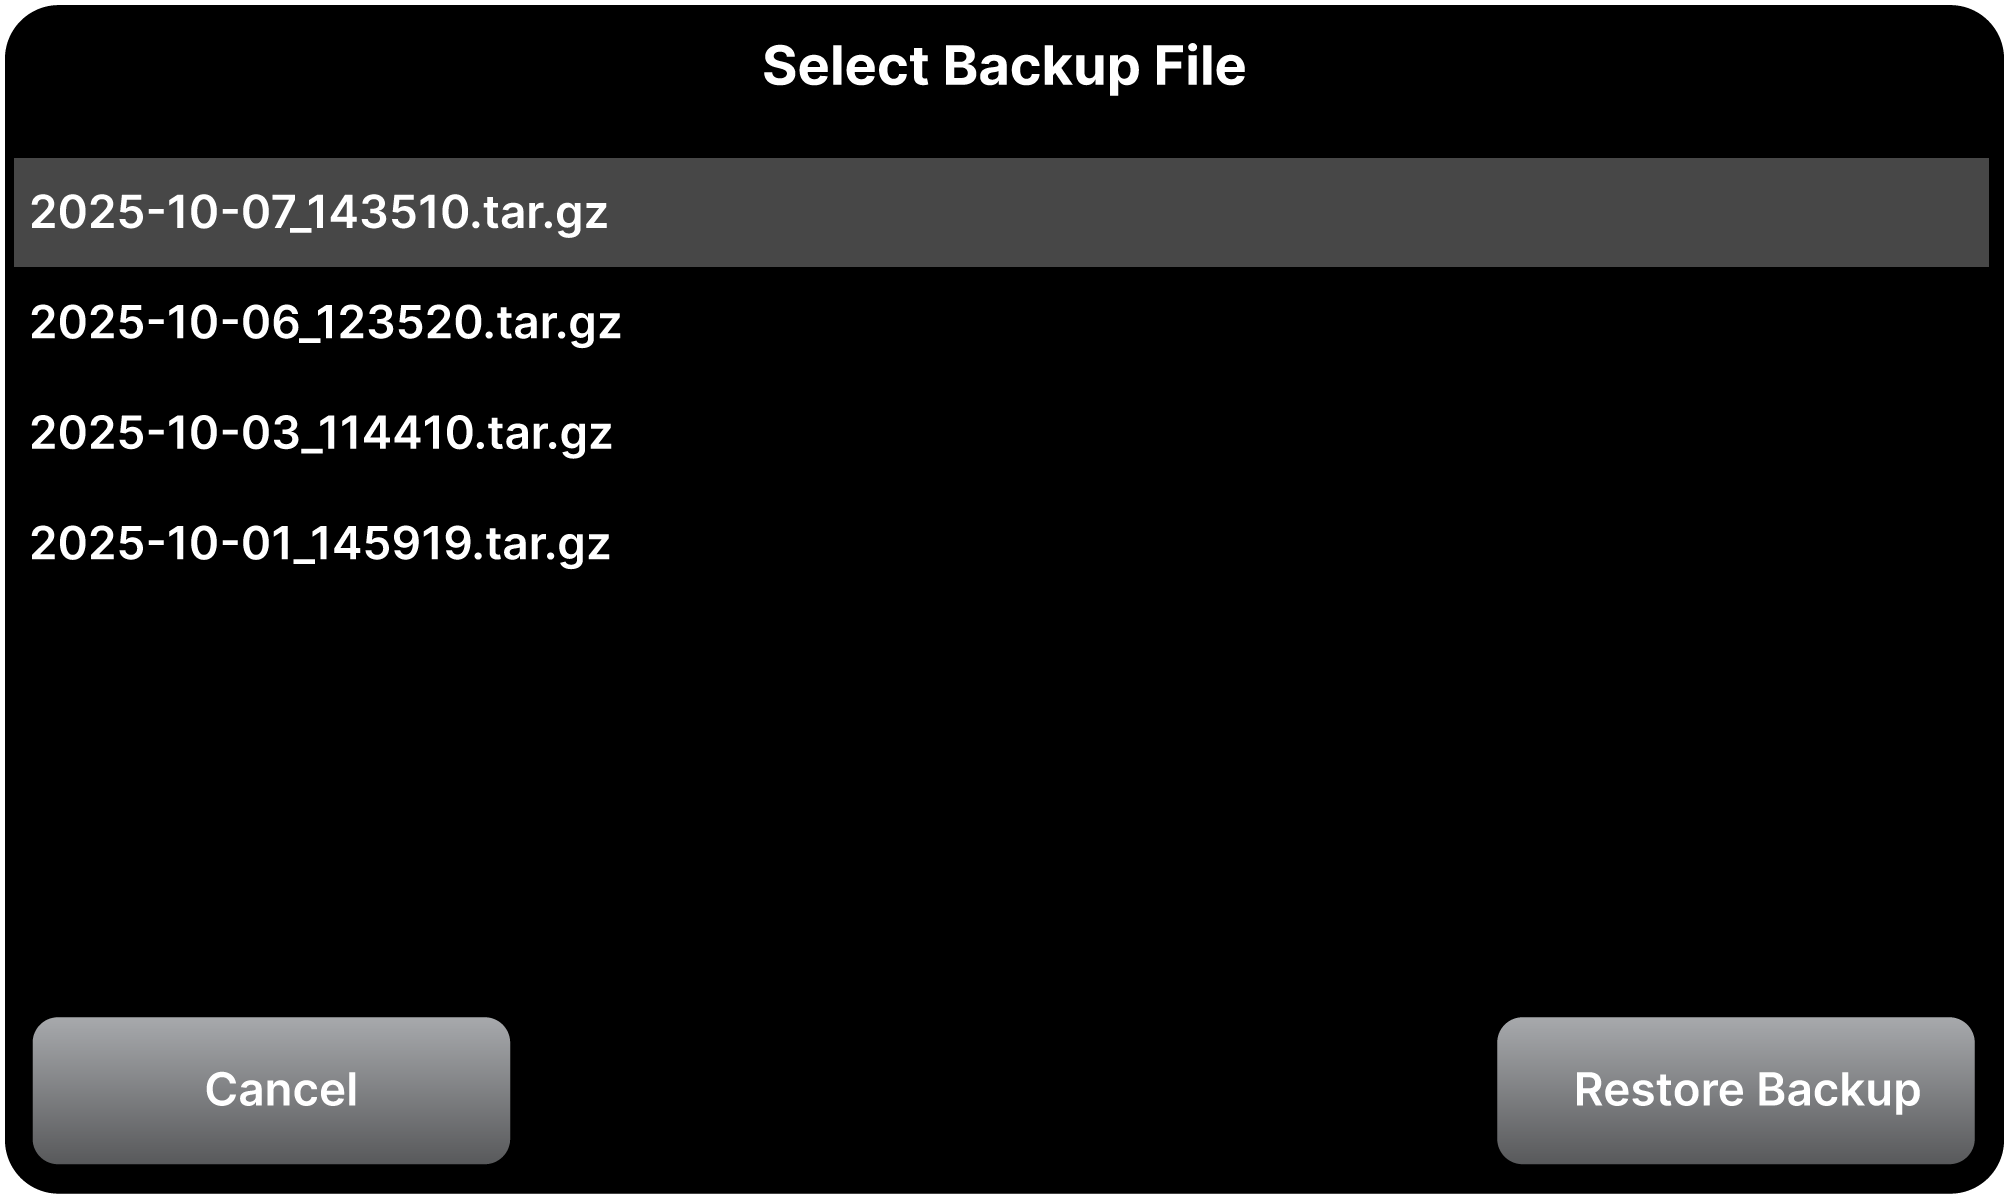
Restoring a Backup
Once you’ve created one or more Stadium device backups on a microSD card, you can use the Restore Backup feature to restore all user files and settings from a saved backup.
Important! Restoring a backup will permanently overwrite your Helix Stadium device’s current User Presets, Setlists, IRs, Playlists, Templates, Favorites, User Presets, User Account data, and Global Settings, replacing them with those in the selected Backup file. Consider creating a backup first, before proceeding with the following Restore Backup process to ensure you have copies of all your current Stadium files and settings, should you want to retain them.
Note: Factory Presets are not stored in a Stadium Backup. Therefore, Factory Presets remain within Stadium’s Factory Presets folder, unaffected by a Restore From Backup. Factory Presets are only updated or overwritten by performing a Factory Reset or by updating the device’s firmware.
-
Tap

-
Within the Select Backup File dialog that appears, you’ll see the list of backup files that you’ve created on the microSD card, named with the date created and sorted with the most recent backup at the top of the list. Tap the desired backup file to select it, then tap the dialog’s Restore Backup button.
-
When prompted, tap
-
A progress dialog informs you of the restore process status—do not adjust any controls or power off your Stadium device during this process!
-
When the “Restoring from microSD card” was successful pop-up appears, tap
-
Tap the

-
Tap
-
You can now power your Helix Stadium device back on normally. Once powered on, you should see that all items from your backup are now restored.
Formatting a microSD Card
Important! Formatting will permanently erase all data on the microSD card.
The microSD card included with your Stadium device is already formatted and ready to use. The card is already inserted into your Stadium device’s rear panel microSD slot, with a secure, screwed-on cover to retain it.
Optionally, unscrew the cover and push the card gently inward in the slot to remove it. You can purchase additional microSD cards from most electronics retailers. Helix Stadium can utilize a microSD card with a minimum capacity of 32 GB, HC type, and U1 speed class (or higher). Note that a microSD card must first be formatted using the following steps to enable its use with Helix Stadium.
-
With the included microSD card inserted, tap the Maintenance screen’s


-
Wait for the status dialog to complete—do not adjust any controls or power off your Stadium device during the format process. Tap
-
While in the Maintenance screen, you can now proceed to create a backup if desired. Once you want to exit the Maintenance screen, perform the following steps:
-
Tap the
-
Tap
-
-
You can now power your Helix Stadium device back on normally and resume using it.
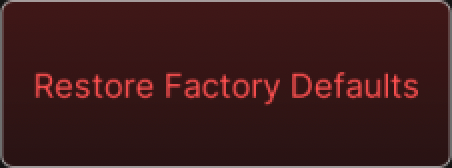
Performing a Factory Reset
This action will perform a complete Factory Reset of Helix Stadium.
Important! A reset will permanently delete all your created User Presets, Setlists, IRs, Playlists, Templates, Favorites, and User Account data from the device’s internal memory, and reset all Global Settings and User Default customized parameters to their factory defaults. It is recommended that you first follow the preceding steps for Creating a Backup to retain your current data and settings.
-
Tap the Restore Factory Defaults button
-
When prompted to reset to factory default settings, tap
-
Wait for the quick reset process to complete—do not adjust any controls or power off your Stadium device during the process. Tap
-
You can optionally proceed with the preceding Restoring From Backup steps if you wish to restore all data and settings from one of your backups. Or, to exit the Maintenance screen:
-
Tap
-
You can now power your Helix Stadium device back on normally and resume using it.
-