Important! The Helix Stadium application is supported on Helix Stadium family devices with firmware version 1.1.0 (or later). The Helix Stadium app supports firmware updates via USB-C connection to Stadium devices running firmware version 1.0.0 (or later). However, most other application functionality is only supported with the devices running the version 1.1.0 device firmware (or later). We highly recommend updating to the latest available firmware version and using the latest Helix Stadium application version.
Use the Helix Stadium application on your macOS or Windows® computer to connect via Wi-Fi and create, edit, backup, and restore your complete library of Stadium presets, and import and export IRs, Preset Templates, and Favorites. This page provides an overview of installation, setup, the app’s “Views,” and using the Helix Stadium application to create and edit presets.
The Helix Stadium app can also be used to perform device firmware updates via a USB connection on macOS and Windows computers. Please refer to the Stadium Firmware Updates page for details.
Get The Helix Stadium Application
Download the free Helix Stadium app installer for macOS or Windows from line6.com/software, launch the app installer, and follow its on-screen instructions to complete the installation.
Attention Windows Users: If you plan to use Helix Stadium as a low-latency, 8-in/out USB audio interface with Windows DAW host applications, you’ll need to download and install the Helix Stadium ASIO Driver separately—see the USB Audio section.
Connect to your Stadium Device
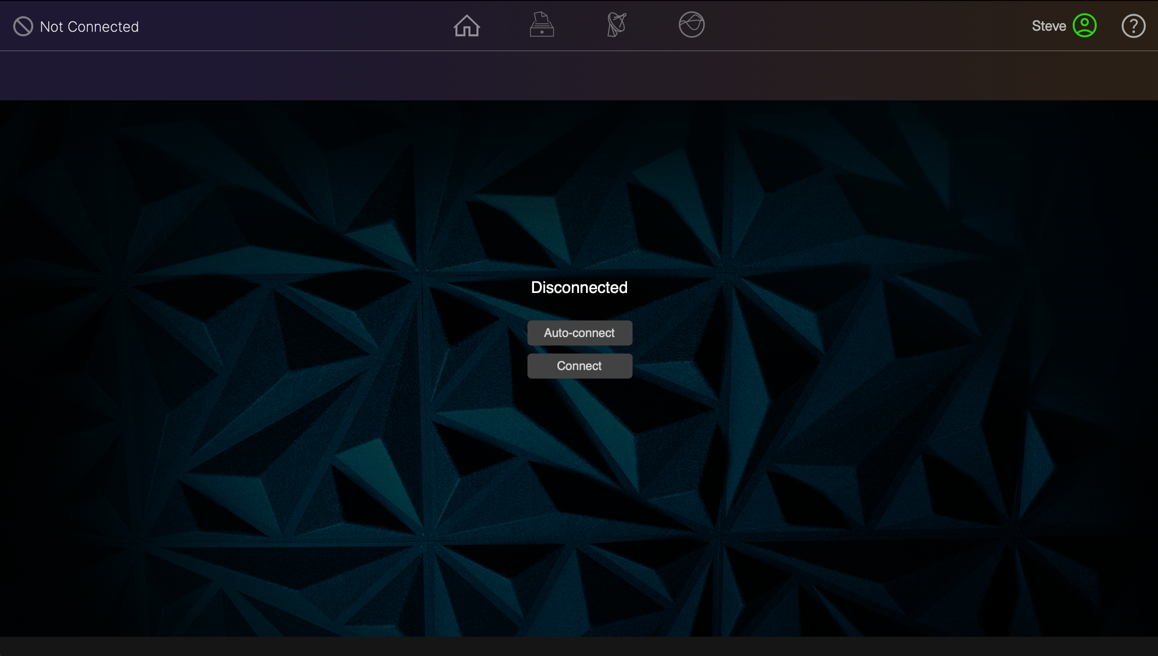
To use the Helix Stadium application, you’ll need to connect to your Stadium device to wirelessly “sync” its content for real-time preset loading, editing, and import/export of asset files. The connection between the app and device is established when both are connected to your local Wi-Fi network. When Helix Stadium is not connected, the Helix Stadium app displays the Disconnected splash screen.
The Device Connection button on the app toolbar also displays the current status, as either not connected ![]()
![]()
Application and Firmware Update Notification
Upon launch of the Helix Stadium application and your Line 6 account log in (via the app’s ![]()
If prompted to update both the application and firmware, please update the Helix Stadium application first.
Updating the Helix Stadium Application
If prompted, click ![]()
![]()

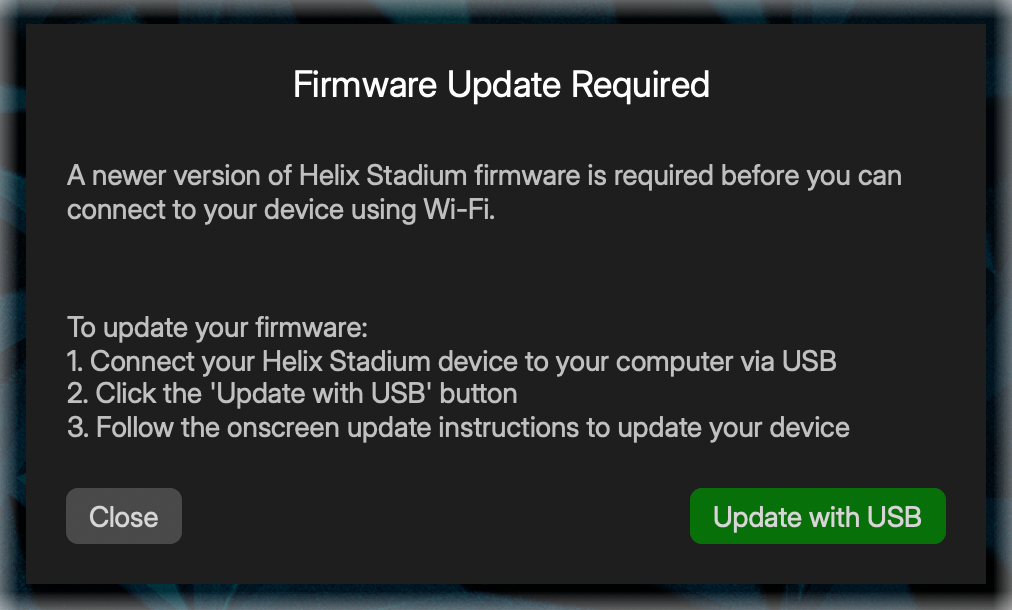
Updating the Helix Device Firmware
To perform firmware updates using the Helix Stadium app, you must establish a USB connection between your computer and the Stadium device. If a Firmware Update notification appears after the Helix Stadium application connects via USB, it is recommended to proceed with the update. Please refer to the following Device Firmware Update page for USB connection details.
Managing the App-To-Device Connection
-
By default, your Helix Stadium Global Settings > Preferences > Remote Access is set to “Allow,” allowing connections from the Helix Stadium application via any computer. Optionally, you can set Remote Access to “Require PIN” for added security using the following steps.
-
Go to the device’s Global Settings > Preferences and set Remote Access to Require PIN.
-
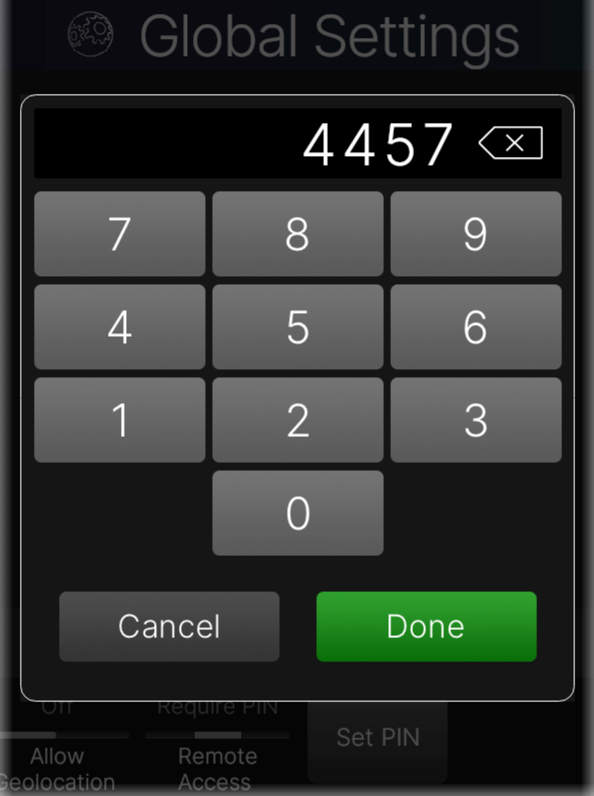
Also in the Preferences, tap on the Set PIN button above Knob 5, type in your desired 4-digit PIN code, and tap

-
-
Enable your computer’s Internet connection, and ensure your Stadium device is connected to the same network via Wi-Fi (or Ethernet)—see the Wi-Fi & Ethernet Connections page for details.
-
Launch the Helix Stadium app, click the

-
Click the

-
If desired, keep the Auto-connect at Launch switch on (in the right position)

-
-
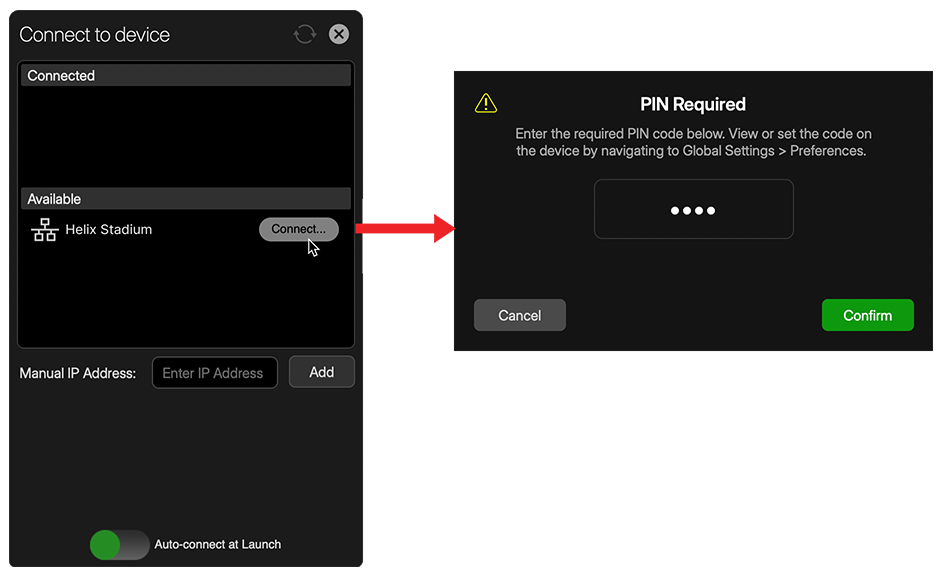
Click the Connect button


-
If you configured your Stadium’s Remote Access for “Require PIN” in Step 1, enter your 4-digit PIN when prompted and tap

-
*Note: Alternatively, on app launch, you can click the ![]()
If you encounter problems connecting the Helix Stadium app to your device with these steps, please use the Manual IP Address option below.
-
Once connected, the app’s toolbar button indicates the connection

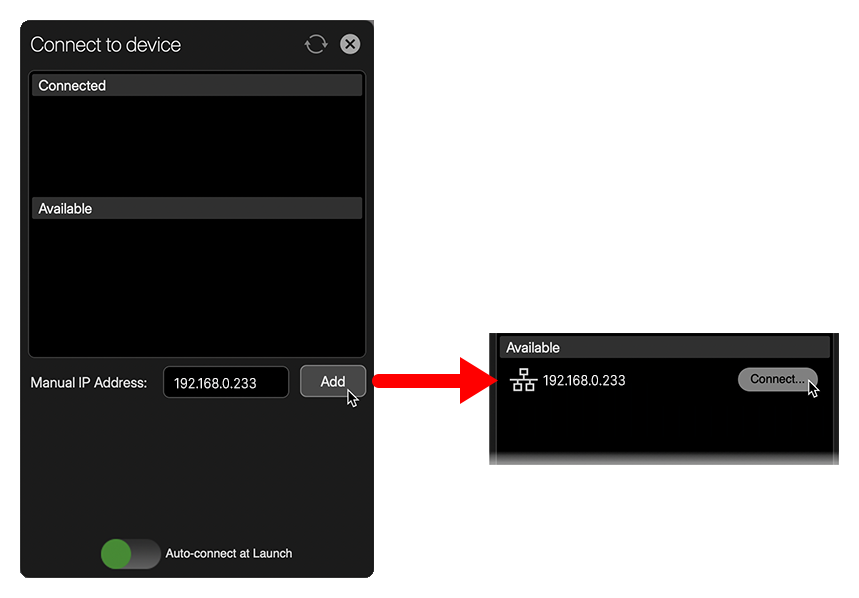
Connecting Using Helix Stadium’s Manual IP Address
Some Wi-Fi router configurations may prevent the app from connecting to your Stadium device when using the preceding steps. If you encounter this issue, please use the following steps to manually enter your device’s IP address for connection.
Click to expand... Steps for Manual IP Address configuration.
-
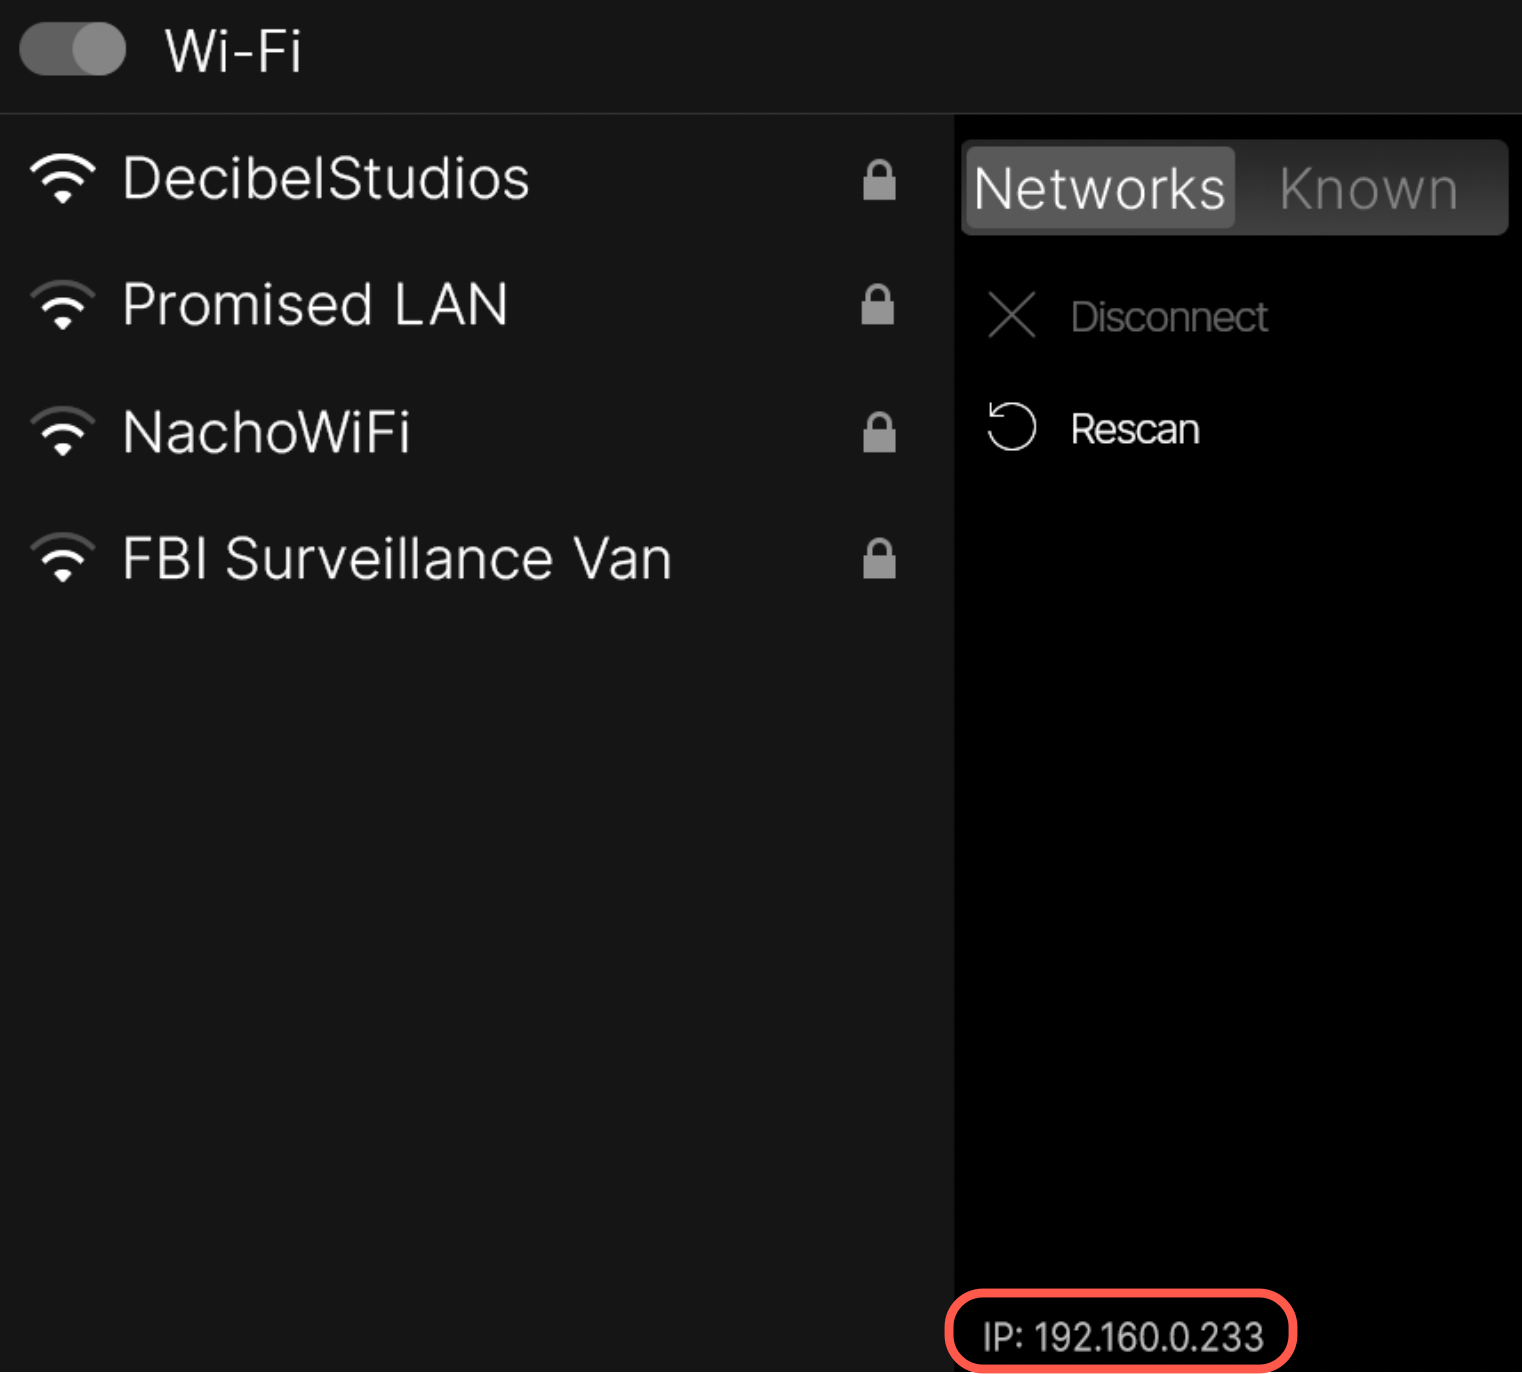
On your Stadium device, go to the Main Menu > Wi-Fi Settings dialog, and note the IP address displayed there. This IP number is specific to your Stadium device's network connection.
-
Launch the Helix Stadium app and click the
-
Enter your IP address in the Manual IP Address field and click
-
The Helix Stadium app should then connect to your Stadium device.
-
Note that the Auto-Connect feature is not supported for future connections using the Manual IP Address method. Repeat step 1 above, and your IP address should be remembered and appear in the Manual IP Address field, making it easy to complete step 2.
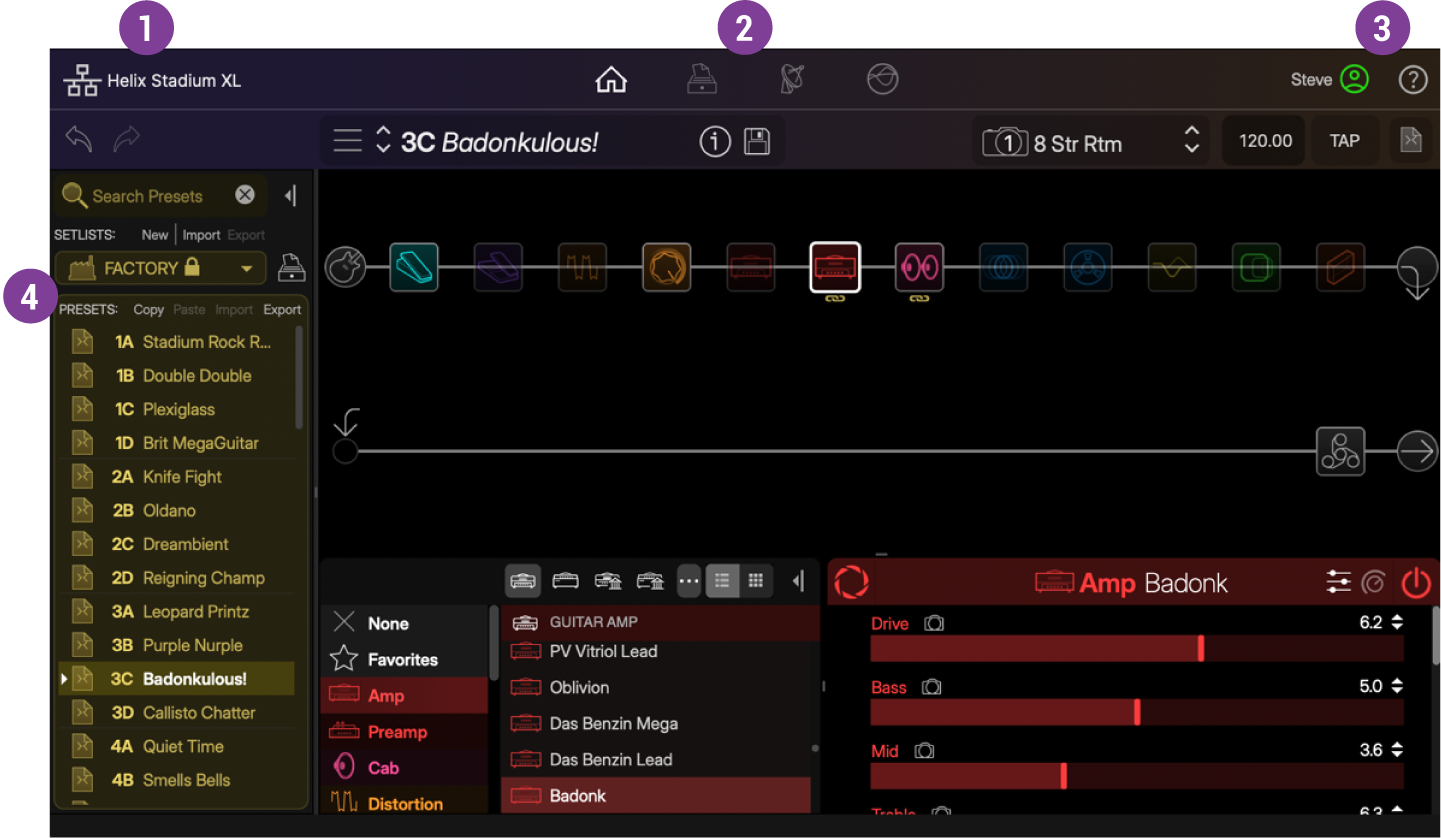
Main Application Window
![]()
![]()
![]()
![]()
![]()
![]()
-
My Account: Click to Log In, Log Out, and Manage your Line 6 account.
-
Help: Click to access the About Helix Stadium & Legal Info for app version, copyright, and accreditation details. You’ll also find a link for Helix Stadium Online Support, which will direct you to Stadium product information and this online Owner’s Manual you are currently reading.
![]()
![]()
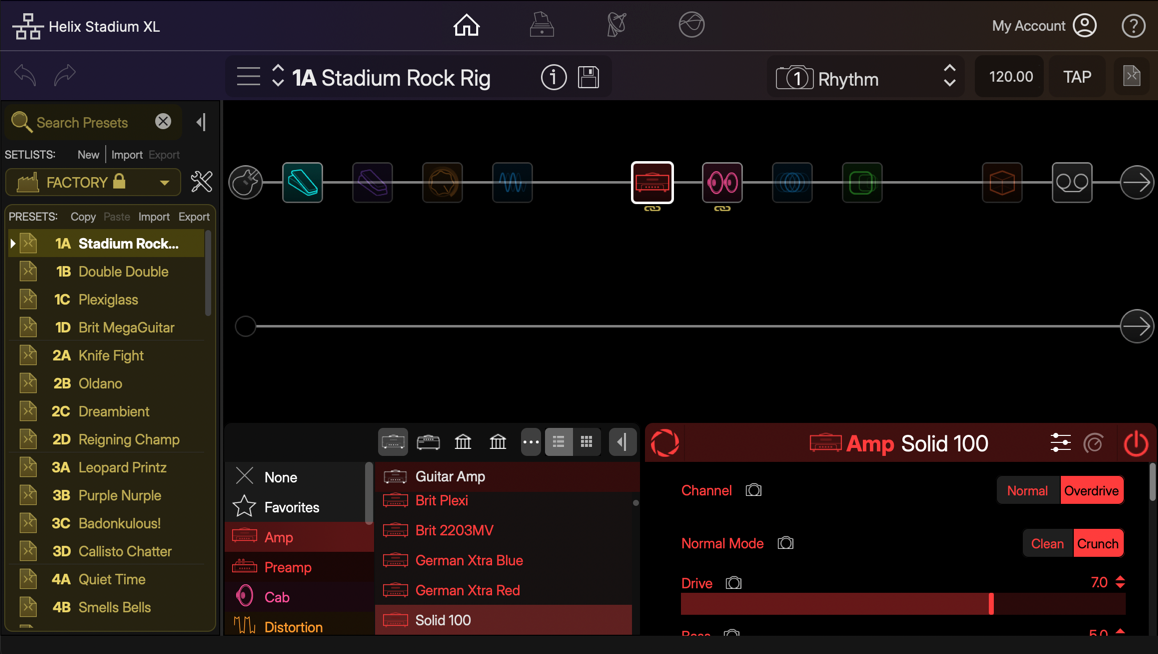
The Home View
This main application window displays the current preset’s signal flow, where you can fully create and edit your presets, much like within the Stadium device's Home - Edit View screen. To the left of the app’s Home View, you can also access the Preset List to select a Setlist and load a preset directly into the Home View, as well as several other preset functions. Click the Manage button ![]()
Creating New Presets
Choose a Preset Template to begin building your own custom tone. Select the Empty Preset template to start from scratch, or choose one of the other provided templates for a specific signal routing or input configuration.
-
From the Home View - Menu button

Tip: You can also create your own custom Preset Templates. Please see Saving Your Presets below.
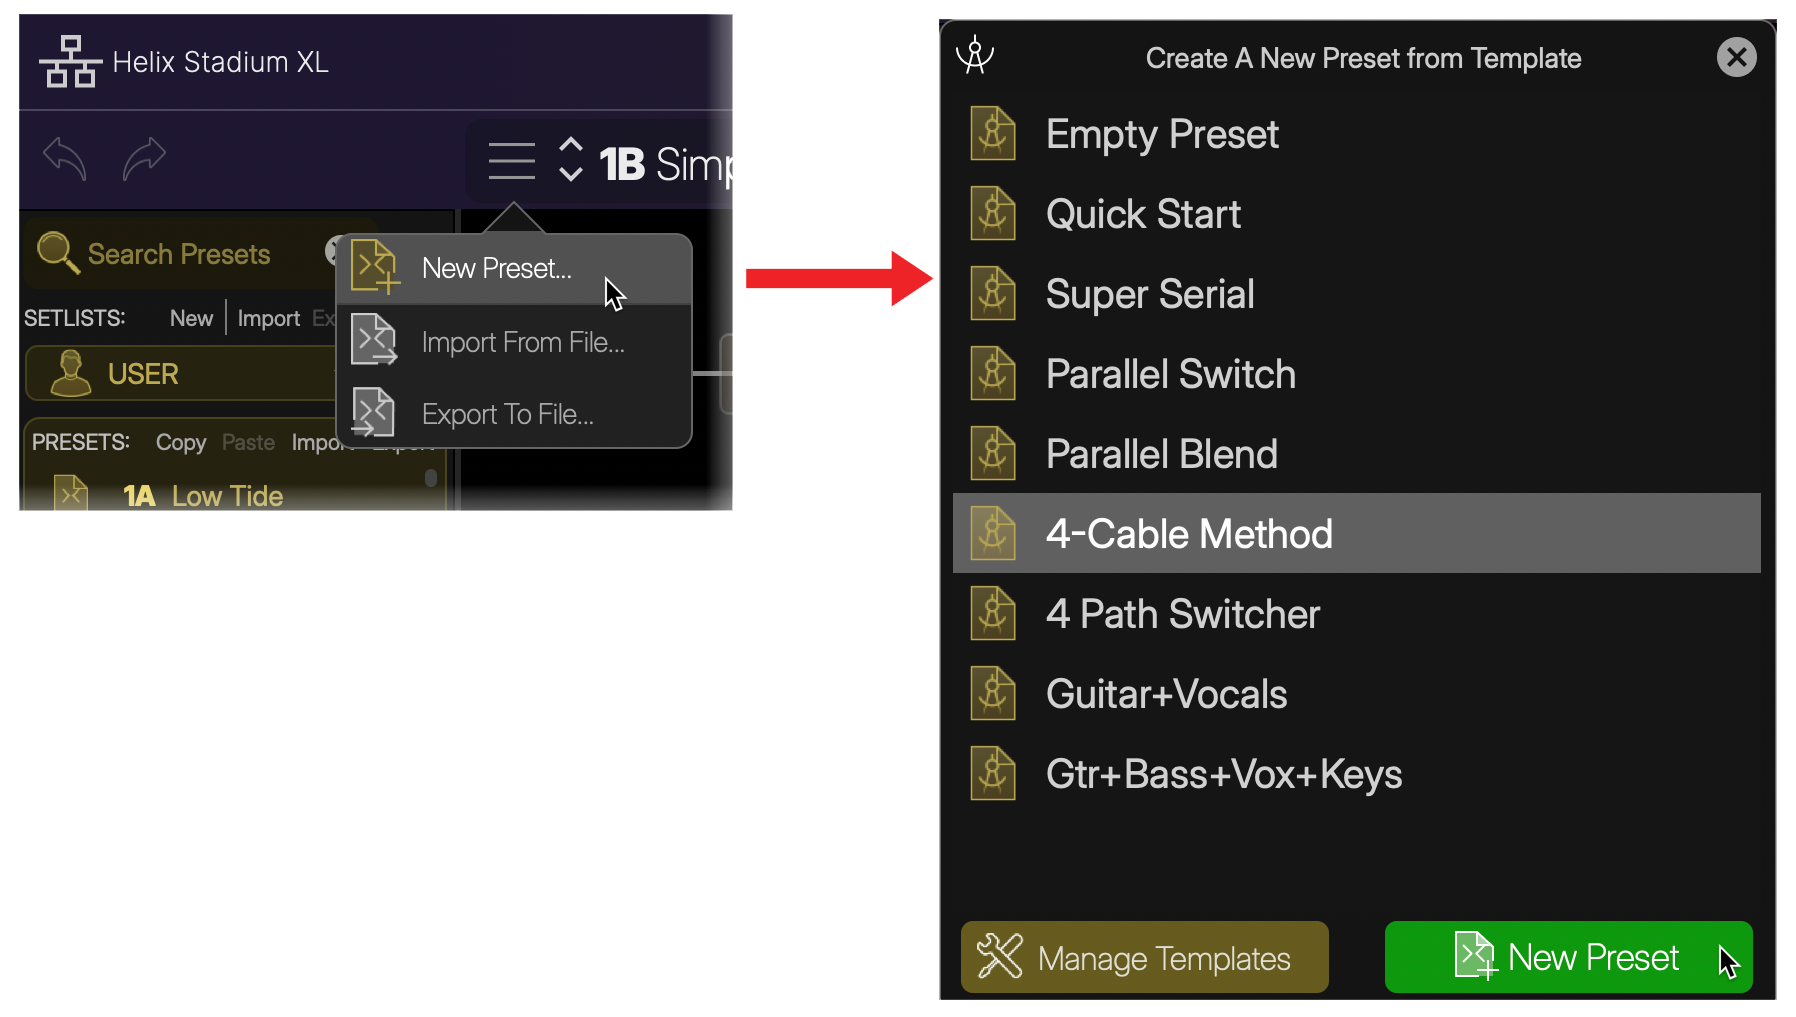
Select New Preset from the menu, choose the desired template, and click ![]()
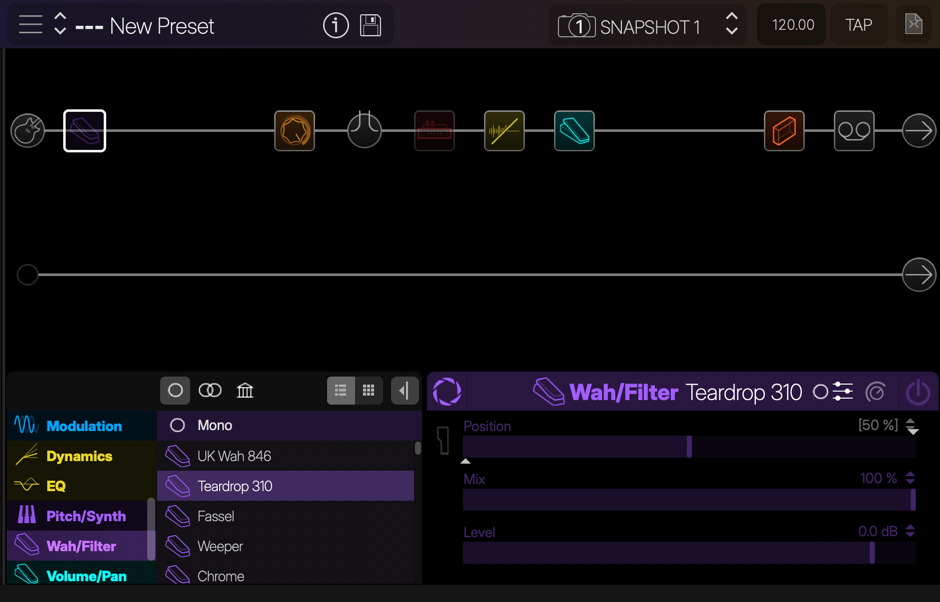
A new, unsaved preset is created within the User Presets folder from the selected template.
-
Add and edit blocks as desired to build your preset, then be sure to save the preset

Tip: Use the Templates Librarian to manage your Preset Templates.
Editing Your Tones
The Helix Stadium app’s Home View screen is functionally very similar to your Stadium device's Home > Edit screen. You can perform the following tasks in the app and hear your edit results in real-time.
Add blocks: Click on an empty location on any path in the app’s Home View and select the desired model from the Model List at the bottom left of the screen.
Edit block settings: Click on any block in the app’s path to access its parameters in the Inspector panel at the bottom right of the screen for editing. Note that you can choose the Sliders or view for the app’s Inspector.
Sliders vs. Knobs? Over the years, our customers have been pretty evenly split on their opinions for slider versus knob controls for parameter editing. Rather than weighing in on that debate, we’ve provided both options so you can choose. Use the Slider/Knob selector ![]()
-
For Cab and EQ blocks, optionally tap the

*Note: The Focus View for other Amp and Effect blocks is not available within the Helix Stadium application at this time.
-
Hover your mouse cursor over any block in the signal flow to access the Block Bypass and Clear Block buttons that appear above it

-
Within the app’s Inspector edit panel, right-click on an individual parameter slider/knob for additional functions, such as Reset, Controller Assignment, and more.
-
Click and drag any block left/right to change its position in a path. Drag a block down from a main path to create a split/parallel path, or drag a block to any other existing path to move it there.
-
Right-click on a block to access its Action Panel to create Bypass, Controller, MIDI, or Snapshot Control assignments, Copy, Paste, Clear, Add to Favorites, and more.
-
Remember to click the Save button

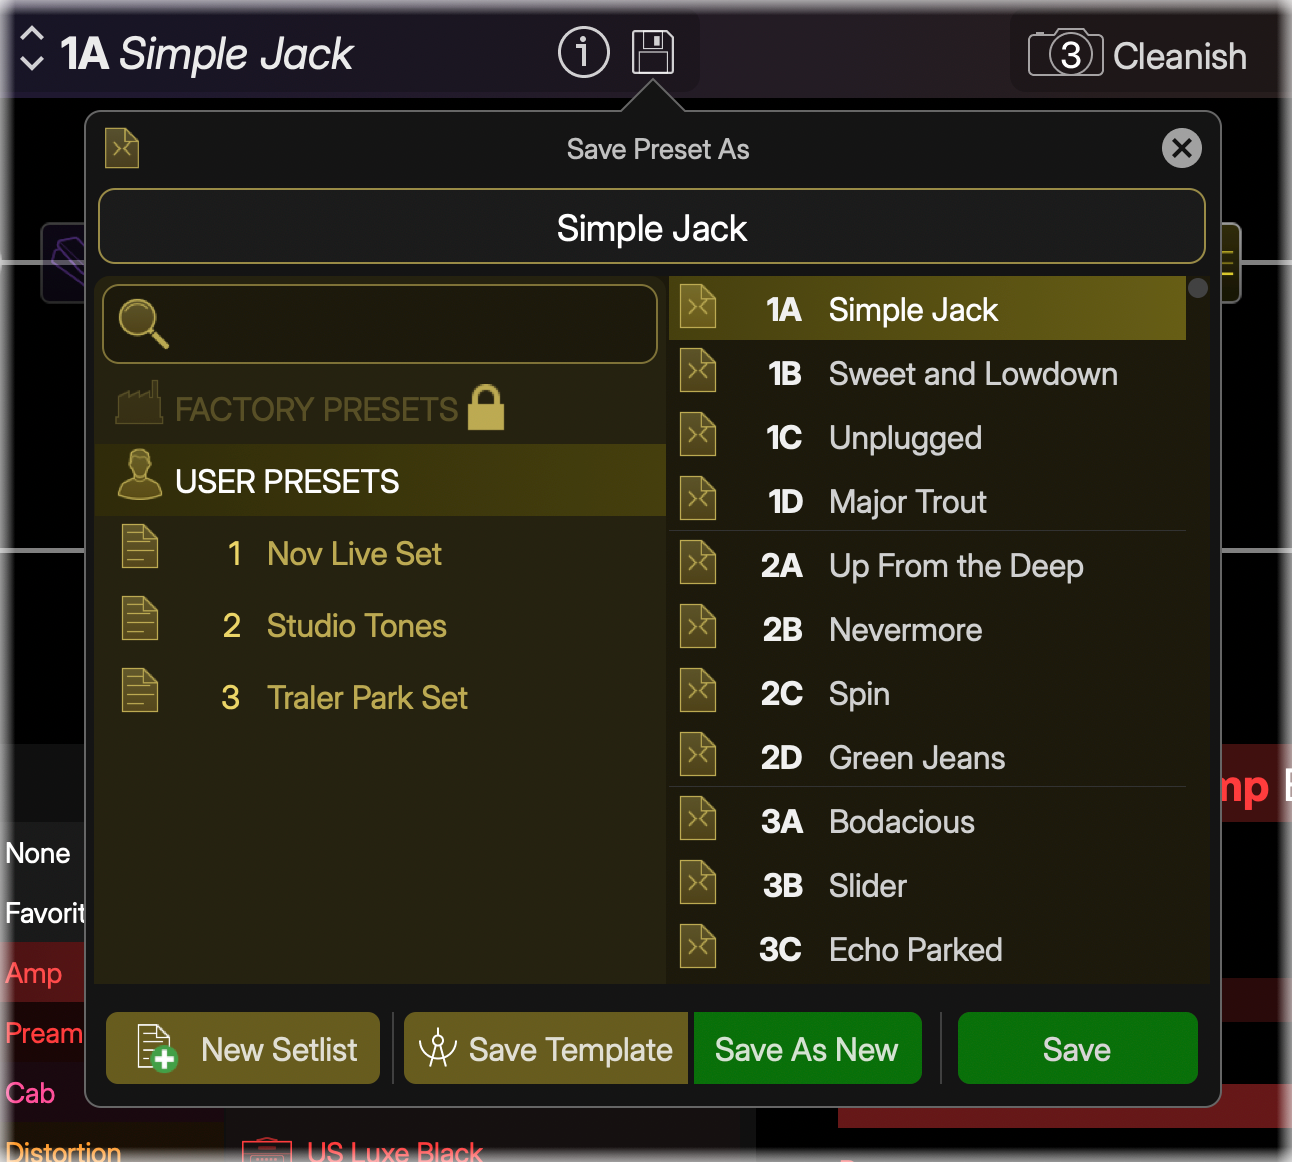
Saving Your Presets
Once you’ve edited your preset to your liking, save the preset to retain it in your Stadium’s Preset Library. Please also see the Saving Presets page for additional preset and setlist details.
-
Click the Save button
-
To save your changes to the currently saved preset, click the Save button

-
To name the preset, type in your desired name in the field at the top of the dialog

-
To save a unique copy of the preset into a different location, select the desired location in the preset list:
-
If the selected location is empty, click the Save As New button

-
If the selected location already includes a preset, click the Overwrite button

-
Note that saving a preset into a Setlist location also automatically saves its original preset file within the User Presets list (since Setlists contain only “aliases” that reference their original User Presets).
-
-
To save the preset as a Preset Template, click the Save Template button

-
To exit the Save Preset dialog without saving, click the Cancel button

Note: Factory Presets are read-only. Therefore, the Factory Presets folder or list is not selectable within the Preset Save dialog. However, you can use the above “Save as New” steps to save a unique, editable copy of any Factory Preset in the User Presets folder.
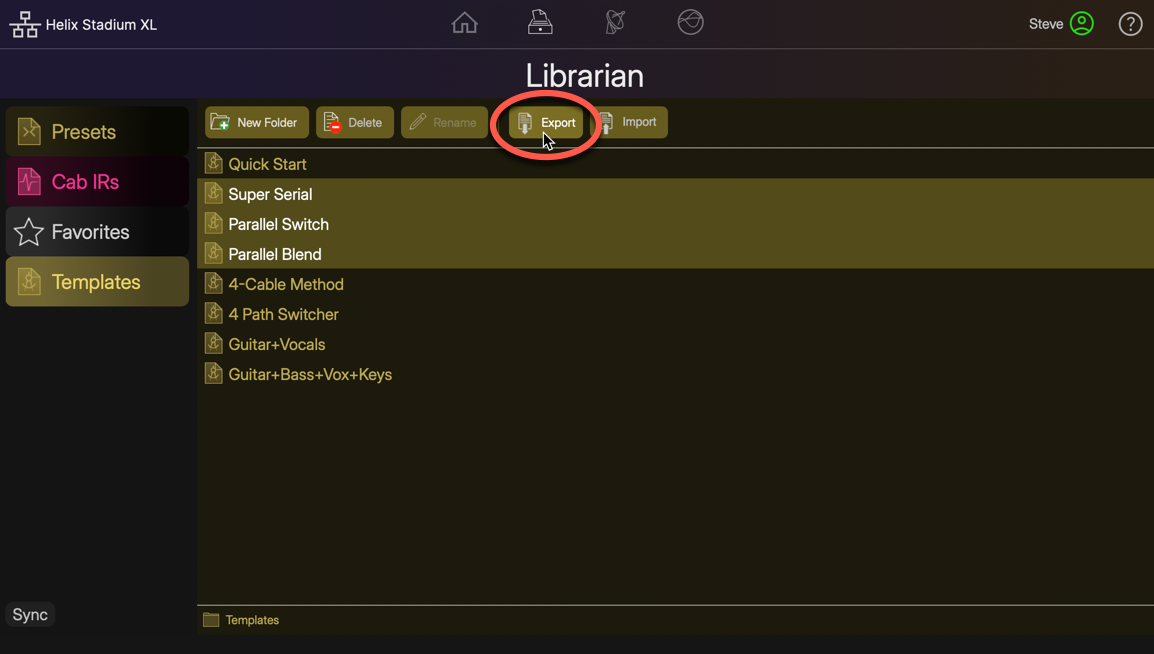
The Librarian View
The Librarian window provides access to all Helix Stadium file assets, which include Presets, Cab IRs, Favorites, and Preset Templates.
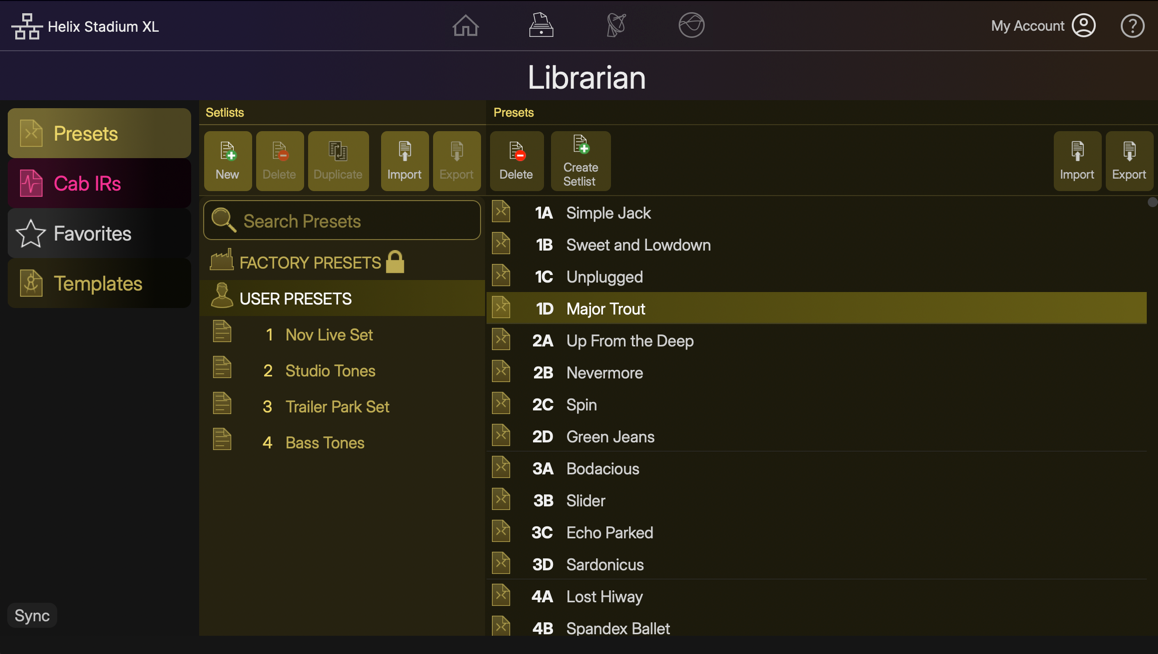
Select a Library in the left column (Presets, Cab IRs, Favorites, or Templates) to display its contents list. Much like working in the Librarian lists on your Stadium device’s screen, you can fully manage all your files in the app. Additionally, the Librarian’s Import and Export options allow you to copy and move files between your computer and Stadium device. See the following sections for details.
Tip: Type into the Search field ![]()
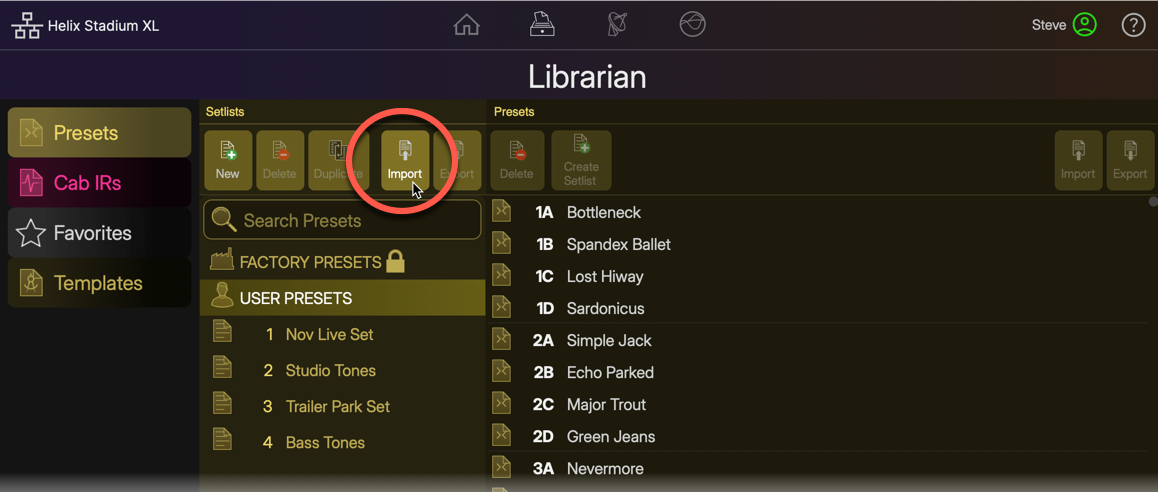
Importing & Exporting Presets and Setlists
Helix Stadium presets and setlists can be exported using the Helix Stadium app to build a virtually unlimited library of Stadium preset (.hsp) and setlist (.hss) files. These presets and setlists can be imported into your Stadium device’s internal memory at any time using either the app’s Home View > Preset Panel or the Preset Librarian. Please also refer to the Presets and Setlists page.
Tip: You can import original Helix/HX/Native Plug-in preset files (.hlx) and setlist files (.hls) to add them to your Stadium preset library following the steps below. Please also see the Importing Presets section for details on preset compatibility.
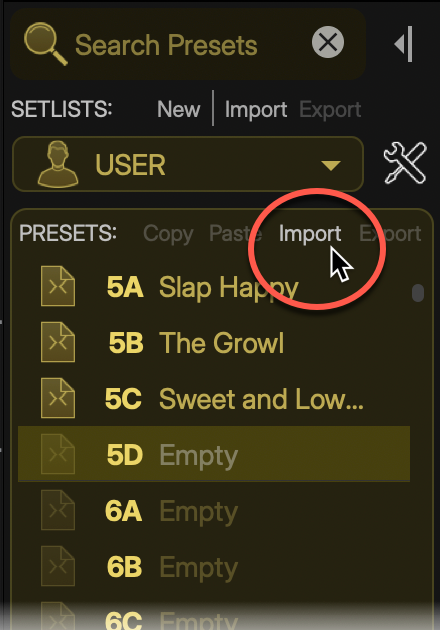
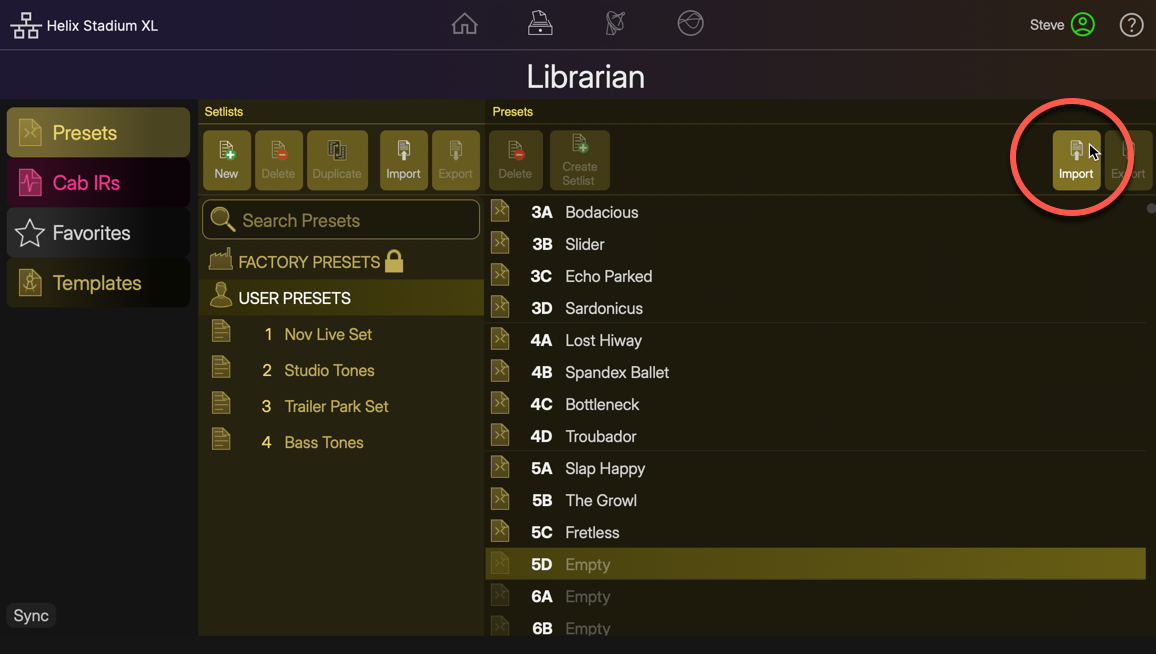
Importing & Exporting Presets
To Import a Preset: From either the app’s Home View Preset Panel or the Preset Librarian, select an empty preset location and use one of the several Preset Import options, as shown below.

-
Browse to your computer folder where preset files are stored, select one (or multiple presets), and import. Note that if you select a preset location that already contains a preset, the imported preset will permanently overwrite it.
-
Alternatively, access the Import Preset command from the application’s main File menu, or drag preset files directly from your computer and drop them into the desired preset list location within either the Helix Stadium app’s Home View Preset Panel or Preset Librarian.
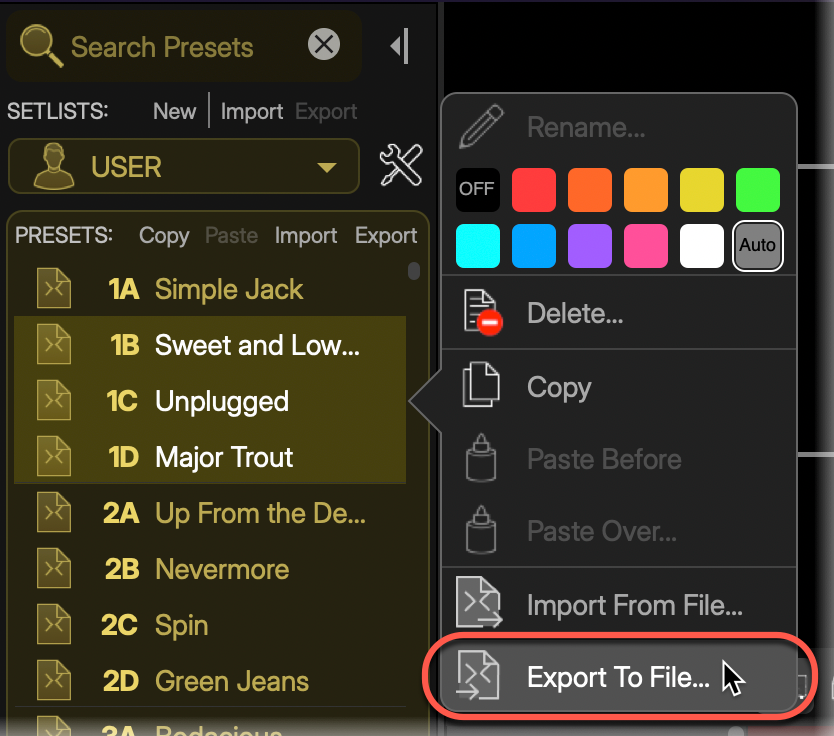
To Export a Preset: Select any Factory, User, or Setlist preset(s) within either the app’s Home View Preset Panel or the Preset Librarian View list and use one of the several Export Preset options.

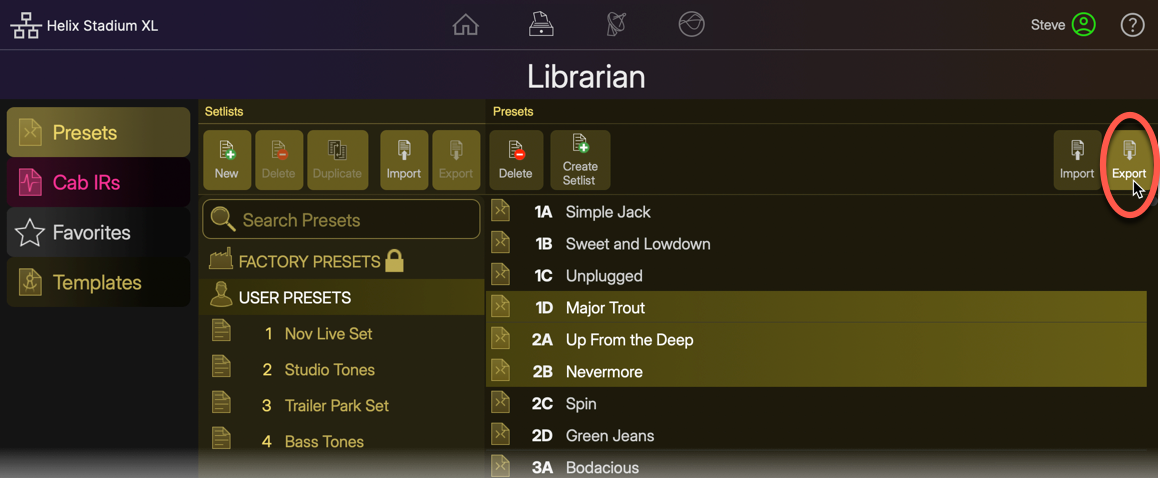
-
Browse to the desired computer folder where you’d like to store your Stadium preset files and export them.
-
Alternatively, access the Export Preset command from the application’s main File menu, or drag preset files directly from any preset list location within either the Helix Stadium app’s Home View Preset Panel and drop them into a computer folder to export them.
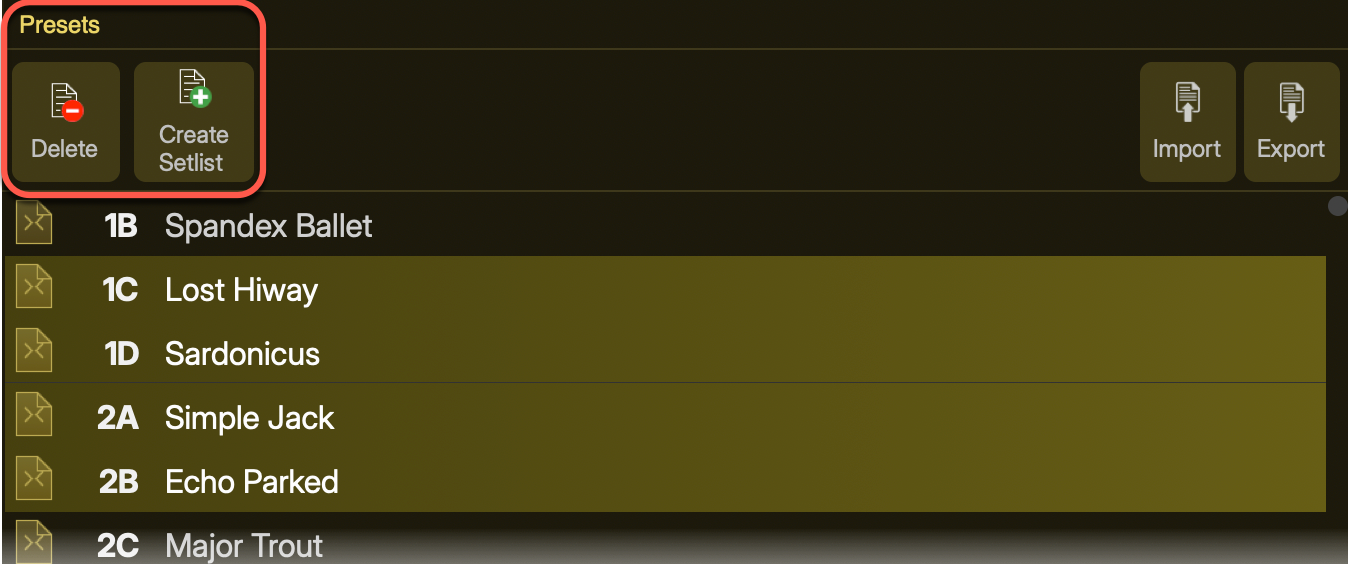
Managing Presets
Use the buttons at the top of the Librarian’s Presets panel to Delete presets from the current User Presets folder or Setlist, or to Create a Setlist that includes alias copies of the currently selected presets. (Presets within the Factory Presets folder are read-only—they cannot be deleted, but can be exported to your computer or dragged into other preset folders/setlists to make editable copies of them.)
Tip: Click and drag any preset(s) up/down within the Preset panel to reorder the Library list.
Importing & Exporting Setlists
To Import a Setlist: Use one of the Setlist Import options from either the app’s Home View Preset Panel or the Preset Librarian.
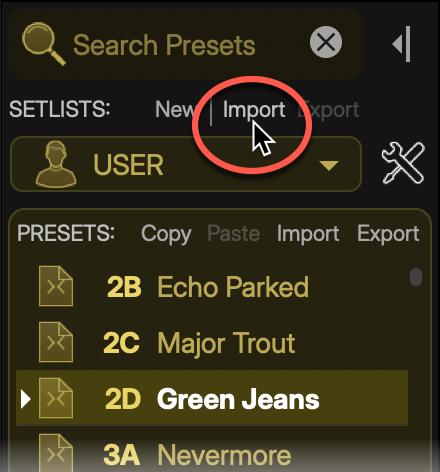
-
Browse to the computer folder where Stadium setlist files are stored, select one or more setlist(s), and import them. The imported setlist will be added as the last Setlist.
-
Alternatively, you can access the Import Setlist command from the application’s main File menu.
Note: Since setlists contain only “alias” type presets, an original reference preset file for each imported setlist preset is added into the User Presets folder.
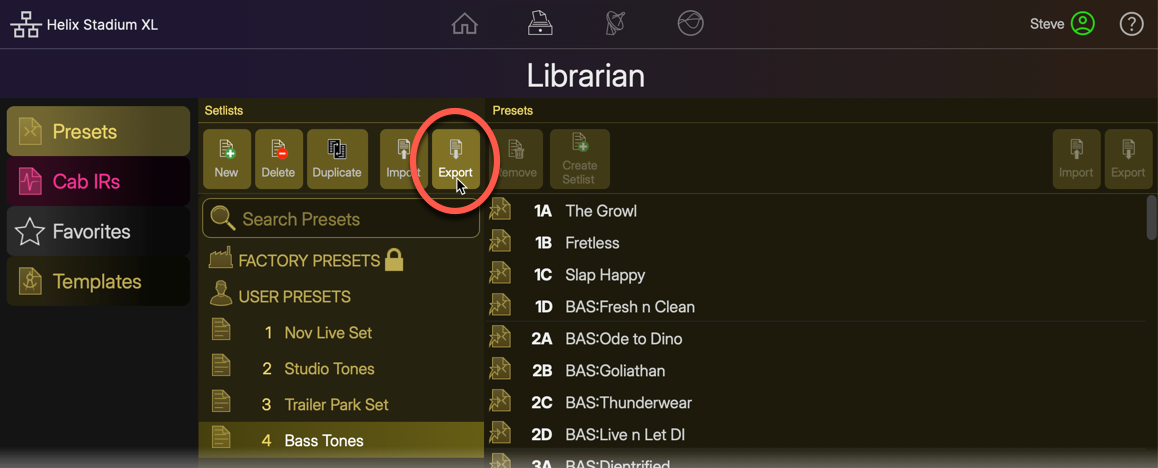
To Export a Setlist: Use one of the several Export Setlist options from either the app’s Home View Preset Panel or the Preset Librarian.
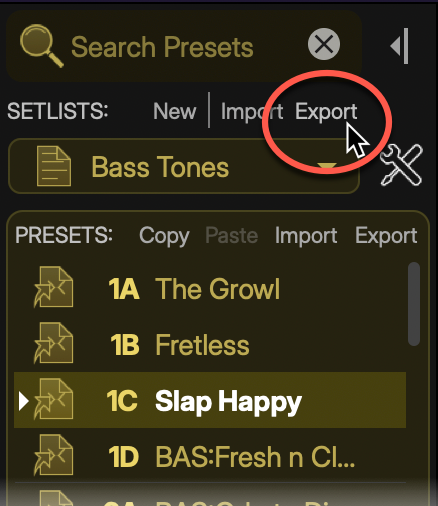

-
Alternatively, access the Export Setlist command from the application’s main File menu.
-
Browse to the desired computer folder where you’d like to store your Stadium setlist files and export them.
Managing Setlists
Use the buttons at the top of the Preset Librarian’s Setlist panel to create a New setlist or Delete or Duplicate the currently selected setlist(s).

Tip: Click and drag any setlist(s) up/down within the Setlist panel to reorder the list.
Importing & Exporting IR Files
Helix Stadium devices can utilize third-party Impulse Response .wav files within one or both tab locations within a Cab block, providing endless possibilities for speaker emulation. Please refer to the Cab IR section for details on using IRs. Many vendors now offer expertly captured IRs of practically any speaker and mic combination. Once you’ve purchased and saved IR .wav files to your macOS or Windows® computer, launch the Helix Stadium application and import your desired IRs into your Stadium device’s IR library.
Note: If you import several hundred IR files, the next time you power on your Helix Stadium device, it may take a few extra minutes to complete a necessary indexing process for the IR Library. Future startups of your device will not require this additional indexing time.
Importing IR Files
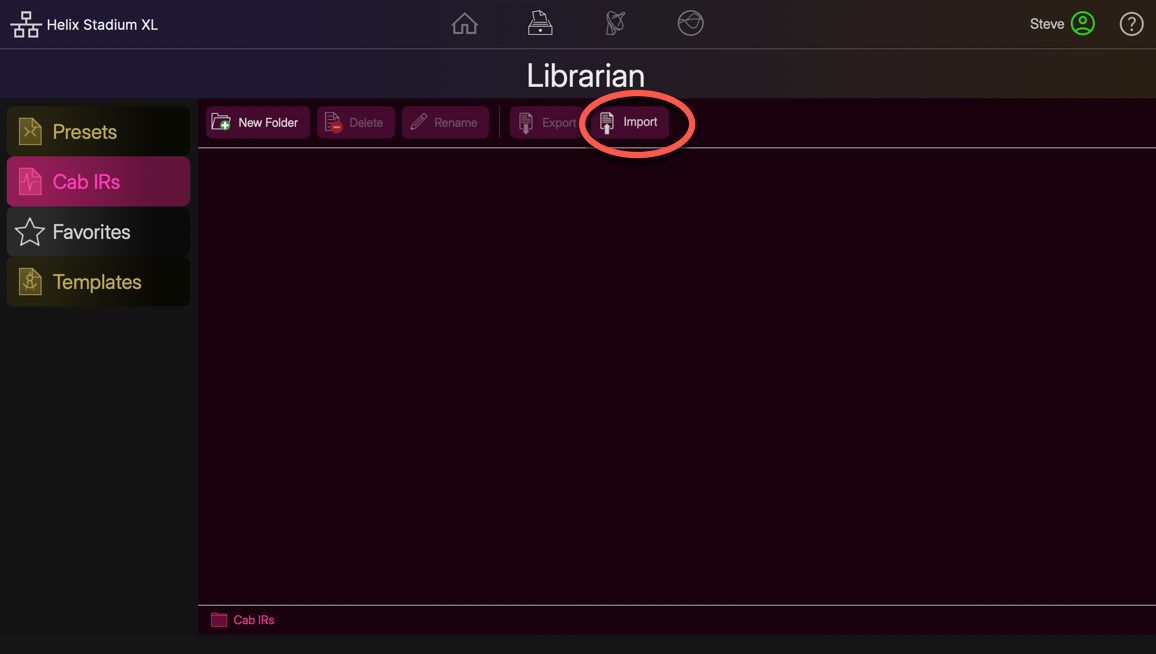
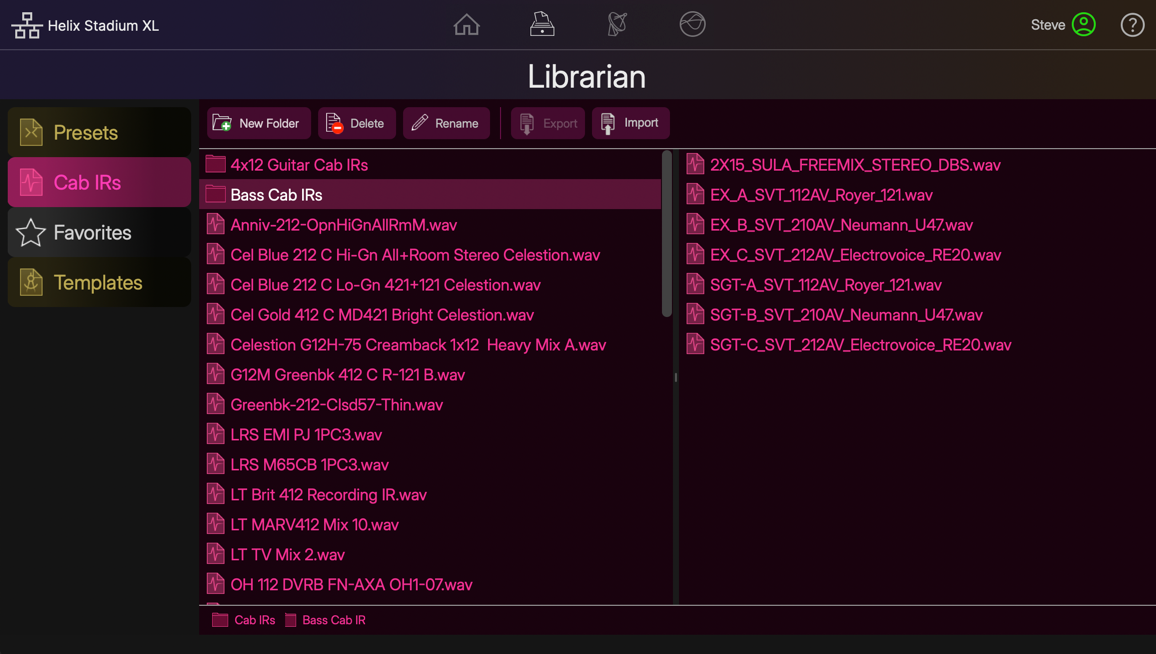
Within the Librarian View, click the Cab IRs button 
Note: Import of mono or stereo IR .wav files of any sample rate and bit depth is supported. IRs are automatically converted and processed within Helix Stadium as 48kHz, 32-bit float, mono.
-
Click on the Import button
-
Alternatively, you can drag IR .wav files from your computer folder and drop them directly into the Cab IR librarian to import them.
-
-
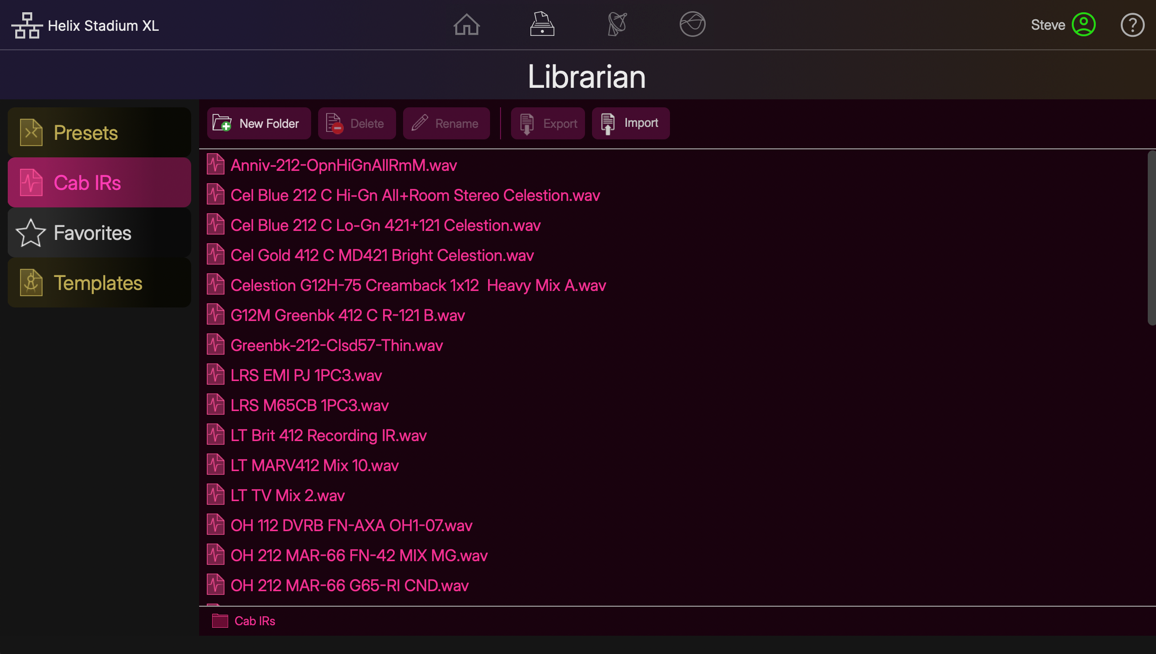
When the import is complete, you’ll see all IRs appear in the librarian’s right pane. These IRs are then available for any preset’s Cab blocks.
-
To Use Your Imported IRs: Add a Cab block within your preset, select either of the tabs within Cab’s Inspector, select the Cab IR category, and your list of imported IRs is available for selection. You can add up to two IRs within a Cab block. Please refer to the Cab IR page for additional details.
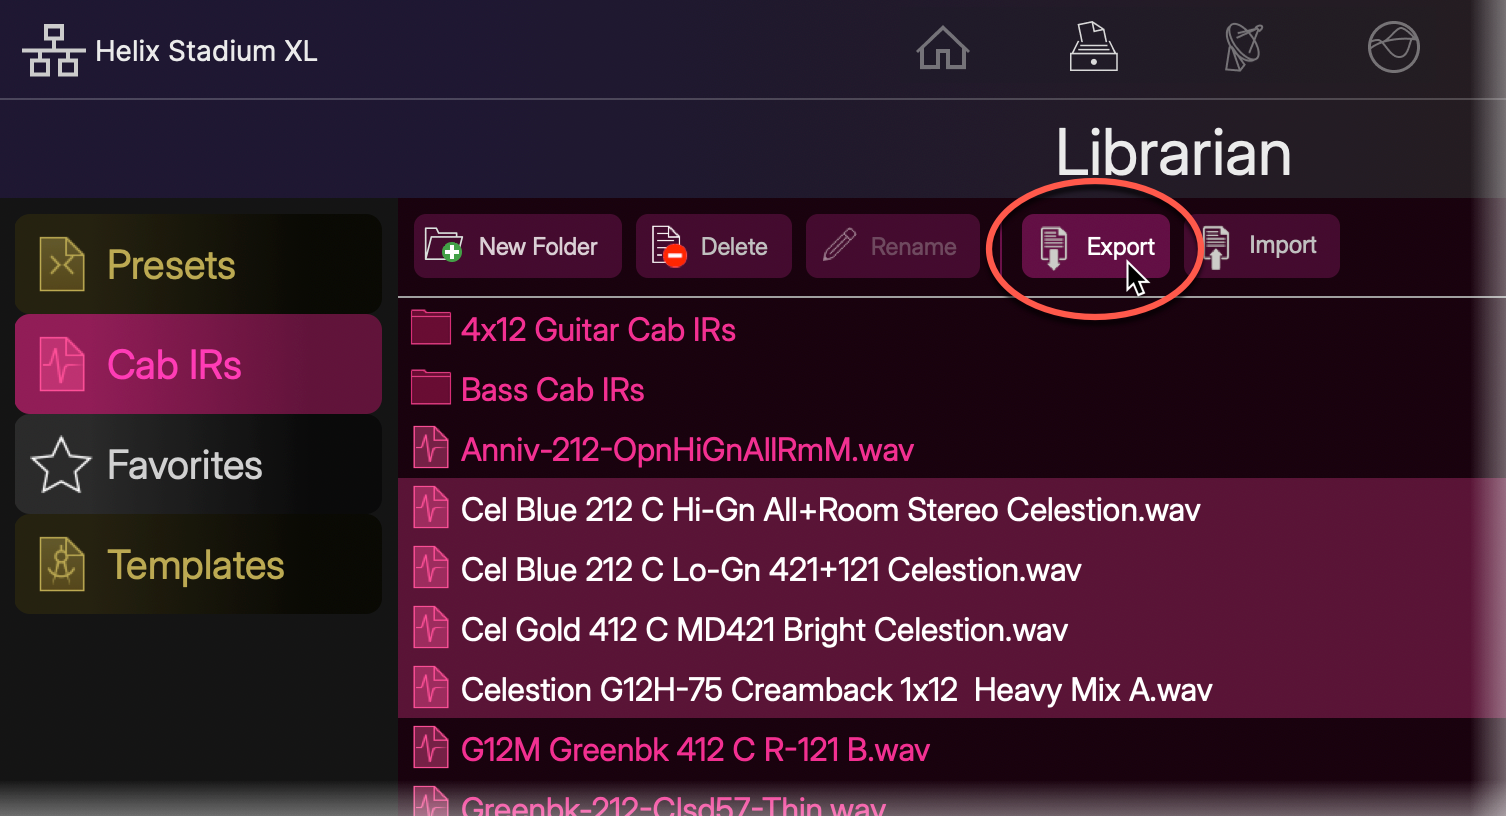
Exporting IR Files
-
To Export IRs: Select the desired IR file(s) within the Cab IRs Librarian right pane, click the Export button, browse to the desired folder on your computer, and save.
Managing IRs
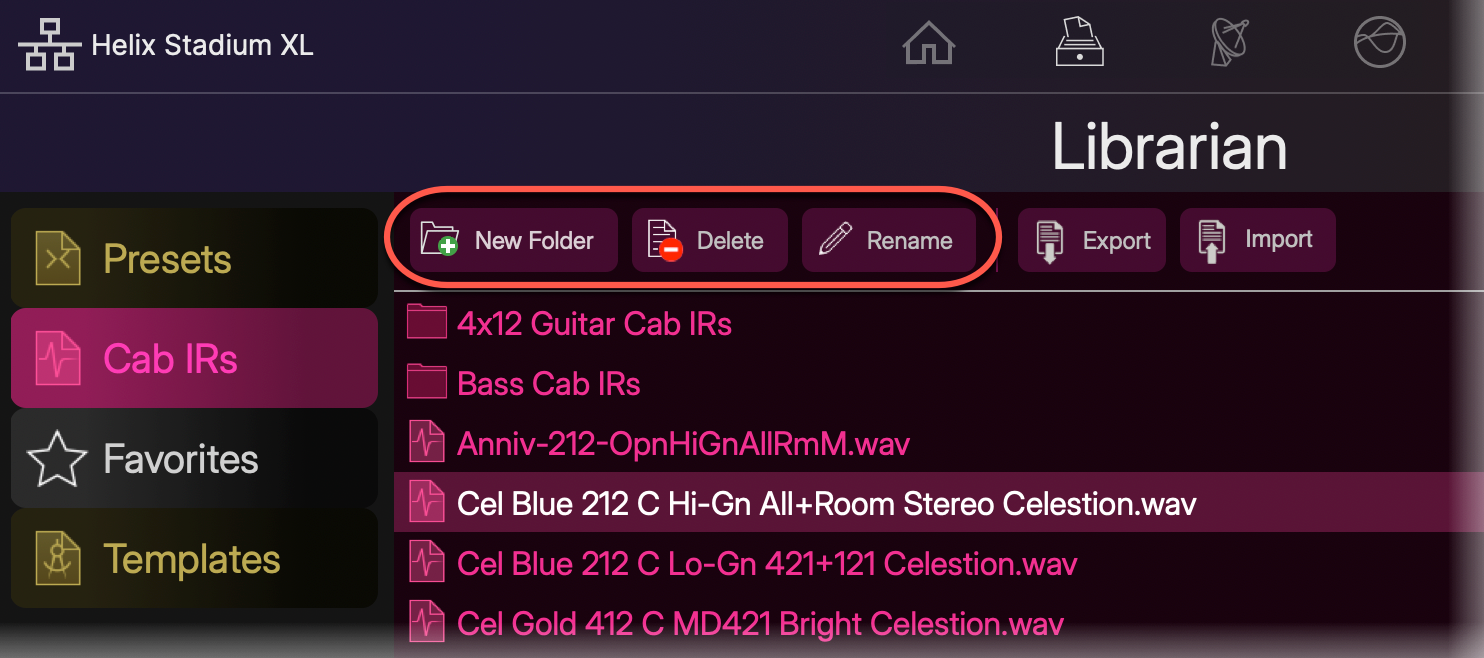
Use the buttons at the top of the Cab IR Librarian to Delete* or Rename the selected IRs, or to create a New Folder for managing your library of IR files. Please also refer to the Cab IR File List section for additional details.
*Note: Deleting an IR file from the IR Library that is used within any saved preset will result in the preset’s Cab block changing to “UNRESOLVED,” with no IR loaded in the respective tab.
-
Note that you can select the desired IRs in the list, then click New Folder to automatically move all selected IRs into the newly created folder in a single step.
-
Folders always appear at the top of the Cab IR list. Drag IRs between the IR list and your folders to move and arrange them as desired.
-
Click on a folder to show its contents on the right.
-
Importing & Exporting Favorites and Preset Templates
The Helix Stadium app’s Librarian View also offers import and export for your Favorites and Preset Templates. This allows you to back up these files on your computer and restore them individually as desired.
Within the Librarian View, click Favorites 

Importing Favorites or Preset Templates
Click on the Librarian’s Import button, browse to the folder on your computer where your Favorite or Template files are stored, and select and import the desired file(s). Alternatively, you can drag Favorite or Template files from your computer folder and drop them directly into the app’s respective Librarian to import them.
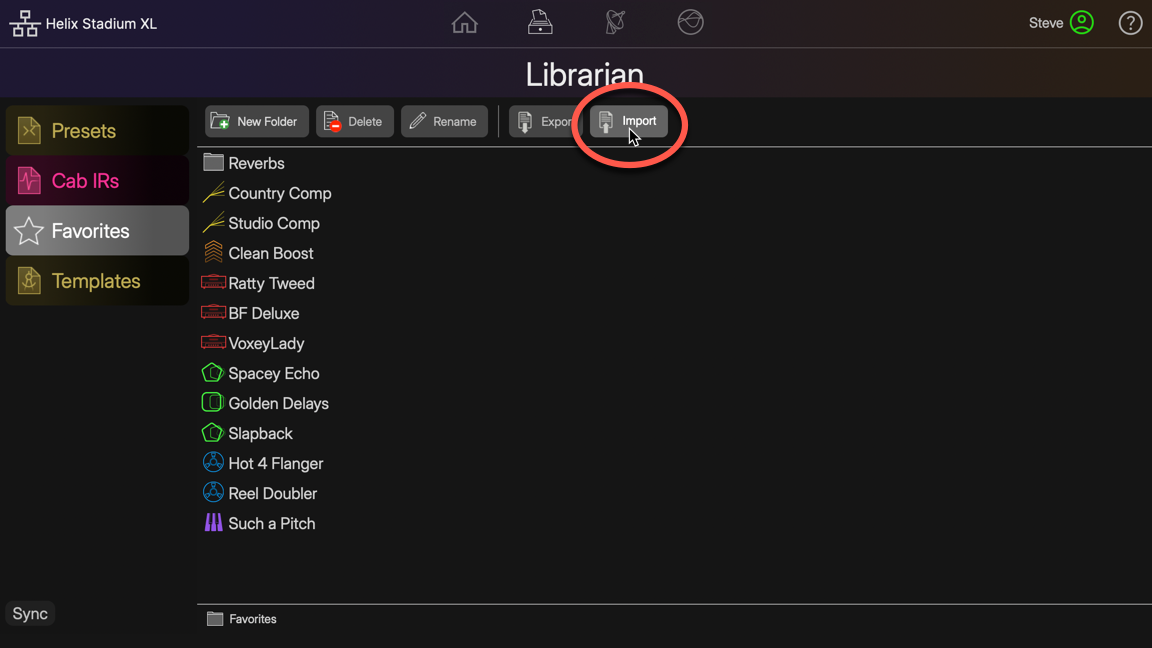
Tip: You can import either Stadium Favorite (.hls) or original Helix Favorite (.fav) files.
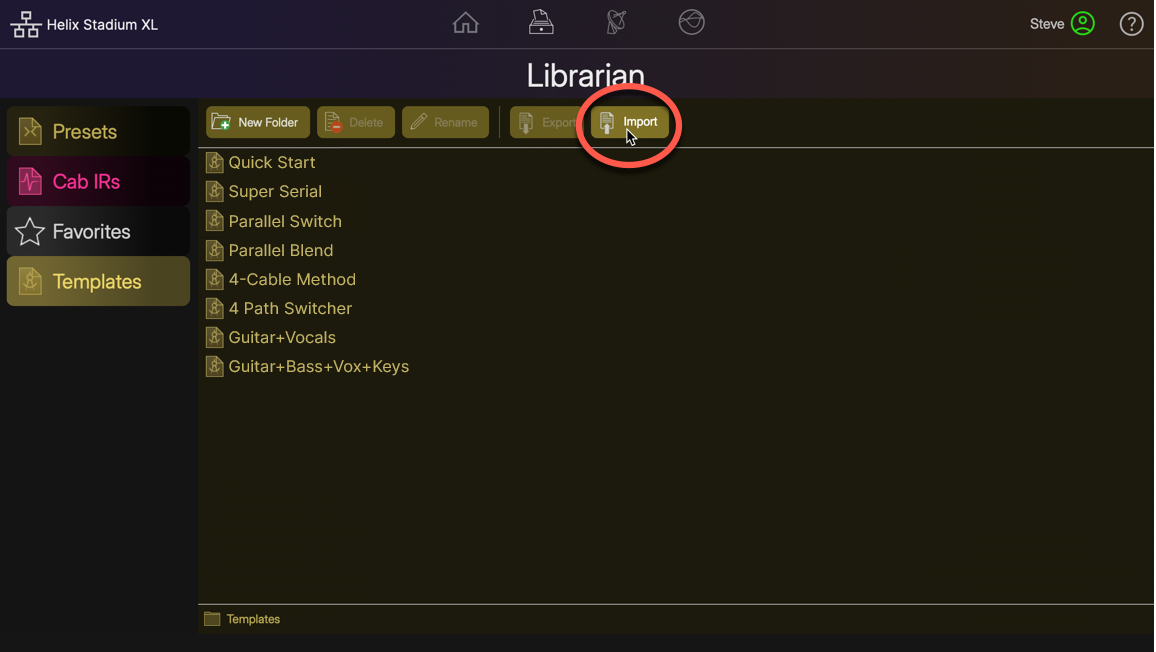
Tip: A set of Preset Templates is already included to get you started.
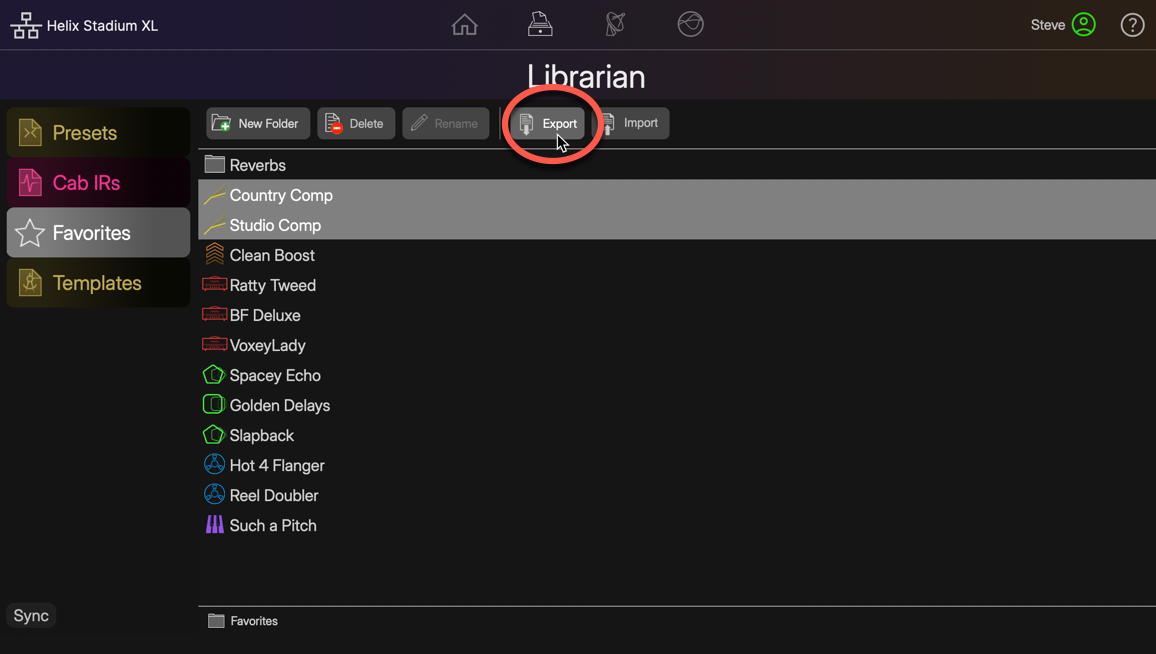
Exporting Favorites or Template Files
Select the desired file(s) within the Librarian right pane, click the Export button, browse to the desired folder on your computer, and save. Alternatively, you can drag Favorite or Preset Template files to a computer folder to export them.
Managing Favorites and Templates
Use the buttons at the top of the Favorites or Templates Librarian to Delete or Rename the selected files, or to create a New Folder to manage your Favorites and Templates.

-
Note that you can select the desired Favorites or Templates from the list, then click New Folder to automatically move all selected files into the created folder in a single step.
-
Drag files between the Librarian list and your folders to move and arrange them as desired.
-
Click on a folder to show its contents on the right.
-
Configuring Bypass and Controller Assignments
Within the Helix Stadium application, Bypass and Controller Assignment options are available via right-click Action menus, as described in the following sections. Please also refer to the Stadium device’s Bypass and Control Assignment page for additional details regarding assignment types and behaviors.
Creating and Editing a Block Bypass Assignment
Right-click on the block for which you want to create or edit a Bypass assignment to open its Action menu.

-
To assign to a Switch, Pedal, or XY controller: Choose Assign Bypass Controller. In the Controller Assign dialog that appears, select the specific switch or controller to which you want to assign the block bypass. To remove an existing Bypass assignment, select “None.”
-
To create a MIDI Bypass assignment for the block: Select Bypass MIDI Control from the block’s Action menu. In the MIDI Assign dialog that appears, choose the desired MIDI Command type and its additional Value or Note options. To remove an existing MIDI Bypass assignment, select “None.”
-
To additionally configure the block so that its Bypass is stored and recalled via Snapshots: Set the block Action menu’s Bypass Snapshot Control switch to its right position to enable it

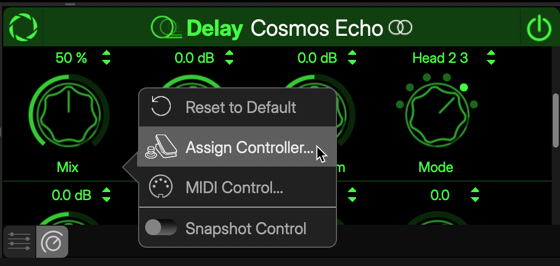
Creating and Editing a Parameter Controller Assignment
Practically any parameter for any block can be assigned to a switch, pedal, XY Controller, external, or MIDI for remote control. Most assigned command parameters also allow control via Snapshots. These options are configured in the app’s Parameter Panel.
-
Click the block you want to create or edit a Controller assignment for.
-
Within the lower right Parameter Panel, right-click on the desired knob (or slider, if using the panel’s Slider View) to open its Action menu.
-
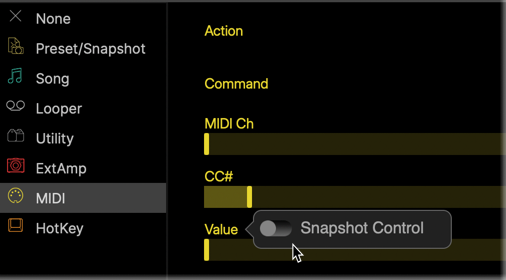
To assign to a Switch, Pedal, or XY controller: Choose Assign Controller. In the Controller Assign dialog that appears, select the specific switch or controller to which you want to assign. To remove an existing parameter assignment, select “None."
-
To create a MIDI Bypass assignment for the parameter: Select Bypass MIDI Control from the block’s Action menu. In the MIDI Assign dialog that appears, choose the desired MIDI Command type and its additional Value or Note options. To remove an existing MIDI parameter control assignment, select “None.”
-
To additionally configure the parameter so that its values are stored and recalled via Snapshots: Set the parameter Action menu’s Snapshot Control switch to its right position to enable it

The Command Center View
This view displays the Command Center window for editing the Command Center options for the current preset. All functions within this window are the same as editing within the Stadium device’s Command Center screen. Please refer to the Command Center page for details.

Configuring a MIDI CC assignment on a pedal
Snapshot Control
For Command Center parameters that support it, you can right-click on a parameter slider and toggle the Snapshot Control switch on/off. Enabling Snapshot Control stores its values with snapshots and sends them on snapshot recall. See the Command Center page for additional info.
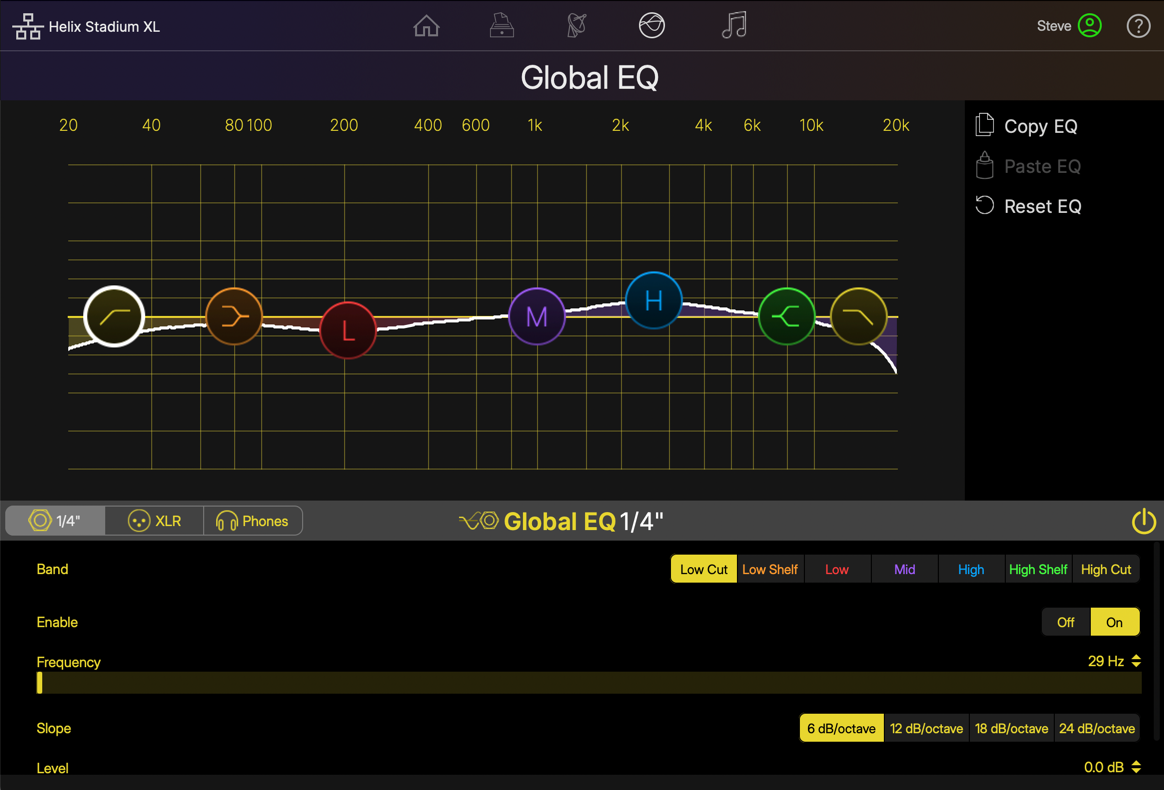
The Global EQ View
This view displays the Global EQ, providing access to the three Global EQs—one for each Matrix Mixer 1/4”, XLR, and Phones layer. All functions are the same as editing within the Stadium Device’s Global EQ screen. Please refer to the Global EQ page for details.