The Global Settings menu contains additional parameters that apply to all presets and songs, such as input and output levels, footswitch behavior, display brightness, etc.
-
Tap the Menu icon


-
Tap the desired submenu icon; its parameters appear in the inspector.
-
To view additional pages, press


-
Not sure what a global setting does? Tap the setting to open the Parameter Panel, which provides a description:
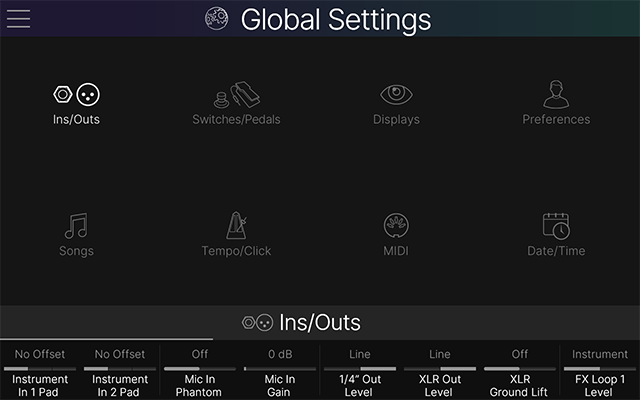
Global Settings > Ins/Outs
Click to show/hide Global Settings > Ins/Outs settings...
|
Parameter |
Description |
|---|---|
|
Inst [X] Pad |
Sets the Instrument input level.
|
|
Mic In Phantom |
When set to On, 48V phantom power is provided via the XLR Mic In jack for studio condenser microphones. IMPORTANT! Never plug or unplug a mic or XLR cable while phantom power is On. Leave this setting Off unless you’re sure your connected mic requires phantom power. Please refer to your microphone manufacturer's documentation. |
|
Mic In Gain |
Controls the preamp gain for the XLR Mic input. Note that the Mic’s input signal can be further adjusted up or down from the Input > Mic block’s Trim parameter. |
|
1/4" Out Level |
Choose Instrument when connecting the 1/4” outputs to stompboxes or the front of guitar or bass amps. Choose Line when connecting to studio monitors or the line inputs on mixers. |
|
XLR Out Level |
Choose Mic when connecting the XLR outputs to the XLR mic inputs on mixers. Choose Line when connecting to mixers, studio monitors, or audio interfaces. |
|
XLR Ground Lift |
When On, lifts the ground pin on the XLR outputs. This may help in reducing ground loops in certain situations. |
|
FX Loop [X] Level |
Choose Instrument when using a Send/Return pair as an FX loop for external stomp boxes. Choose Line when connecting external rack processors, keyboards, drum machines, mixers, or other line level gear. Note that FX Loop levels can be further adjusted via an FX Loop block's Send and Return parameters. |
|
Return [X/X] Type |
Determines the behavior of the Return 1 and 2 (Return 3 and 4 on Stadium XL
|
|
Re-amp Src Out USB 7 |
Determines which two physical inputs are sent dry (unprocessed) to your DAW software. USB Out 7 and 8 are dedicated to recording a DI signal, which can then be used with plug-ins or for Re-amping back through Helix Stadium. |
|
Re-amp Src Out USB 8 |
|
|
USB Out 1/2 |
Determines where the USB Out 1/2 signal is sourced from:
|
|
S/PDIF Out |
Determines where the S/PDIF Out signal is sourced from:
|
|
S/PDIF Out Level |
Sets the S/PDIF output level. For most cases, you can leave this set to 0.0dB. |
|
S/PDIF Sample Rate |
Selects the sample rate for the S/PDIF output. When connecting to another S/PDIF device, ensure both units are set to the same sample rate. Note that this setting does not affect USB audio. |
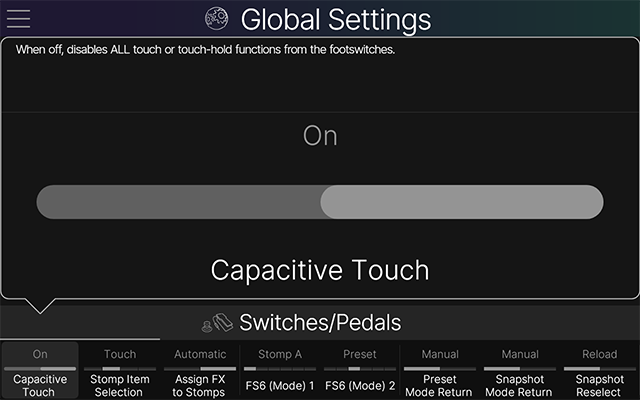
Global Settings > Switches/Pedals
Click to show/hide Global Settings > Switches/Pedals settings...
|
Parameter |
Description |
|---|---|
|
Capacitive Touch |
When off, disables all touch or touch-hold functions from the footswitches. |
|
Stomp Item Selection |
Determines whether touching, pressing, or both touching and pressing a Stomp mode footswitch selects the assigned focused block or jumps to the Bypass/Control Assign or Command Center page. |
|
Assign FX to Stomps |
Determines whether or not Helix Stadium automatically assigns a new effect block to the earliest empty Stomp Mode footswitch location. Amp, Preamp, Power Amp, Cab, IR, Split, and Merge blocks are never auto-assigned. |
|
FS6 (Mode) 1 |
Determines which of the two footswitch modes FS6 toggles between, both of which appear on FS6 (MODE). Shortcut: While in More Mode, press and hold the desired mode select switch to swap out the current FS6 Mode 1 or Mode 2. |
|
FS6 (Mode) 2 |
|
|
Preset Mode Return |
If FS6 (MODE) is set to toggle between Preset and another mode (Stomp A, Stomp B, Snapshot, Combo, or Transport), this parameter determines whether selecting a preset footswitch automatically toggles back to the other mode. This setting is locked to "Manual" if neither FS6 Mode 1 nor FS6 Mode 2 is set to "Preset." |
|
Snapshot Mode Return |
Determines whether selecting a snapshot switch stays in Snapshot mode (“Manual”) or automatically returns to the previous mode (“Automatic”). |
|
Snapshot Reselect |
Determines whether pressing the active snapshot footswitch reloads the stored state of the snapshot (“Reload”) or toggles between it and the previously selected snapshot (“Toggle Prev”). |
|
Combo Top Row |
Determines which functions appear on the top row (FS2~FS5) and bottom row (FS8~FS11) in Combo Footswitch mode. (Transport switches cannot be assigned to Combo mode.) |
|
Combo Bottom Row |
|
|
Up/Down Switches |
Determines whether FS1 and FS7 are Bank, Preset, Snapshot, Song, or Marker Up/Down. Up/Down switches appear in Preset, Snapshot, and Combo Footswitch modes only, and can be manually assigned to Stomp A and Stomp B switches via Command Center > Preset/Snapshot and Song commands. Shortcut: Press and hold FS1 and FS7 together to cycle through available Up/Down assignments. |
|
Swap Up/Down |
When On, swaps FS1 and FS7 for the Preset, Snapshot, and Combo Footswitch modes, so that Down is on the top and Up is on the bottom. |
|
Flip EXP 1/2 Polarity |
Stadium XL When On, the polarity of the onboard Expression Pedal behavior is reversed (for both EXP 1 and EXP 2 modes of the pedal), so heel and toe values are reversed. |
|
EXP Pedal Position |
Determines whether expression pedal positions are recalled per preset or applied globally. If you want a Wah or Volume Pedal to maintain its current position when switching presets, set this to “Global.” |
|
Control A (Tip) |
Control C and D jacks are available on Stadium XL Determines whether each Control jack (A~D) is an expression pedal input, external footswitch input, external drum trigger input, or an external amp remote switch output. |
|
Control B (Ring) |
|
|
Control C (Tip) |
|
|
Control D (Ring) |
|
|
Flip A (Tip) Polarity |
Control C and D jacks are available on Stadium XL When on, reverses the polarity of an expression pedal or footswitch received at the respective jack’s tip or ring conductor. Reversing the polarity may be necessary for compatibility with certain third-party switch or expression pedals—please see the device manufacturer's documentation. |
|
Flip B (Ring) Polarity |
|
|
Flip C (Tip) Polarity |
|
|
Flip D (Ring) Polarity |
|
|
Trigger A Sensitivity |
Control C and D jacks are available on Stadium XL Controls the sensitivity of a drum trigger connected to the respective jack’s tip or ring conductor. Grayed out and unavailable unless Control A, B, C, or D is set to “Trigger In.” |
|
Trigger B Sensitivity |
|
|
Trigger C Sensitivity |
|
|
Trigger D Sensitivity |
|
|
Trigger A Threshold |
Control C and D jacks are available on Stadium XL Determines the minimum force required for a drum trigger connected to the respective jack’s tip or ring conductor. Grayed out and unavailable unless Control A, B, C, or D is set to “Trigger In.” |
|
Trigger B Threshold |
|
|
Trigger C Threshold* |
|
|
Trigger D Threshold* |
Global Settings > Displays
Click to show/hide Global Settings > Displays settings...
|
Parameter |
Description |
|---|---|
|
Main LCD Brightness |
Controls the brightness of the main display. |
|
Scribble Strip Brightness |
Stadium XL Controls the brightness of the scribble strip displays above the footswitches. Note that 0% is the lowest brightness available; there is no way to turn off the scribble strips completely. |
|
Screen Dim Timeout |
If no signal is present at the Instrument or Mic input, and a button press, footswitch press, expression pedal move, or screen tap has not been registered for a certain amount of time, both the main display (and scribble strips |
|
Dim LED Brightness |
Sets the dim state brightness of all footswitch LEDs from 0% (completely unlit) to 50% (half the brightness of the bright lit state. If you prefer blocks to appear dim with dark switches instead of dim switches, set this to 0%. |
|
Tap LED |
If the TAP switch’s constant tempo indication flashing annoys you, set this to “Off.” |
Global Settings > Preferences
Click to show/hide Global Settings > Preferences settings...
|
Parameter |
Description |
|---|---|
|
Preset Numbering |
Determines whether preset numbers appear as banks of four (A, B, C, D) or are numbered 0-127 (0-511 within the USER PRESETS folder) or 1-128 (1-512 within the USER PRESETS folder), which may be convenient when recalling presets via incoming MIDI program change messages. |
|
Tap Tempo Pitch |
Determines how delay repeats behave when repeatedly pressing the TAP footswitch. “Authentic” respects the natural pitch fluctuations inherent when changing a real delay device’s time knob; “Transparent” minimizes these artifacts. |
|
Allow Geolocation |
When On, Helix Stadium automatically detects your time zone for Global Settings > Date/Time to set the correct time. (An active internet connection is required.) This information is not stored or shared with any third party. It is advised to use the correct local time and time zone when using your Line 6 account. |
|
Remote Access |
Determines whether Helix Stadium software application clients can connect (“Allow” or “Deny”) for remote control/file transfers, or if a security PIN is required to connect to this Helix Stadium device (“Require PIN”). You must set a 4-digit PIN to enable the Require PIN security feature—see the next setting. |
|
Set PIN |
Only available if Remote Access is set to “Require PIN.” Tap the Set PIN button, enter your desired 4-digit PIN in the dialog, and tap When Remote Access is set to “Require PIN” and you’ve created your 4-digit PIN, you will be prompted to enter this PIN in the Helix Stadium application when connecting to this device for greater security. See Helix Stadium Application > Connect to Helix Stadium. |
Global Settings > Songs
The Songs category includes Global Settings that apply to Helix Stadium's Song View - Song selection and Marker options.*
*Note: The Showcase - Song features are still in development and will be functional in a future firmware update for Helix Stadium. For the latest details, please visit the Line 6 website’s Helix Stadium product page.
Global Settings > Tempo/Click
Note: You can also quickly access Tempo/Click settings by briefly touching the TAP/Tuner switch.
Global Settings > MIDI
See MIDI for more information.
Global Settings > Date/Time
Note: You can also quickly access the Date/Time settings by tapping Set Date/Time from the clock panel’s sidebar.