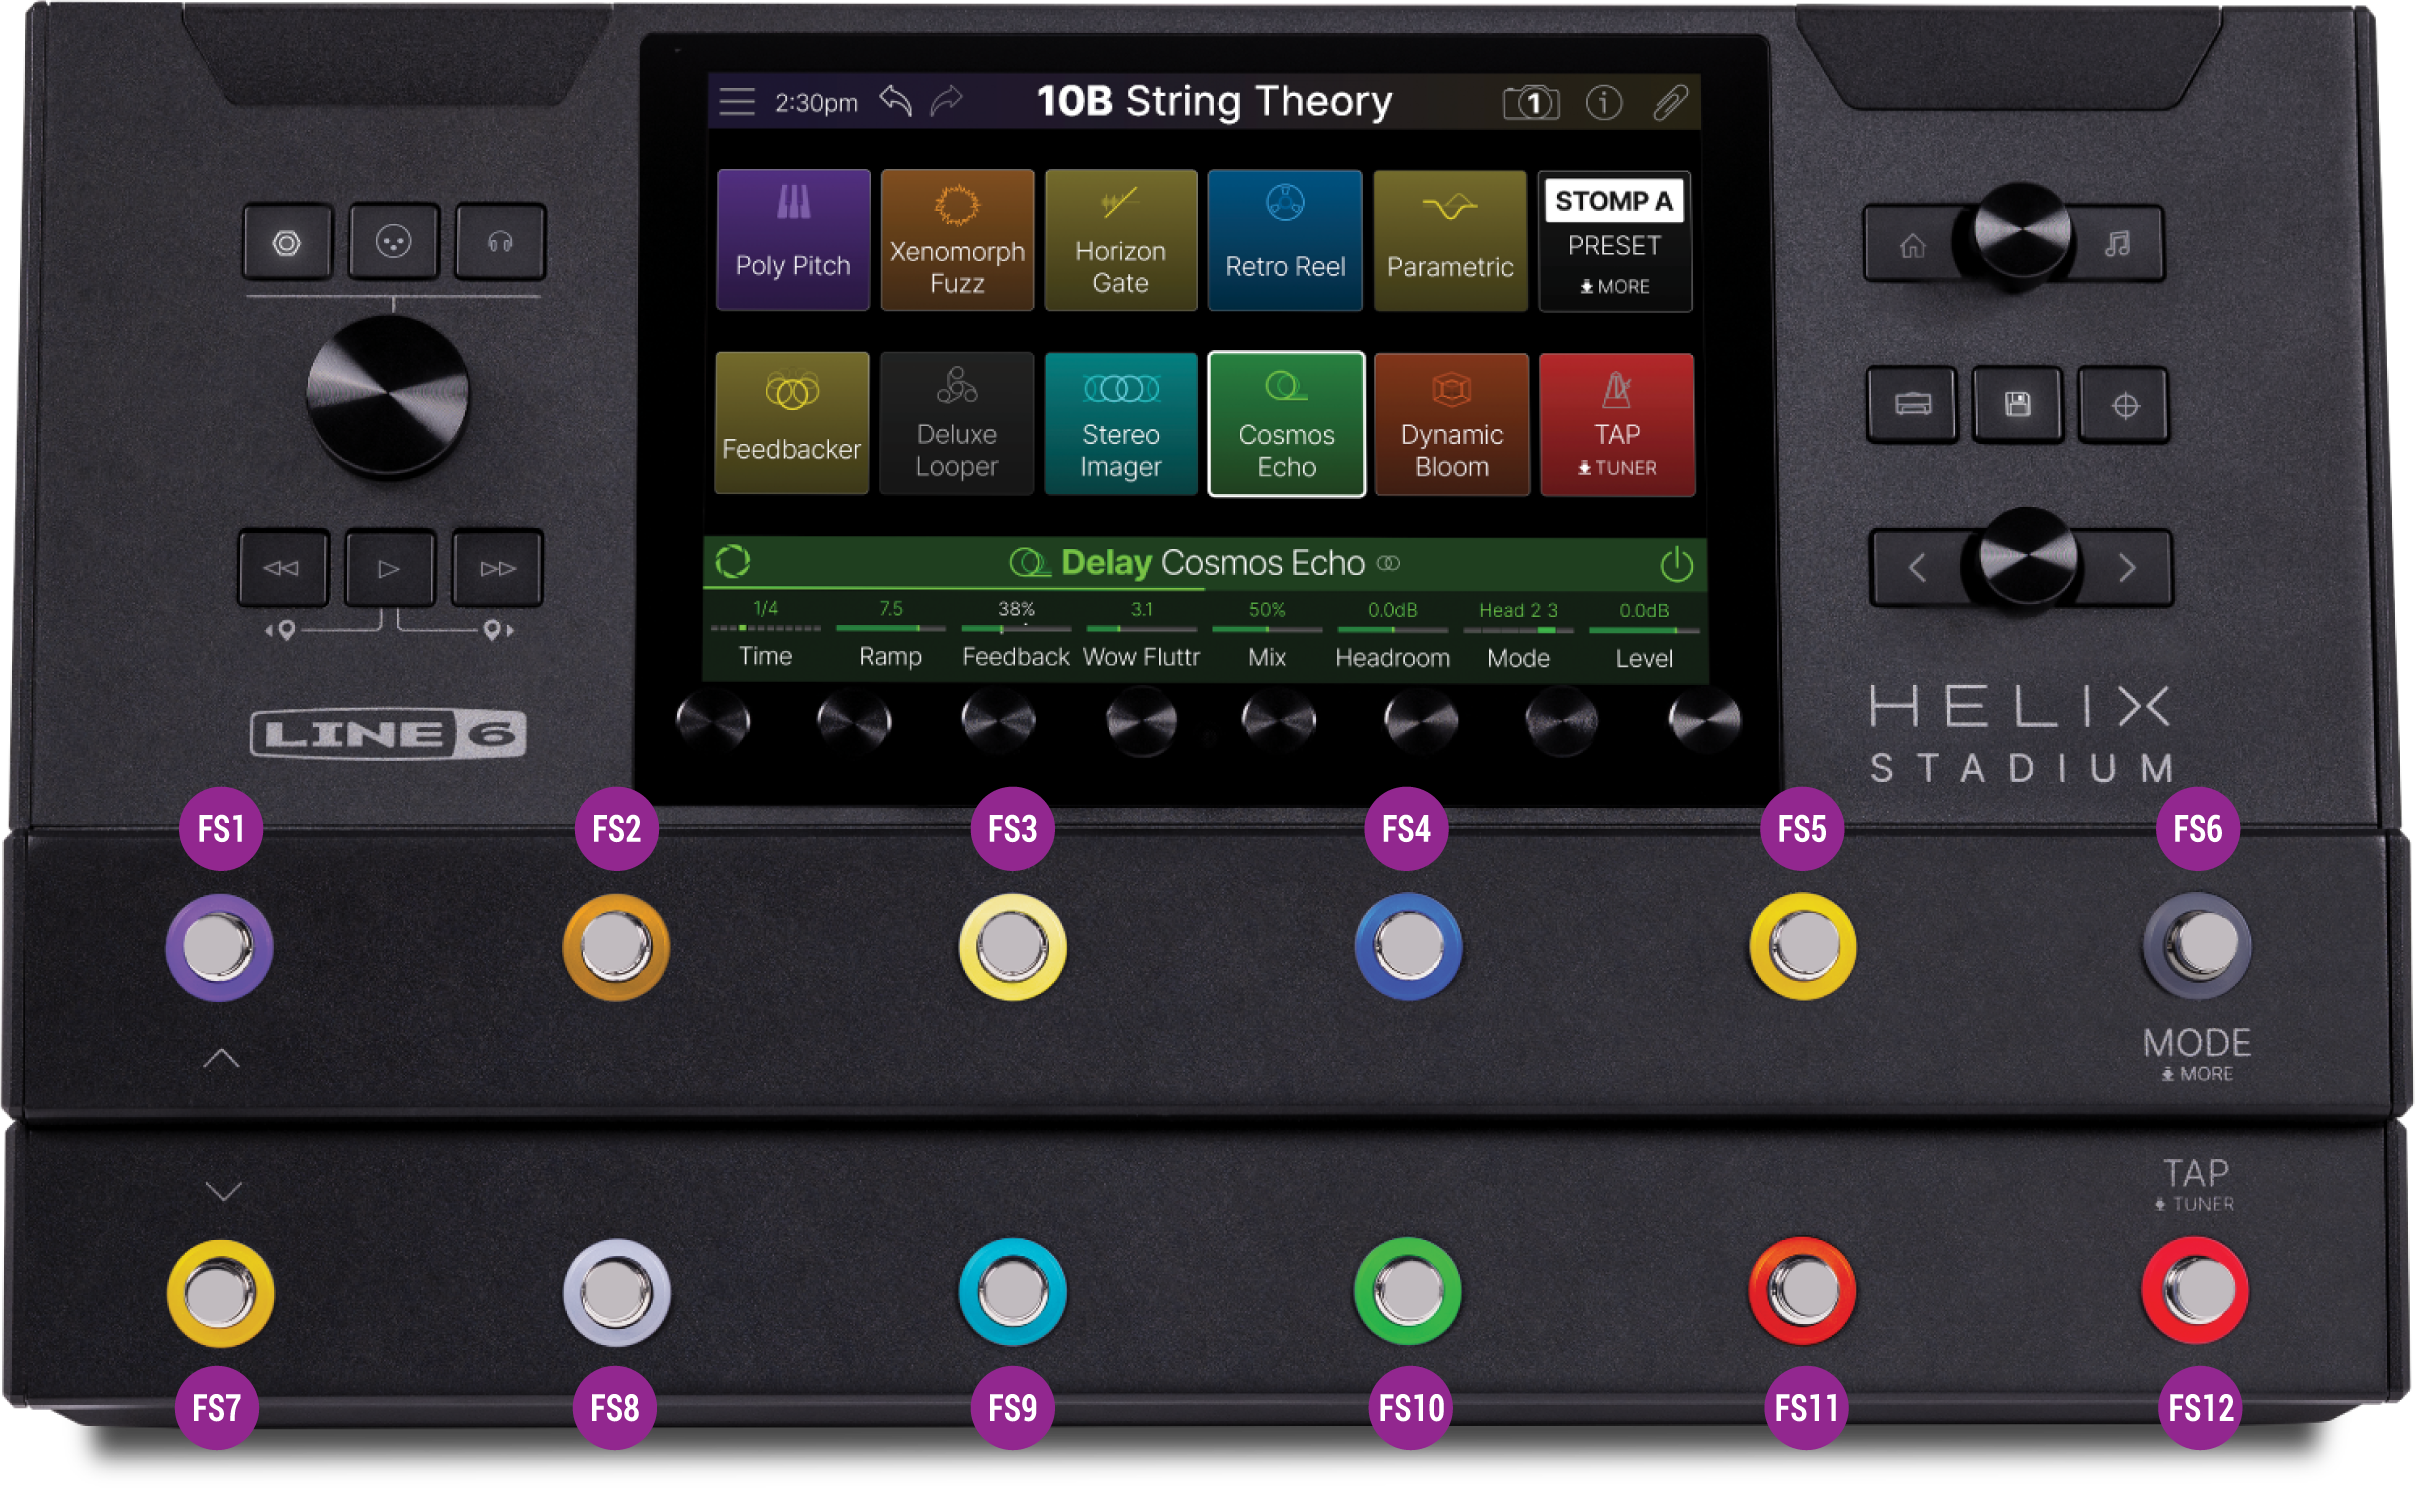
The Top Panel of your Helix Stadium XL or Helix Stadium includes most of the device’s controls, including the touchscreen and multi-function footswitches. These items are described below.
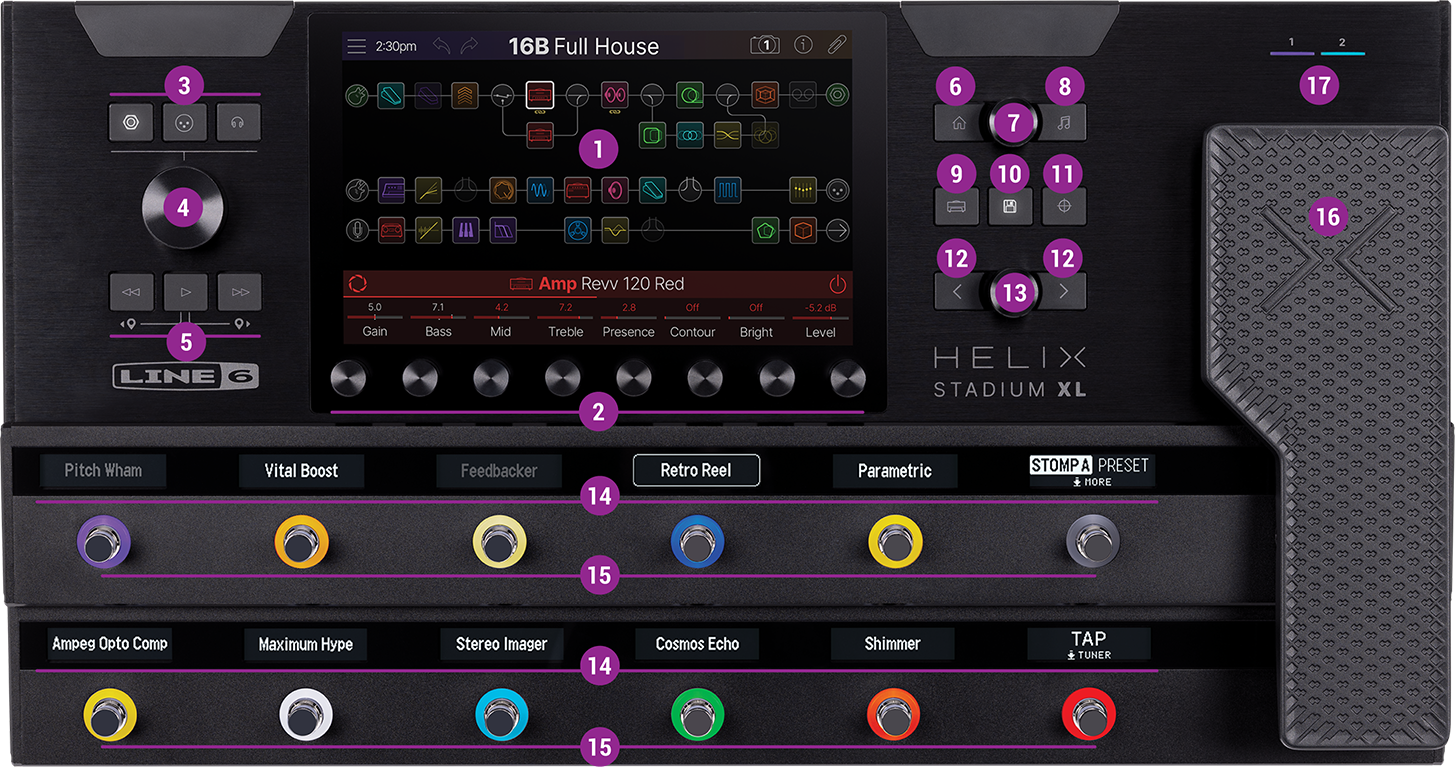
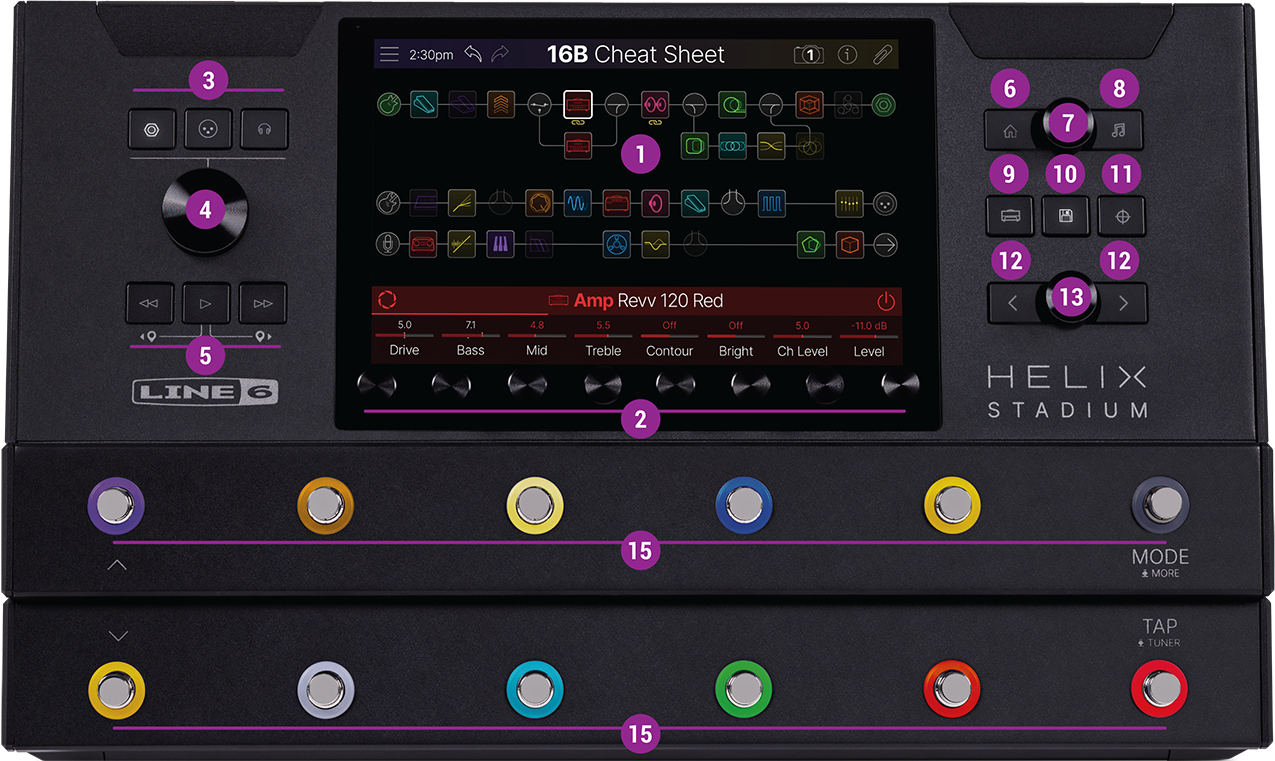
The Top Panel Features
![]()
![]()
-
If a rectangular button or selector appears above a knob, press the knob to engage its function.
-
Press the knob to reset the parameter to its default value. Alternatively, tap the parameter and then tap Reset Value.
-
For a Delay or Modulation block’s Time, Rate, or Speed parameter, press the knob to toggle between ms/Hz and note division values.
-
Press and hold the knob to open the Quick Controller Assign dialog, which lets you assign the parameter to a controller (stomp switch, trigger, expression pedal, incoming MIDI Note/CC, or X/Y Controller axis) in 2 seconds. Alternatively, tap the parameter and then tap Learn Controller. Please see the Bypass and Controller Assignment page for details.
-
Press and turn the knob to quickly assign the parameter to snapshot control. Alternatively, tap the parameter, then tap the Snapshot Ctrl toggle switch on. Please see the Snapshots page for details.
![]()
![]()
![]()
![]()

-
Press the currently lit button to view its Matrix Mixer screen—The 1/4”, XLR, and Phones outputs each have their own dedicated Matrix cue mix layer and Global EQ.
-
Press and hold two (or all three) Output buttons to “link” their Volume knob control and Matrix cue mix. Press and hold all linked Output buttons to unlink them again.
-
Press and hold the currently lit Output button to completely disable Volume knob control. (Say, you don’t want anyone messing with it.) Press the button again to re-enable Volume knob control.
-
![]()
![]()
Caution - It might get loud! Always turn the Volume for the respective output(s) counterclockwise to minimum before making connections to external gear and headphones to avoid encountering loud bursts of audio 🤯 . Exposure to high volume levels can cause hearing damage or harm to your equipment.
![]()
*Note: The Transport buttons are reserved for the upcoming Showcase - Song View functionality. These features are still in development and will be available in a future firmware update for Helix Stadium. For the latest details, please visit the Line 6 website’s Helix Stadium product page.
![]()
![]()
-
For Helix Stadium Devices: Press the

![]()
-
When in the Home View: Turn to select a preset, then press to load it. Or, press to open the Preset List.
-
When in the Preset List: Turn to select a preset, then press to load it.
![]()
![]()
*Note: Song features are still in development and will be available in a future firmware update for Helix Stadium. For the latest details, please visit the Line 6 website’s Helix Stadium product page.
![]()
![]()
![]()
-
Press and hold to quickly jump to the Cab block or cycle through multiple Cab blocks within the current preset.
![]()
![]()
![]()
![]()
![]()
![]()
![]()
![]()
![]()
![]()
-
Home > Edit: Turn to change the selected block’s model. Press and turn to quickly skip model subcategories. Press to open the Model List. From an empty block location, turn to instantly scroll through any favorites.
-
Model List: With the category column highlighted, turn to select a model category, then press to load that category’s first model. With the model category highlighted, turn to select and audition models. Press and turn to quickly skip subcategories within the selected model category. Press to exit back to the Home > Edit screen.
![]()
![]()
*Note: Helix Stadium includes the same footswitch modes, but instead of utilizing scribble strips as offered on Stadium XL, Helix Stadium shows all footswitch labels on the main display’s Home > Play screen.
![]()
-
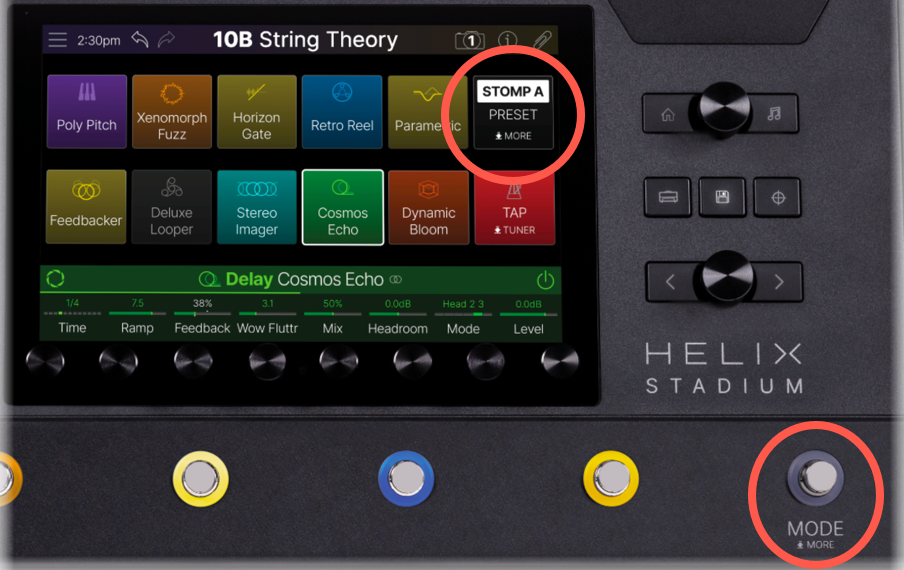
FS6 is dedicated to the Mode switch. Press FS6 to toggle between the two primary footswitch modes (by default, Stomp A and Preset, but these can be changed). Press and hold FS6 for More Mode, where you can access the other four footswitch modes as well as additional helpful functions.
-
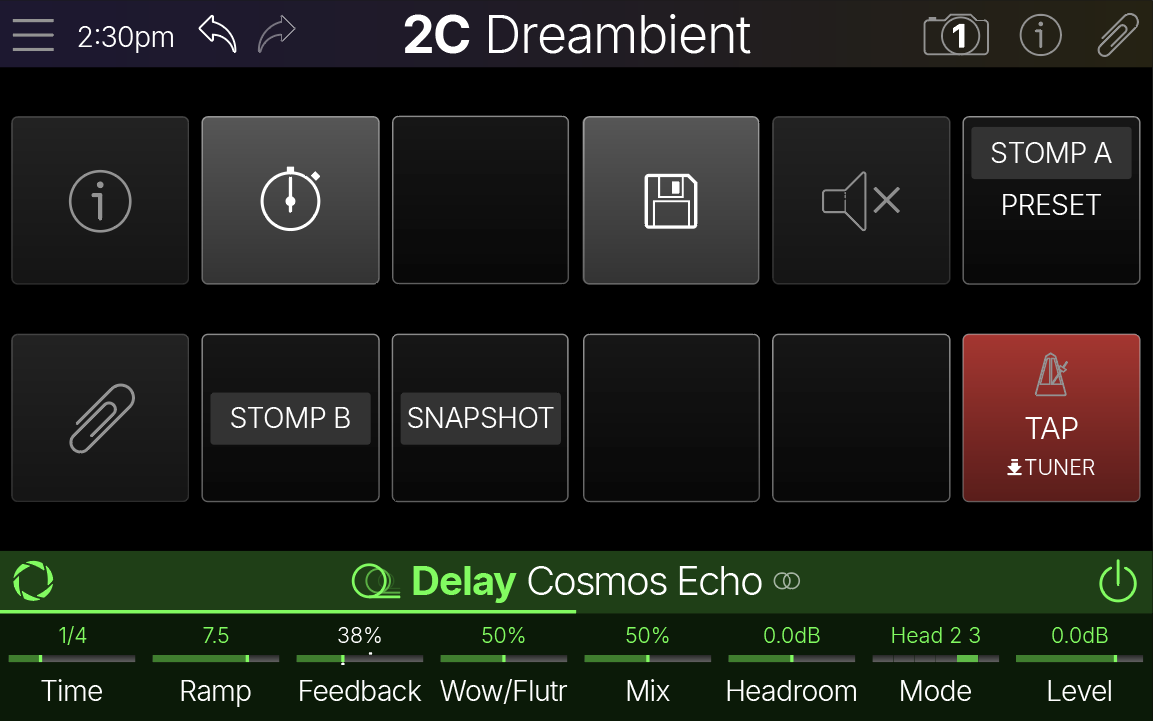
Press the TAP/Tuner switch repeatedly to tap in a tempo for time-based effects (such as Delay and Modulation) to follow. Touch FS12 (but don’t press) to briefly display Tempo/Click settings. Press and hold FS12 to open the Tuner.
![]()
![]()
![]()
-
For Helix Stadium XL, up to four additional expression pedals can be connected via the Control A/B and C/D jacks.
-
For Helix Stadium, up to two expression pedals can be connected via the Control A/B jack.
Note: On all Stadium devices, adding a Wah, Pitch Wham, or Poly Wham block automatically assigns its Position parameter to EXP 1. Adding a Volume or Pan block automatically assigns its Position to EXP 2. You can make custom EXP assignments for practically any parameters—see the Controller Assignment page.
![]()
![]()
Note: On Helix Stadium, you can connect and configure an external expression pedal and switch (or a Line 6 EX2 combination pedal & switch unit) to provide switchable EXP 1 and EXP 2 control with a single pedal. Please refer to the External Pedal and Switch Configuration page.
👆 Capacitive Touch Footswitches
Helix Stadium devices' onboard footswitches offer capacitive touch functionality, letting you lightly touch a footswitch with your finger (or, if you’re gross, other body parts) to instantly jump to its assigned block, parameter, or command. Capacitive touch is on by default, but can be toggled off via Global Settings > Switches/Pedals > Capacitive Touch. You’ll find details on using capacitive touch functions throughout this manual, but here are a few handy tips to try:
-
In Stomp A or Stomp B footswitch mode, briefly touch a switch to instantly jump to its assigned item, whether that’s an amp, cab, effect, or split block, parameter min/max toggle, or Command Center command.
-
No menu diving or even traditional page navigation necessary—just touch a stomp to instantly access its parameters, which is barely one step away from treating Helix Stadium like a pedalboard full of stompboxes. (This is especially handy while in Focus View, where you can instantly jump to each effect’s Focus view without having to return to the Home > Edit screen.)
-
If the switch includes multiple assignments, tap it repeatedly to cycle through all assigned items.
-
-
Touch-hold a Stomp A or Stomp B mode footswitch to open the quick-assign dialog, which lets you assign the currently selected block, modify its latching/momentary operation, relabel the stomp’s scribble strip, recolor the stomp’s LED ring, or clear the switch entirely.
-
Simultaneously touch-hold two Stomp A or Stomp B footswitches to swap their locations.
-
Simultaneously touch-hold two Snapshot footswitches to swap their locations.
-
Briefly touch the TAP/Tuner switch to display Tempo/Click parameters.
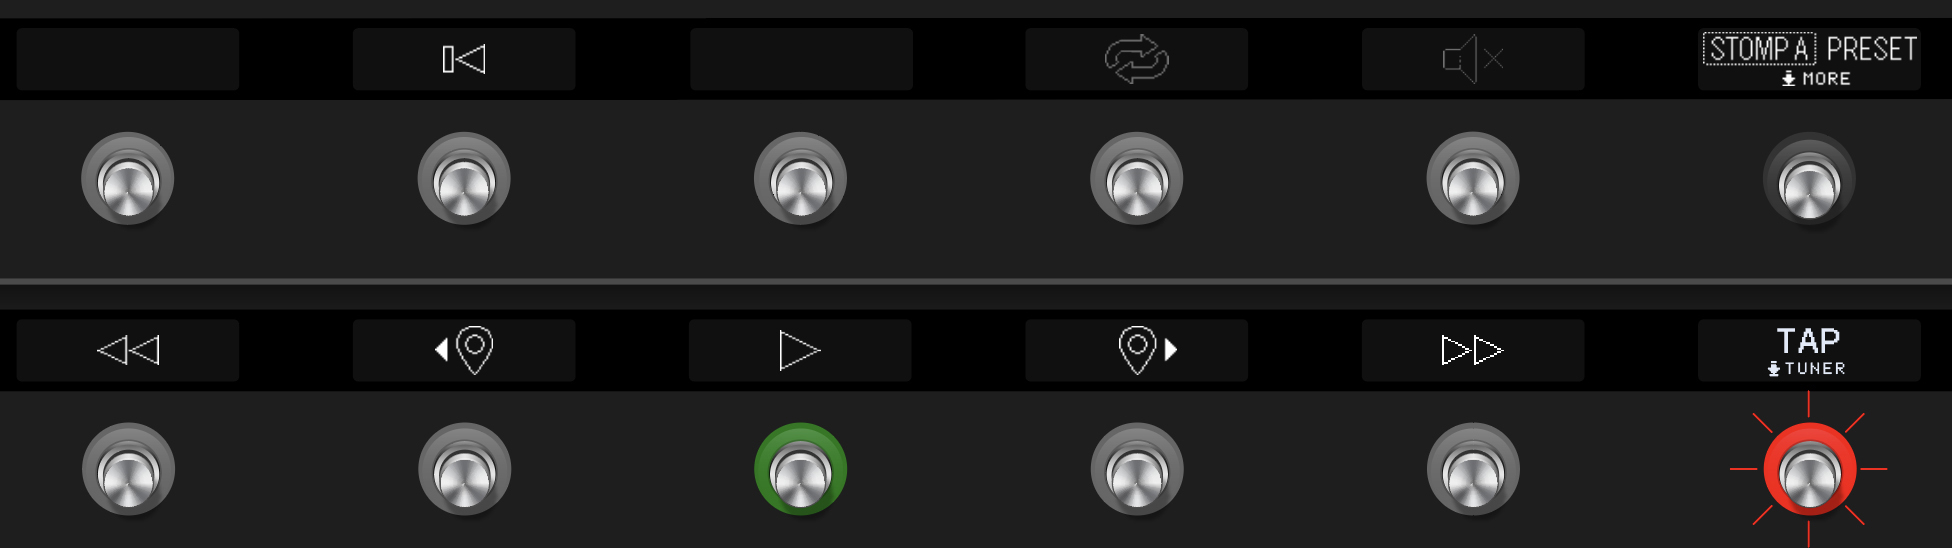
Footswitch Modes
About Footswitch Modes
Helix Stadium devices offer several different footswitch modes, accessible via FS6 (MODE), making it easy to access Stadium’s various functions. These include Stomp A, Stomp B, Preset, Snapshot, Combo, and Transport Modes. By default, FS6 (MODE) quickly toggles between Stomp A and Preset modes, but you can change it to the two modes you use most often. To follow, we cover the available footswitch modes and functions for both Helix Stadium device types.
Footswitch Labels
Helix Stadium XL includes scribble strips to display each footswitch’s current function, but Helix Stadium shows these labels on the Home > Play screen. Press the ![]()
Changing the Footswitch Mode
By default, pressing FS6 (MODE) quickly toggles between Stomp A and Preset modes, but this can be changed to any two modes you like via Global Settings > Switches/Pedals > FS6 (Mode) 1 and FS6 (Mode) 2. Press and hold FS6 (MODE) to enter More Mode, where you can access the additional four footswitch modes not already on FS6 as well as engage additional functions.
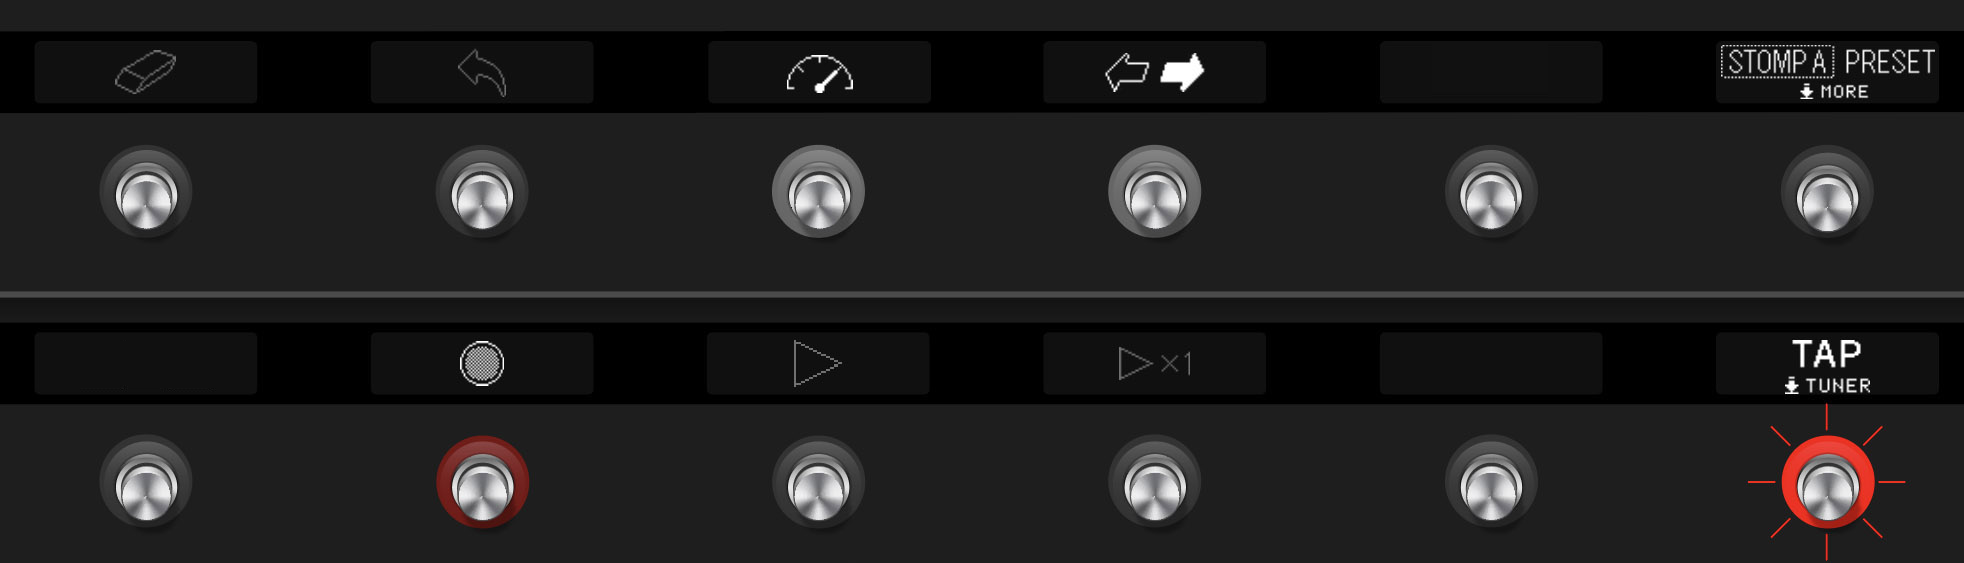
More Mode
Press and hold FS6 to access More Mode. Switches FS1 through FS5 and FS7 offer helpful shortcuts, and switches FS8 through FS11 access the additional four footswitch modes not already assigned to FS6 (MODE).
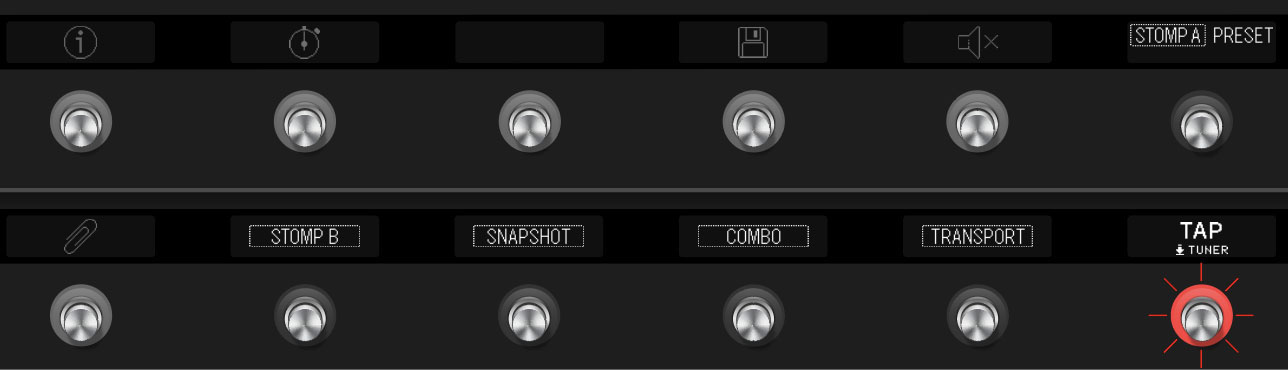
Note: Combo and Transport Footswitch Modes are currently available only on Helix Stadium XL. These modes will be added to Helix Stadium in a future firmware update.
Click to view More Mode
|
More Mode Switch |
Function |
|---|---|
|
FS1 (Preset Info) |
Press FS1 (Preset Info) to open and close the Preset Info screen. All factory presets contain tips on how to best use them. Freely type in info for your own presets, like guitar/pickup/playback system used, creative controller assignments, tips/tricks, self-affirming platitudes, taco recipes, etc. 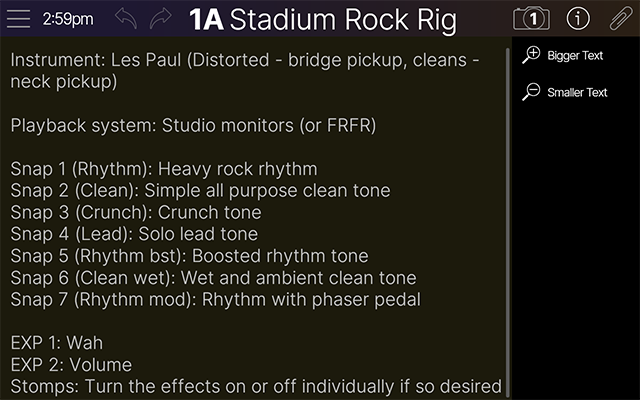
|
|
FS2 (Stopwatch) |
Press FS2 (Stopwatch) to change the main display’s clock to a stopwatch, which begins counting immediately.
To change the stopwatch back to a clock, tap on the main display’s stopwatch and then tap “Clock.” |
|
FS4 (Quicksave) |
If the current preset or song has unsaved changes, the top panel’s |
|
FS5 (Mute All) |
There can be a lot of audio going through Helix Stadium at any given time, and you may not want to track down every signal during an emergency or set break. Instead, press FS5 (Mute All) to instantly mute all outputs. Press FS5 again (or tap the green Unmute button on the display) to unmute. 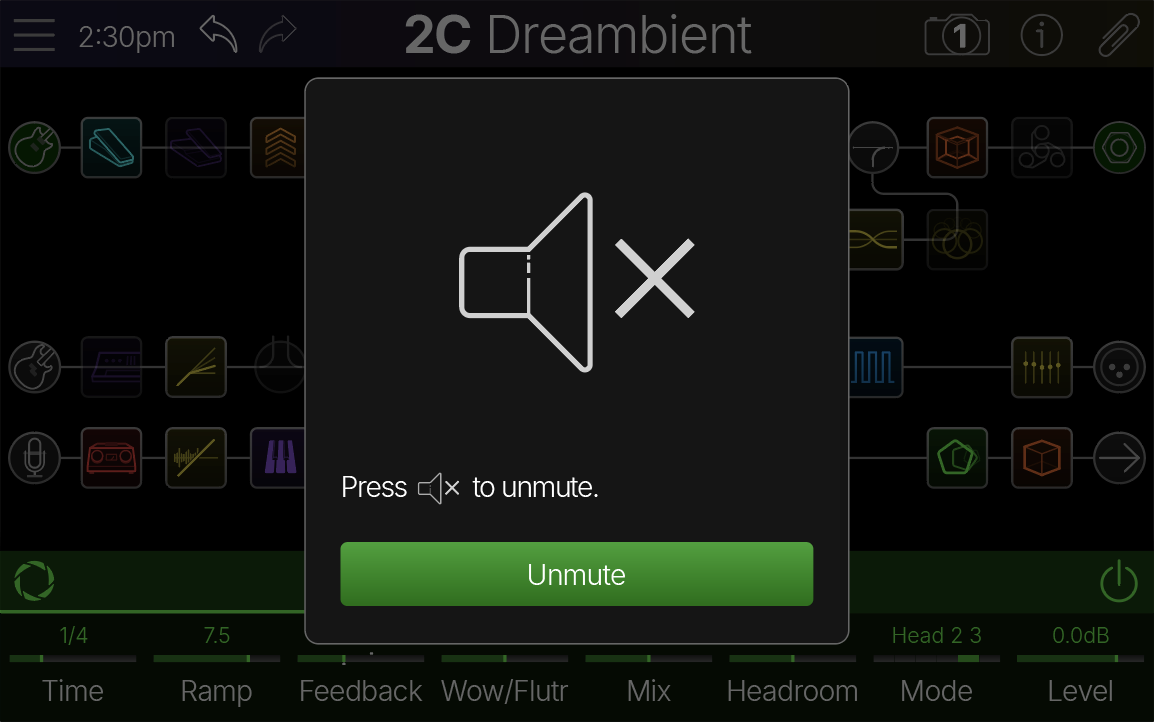
|
|
FS7 (Clip) |
Press FS7 (Clip) to open the Preset Clip screen and begin clip playback; press again to close the Preset Clip screen. Please see Preset Clip for more info. 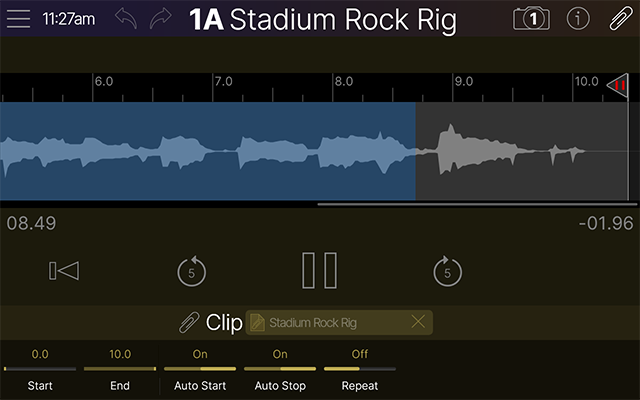
|
|
FS8~FS11 |
Press to access one of the four footswitch modes not already assigned to FS6 (MODE). Tip: To swap out the primary footswitch modes on FS6 (MODE), press and hold the desired mode on FS8~FS11; it replaces the most recent (highlighted) mode on FS6. You can also set this from Global Settings > Switches/Pedals > FS6 (Mode) 1 and FS6 (Mode) 2. |
Stomp A and Stomp B Modes
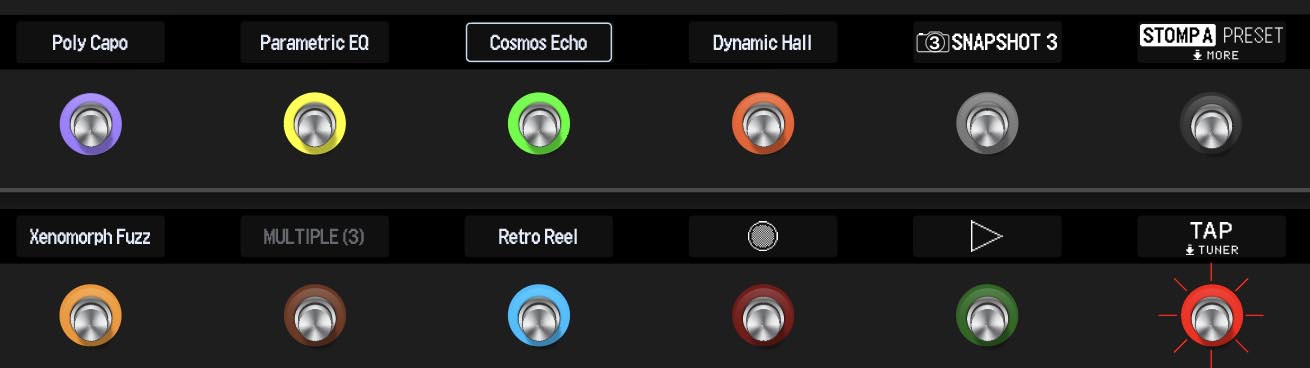
Stomp A and Stomp B footswitch modes are most commonly utilized like a traditional pedalboard—that is, turning individual effects on and off. In fact, adding a new effect block automatically assigns it to the first empty Stomp A/B switch. (You can disable this behavior from Global Settings > Switches/Pedals > Assign FX to Stomps.) However, Stomp A and Stomp B are much more powerful and flexible than that, as they can, via the Command Center, combine functions from most of the other footswitch modes.
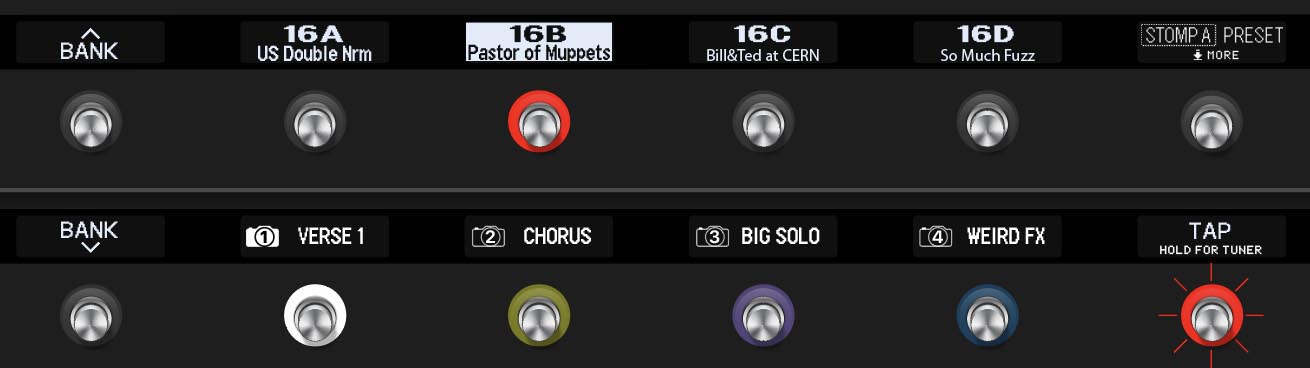
Note: Each Stomp A and Stomp B mode switch can accommodate multiple assignments (up to 16!), including any combination of block Bypasses, parameter min/max toggles, and/or Command Center commands. When a Stomp switch has more than one assignment, its label reads "MULTIPLE (X)," where X is the number of assignments (as shown on FS8 in Helix Stadium XL above). Stomp switch labels and LED ring colors can be customized as desired. See Bypass & Controller Assignments.
-
Block Bypass: Stomp A and Stomp B switches can toggle one or more blocks on (LED bright) and off (LED dim). In fact, when Global Settings > Switches/Pedals > Assign FX to Stomps is set to “Automatic,” all newly added effects blocks are automatically assigned to the next available empty Stomp A or B switch.
-
Parameter Control: Stomp A and Stomp B switches can toggle one or more Home screen parameters between any two values (min and max). For example, a Stomp could toggle an Amp block’s Gain between 2.3 and 5.6, toggle a Delay block’s Feedback parameter between 35% and 90%, or toggle a Split block’s routing from Path A to Path B. See Quick Controller Assign for more info.
-
Command Center commands: Via the Command Center menu, Stomp A and Stomp B switches can be assigned to a wide variety of additional functions and commands. These include MIDI CC messages for controlling an external pedal, Ext Amp commands for switching channels in your real amps, or even preset, snapshot, looper, transport, and other functions from different footswitch modes. See Command Center for more info.
What’s nuts is that a single stomp switch can do all of the above things at the same time. For example, Stomp A1 could turn on a delay block, turn off a reverb block, increase the Compressor block’s Output parameter, decrease the Amp block’s Treble parameter, transmit a middle C note to your synth via MIDI, and start a Quicktime video on your laptop. We have no idea why you’d want to do this, but it’s nice to know you could. Couple this with the fact that you have 20 Stomp switches (or more if you connect external momentary switches to the rear panel Control jacks), and you can quickly see how powerful Stomp A and Stomp B footswitch modes can be.
Tip: Quickly select, create, and swap Stomp mode assignments using Stadium’s Capacitive Touch functionality!
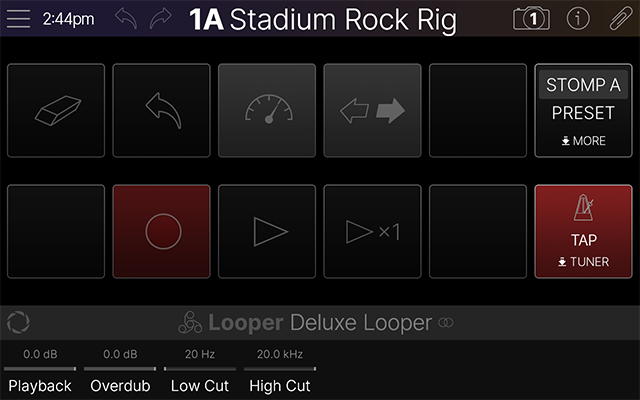
Deluxe Looper Footswitch Mode
Though not selectable via the FS6 MODE switch or More Mode, the Deluxe Looper has its own special footswitch mode. When a Deluxe Looper is added to your preset, just as when adding any other effect model, a Stomp switch assignment is automatically created. Press the Deluxe Looper stomp, and looper-specific functions appear on footswitches 1~4 and 8~10. See Deluxe Looper for more info.
Note: 1 Switch and Shuffling Looper blocks do not utilize a special Looper Footswitch mode—they perform all functions from their single Stomp footswitch.
Preset Mode
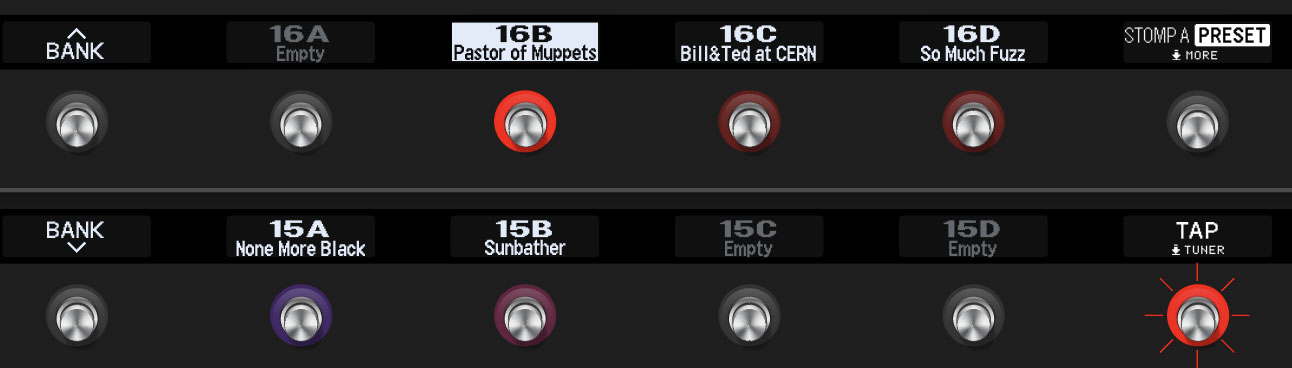
As its name suggests, in this mode, the switches are assigned to the current Factory, User, or Setlist folder’s presets, organized by Bank. Press FS1 (Bank Up) to display and cue the next two banks of presets A~D, and FS7 (Bank Down) to display and cue the previous two banks. Then press the desired preset switch to load it.
Tip: Press FS1 and FS7 together and immediately release them to jump to Snapshot mode. You can also select Snapshot mode by holding FS6 (MODE) and pressing the SNAPSHOT switch.
Note: The Snapshot Footswitch mode behavior can be changed via Global Settings > Switches/Pedals > Snapshot Mode Return. When set to Manual (the default), the switches remain in Snapshot mode unless you press both FS1 and FS7 again to manually return to Preset mode. When set to Automatic, pressing a snapshot switch automatically returns to Preset Mode.
-
While in Preset, Snapshot, or Combo mode, press and hold FS1 and FS7 together to change them to Bank up/down, Preset up/down, Snapshot up/down, Song up/down, or Marker up/down switches. This can also be set from Global Settings > Switches/Pedals > Up/Down Switches.
-
When set to Song Up/Down, FS1 and FS7 cue the next/previous song in the current playlist.
-
When set to Marker Up/Down, FS1 and FS7 cue the next/previous marker in the current song.
-
-
If the USER PRESETS folder (or any Setlist) contains no presets, the preset switch scribbles appear dim and are named “Empty.”
-
Press the currently lit Preset switch to reload the last saved version of the preset. (Note that this will clear any edited settings.)
Snapshot Mode
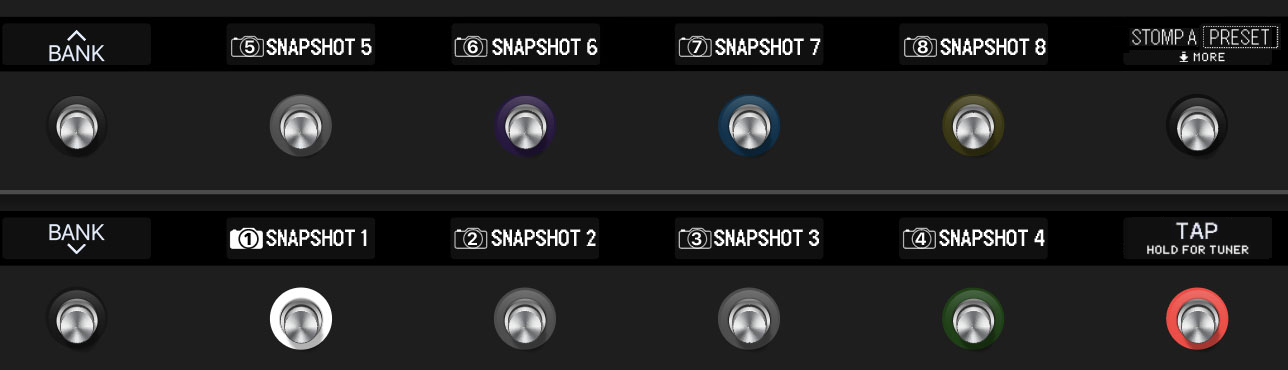

To enter Snapshot mode, press and hold FS6 (MODE) to enter More mode and then press the SNAPSHOT switch. Alternatively, press FS1 and FS7 together from Preset or Combo mode. Please see Snapshots for details about their many useful functions.
-
From Snapshot mode, press any switch, FS2~FS5 or FS8~FS11, to load one of the current preset’s snapshots.
Note: The behavior once a preset is loaded while in Snapshot mode can be changed via the Global Settings > Switches/Pedals > Snapshot Mode Return parameter. When set to Manual (the default), the switches remain in Preset mode, unless you press both FS1 and FS7 again to manually return to Snapshot Mode. When set to Automatic, switches FS2~FS5 and FS8~FS11 auto-return to Snapshot Mode immediately once a Snapshot footswitch is pressed.
Note: The behavior when pressing the currently active snapshot switch a second time can be changed via the Global Settings > Switches/Pedals > Snapshot Reselect parameter. When set to Reload (the default), pressing the active snapshot switch reloads it. When set to Toggle Prev, pressing the active snapshot switch toggles between it and the previously active snapshot; this can be helpful if you want to quickly jump back and forth between two snapshots from a single switch.
Ti: To quickly swap the locations of two Snapshots, touch and hold both Snapshot switches together—see Stadium’s Capacitive Touch functionality.
Combo Mode
Combo Mode lets you combine two different footswitch modes (Stomp A, Stomp B, Preset, or Snapshot) into one, along with Up and Down switches on FS1 and FS7. To enter Combo mode, press and hold FS6 (MODE) to enter More mode and then press the COMBO switch. By default, Preset switches appear on the top row, Snapshot switches appear on the bottom row, but this can be changed via Global Settings > Switches/Pedals > Combo Top Row and Combo Bottom Row.
Transport Mode
Transport mode is used to cue and play songs and markers on Helix Stadium’s Showcase automation and playback engine.* To enter Transport mode, press and hold FS6 (MODE) to enter More mode and then press the TRANSPORT switch.
*Note: Showcase features are still in development. For the latest details, please visit the Line 6 website’s Helix Stadium product page.