Helix Stadium comes loaded with a wide variety of Amp and Preamp models, including a set of Amps created with the all-new Line 6® Agoura™ modelling methodology, which sets a new benchmark for sonic detail and responsiveness—please see the introductory video below. Also included are classic, vintage, modern, special hybrid, and Line 6 Original Amps, with all the Amps and Preamps from the award-winning Helix family of multieffects.
The following information covers the use of Amp and Preamp blocks in Helix Stadium. Models often include some unique parameters, typically based on the controls found on the original gear modeled.
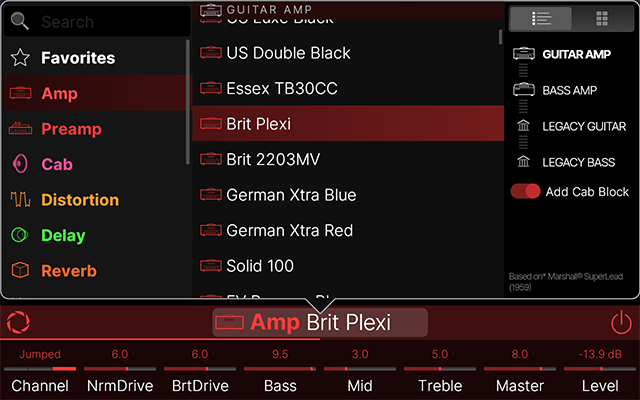
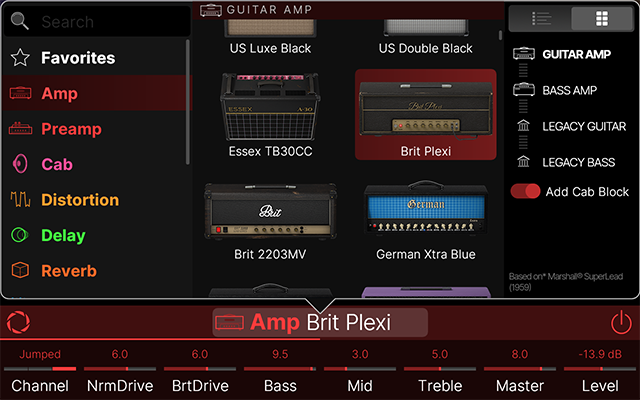
Selecting an Amp or Preamp
-
From the Home screen, tap an empty location on a path. Block categories appear in the inspector:

-
Tap the Amp or Preamp button to open the Model List. Tap the list view button

-
Swipe the list up or down (or turn the Lower Knob) to find the desired item.
-
Tap GUITAR AMP, BASS AMP, LEGACY GUITAR, or LEGACY BASS in the sidebar to quickly scroll the list up or down to that subcategory.
-
Tap the Add Cab Block toggle

-
-
Tap to select the item and press Home
*Note: The Cab block’s Amp > Cab Link toggle (found in the Cab’s Focus view sidebar) automatically selects a matching Cab model when the linked Amp model is changed, but only applies when a Cab block is added via the Add Cab Block toggle.
Amp Models
Amp models consist of the full amplifier, including its preamp, tone stack, and power amp components, expertly captured to preserve the amplifier's unique sonic signature and tonal range. An Amp model provides essentially the same experience as plugging into your favorite guitar or bass amplifier, to which you’ll want to connect a speaker cabinet or IR (Impulse Response) speaker simulator to complete your amp tone.
Agoura vs. HX Amps
Helix Stadium includes an ever-growing library of world-class amp models created with Line 6’s new Agoura™ modeling methodology. However, as Helix Stadium can import presets made with Helix Floor, Helix Rack, Helix LT, Helix Native, HX Effects, HX Stomp, and HX Stomp XL, it must also include the previous generation’s award-winning HX amp models. In the interest of ensuring users don’t dismiss HX amps as “last gen” or anything less than stellar-sounding, we’ve purposely made the delineation between Agoura and HX amps vague—While in list view, a faint gray line appears between the last Agoura amp and the first HX amp in both the GUITAR AMP and BASS AMP subcategories.
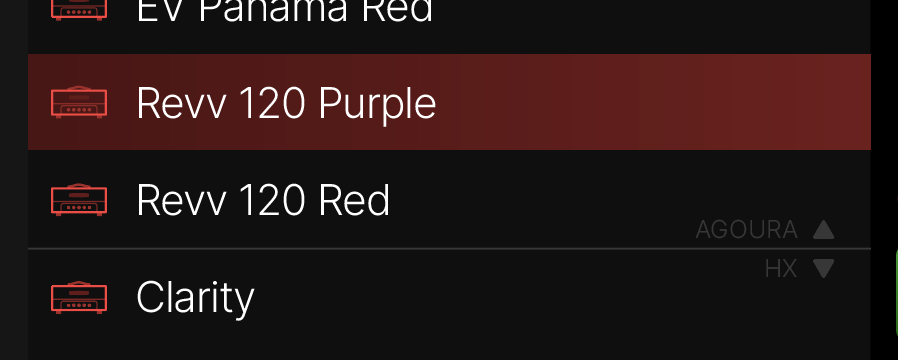
Legacy Amps
LEGACY GUITAR and LEGACY BASS amps (indicated with ![]()
Amps in the LEGACY GUITAR and LEGACY BASS are often the newest and best-sounding HX amps, and as a bonus, they use considerably less DSP than Agoura. So do not sleep on these!
Tip: For the complete, current lists of all Amp, Cab, and Effect Models included in Helix Stadium and the original gear on which they are based, please see Helix Stadium Models on the Line 6 website.
Preamp Models
As of this writing, all Preamp models in Helix Stadium are HX. They are captured from the preamp stage of the amplifier, which is typically where the majority of the tone-shaping and initial gain staging occur. A Preamp model can be a good choice when feeding your Helix Stadium output to an external power amp, and some even work great as drive circuits before full Amp blocks.
Note: Volume levels between the different preamp models can vary significantly. This is normal and true to the preamp circuits of the actual amplifiers modeled. Adjust the Preamp’s Drive and/or Volume controls to achieve your desired saturation and level output.
Amp and Preamp > Focus View
When an Amp or Preamp block is selected on the Home > Edit screen, tap the Focus icon ![]()
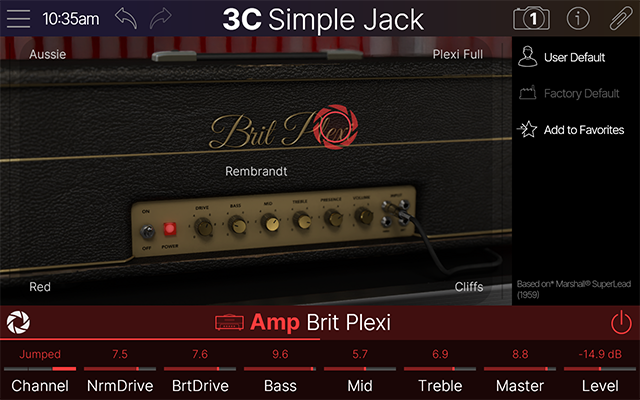
Common Amp and Preamp Parameters
Below are parameters available on numerous Amp models. Please note that you may occasionally see additional and slightly different parameters for certain amps. We typically include the same parameters as included on the original amps we model, along with their functions and sometimes quirky interactions, which can make classic amps special!
Tip: Tap any Amp or Preamp parameter in the Inspector to open its Parameter Panel, where you’ll find a handy description.
|
Parameter |
Description |
|---|---|
|
Bypass |
Tap Note: An Amp/Preamp block’s Bypass is not automatically assigned to a Stomp mode footswitch. But you can manually assign any Amp/Preamp block by selecting the block within the signal flow, touching a Stomp mode footswitch, and tapping Assign Block when prompted. |
|
Channel |
Many Agoura amps have two or more channels of the amp baked in, letting you freely change them with the knob, from an assigned Stomp switch, or via snapshots. |
|
Drive or Gain |
Adjusts the amount of gain applied to the signal, which influences the level of distortion. Use lower settings for cleaner tones and higher settings for added distortion and increased volume levels. |
|
Bass Mid Treble |
Adjusts the low, medium, and high frequency EQ of the tonestack, respectively. Note that some amps instead include only a simple Tone parameter and/or High Cut or Low Cut as alternative EQ parameters. Bass amp models often include Low Mid and High Mid controls rather than a single Mid knob. |
|
Level |
Controls the overall level of the Amp or Preamp block. Unlike the Master volume, it has no effect on the block’s tone. Tweaking an Amp block’s Level parameter is a helpful method of balancing apparent preset levels against one another. |
|
Presence |
Boosts the upper mid and high frequencies in the power amp, resulting in additional punch and bite and an overall brighter tone. |
|
Master |
Controls the Master Volume of the amplifier. This parameter is highly interactive with all other parameters—the lower the Master is set, the less effect the other controls will have. Different textures can be achieved using the Master volume in combination with the amp's Drive/Gain and Level. Higher Master settings typically result in more "power tube" type saturation, which can alter the amount of distortion and affect the amp’s "feel.” Amp models often have the Master turned up by default, because that’s where the real amp’s sweet spot is. However, tube amps are loud, so if you’re playing at bedroom volumes, of course, it won’t sound like a roaring full stack. Turn your playback system up! If you can’t (or aren’t allowed to) play at louder volumes, turn the Master down (if your model has one) to approximate your playback system’s level. |
|
Level |
Adjusts the amplifier's overall output volume. Unlike Drive, Gain, Volume, and Master Volume parameters, the Level adjusts the overall volume with minimum distortion or coloration. The Level can be used to balance the overall volume between presets. |
|
Sag |
Controls the amount of sag, or how much the power supply compresses or “droops” in response to striking the strings hard. Higher values provide more touch dynamics, sustain, and organic feel inherent in vintage tube amps; lower values offer a “tighter” responsiveness for a more modern feel. |
|
Hum |
Adjusts the level of power supply hum that interacts with the signal. Preamp tube heaters in tube amps will leak a bit of 60 cycle hum into the audio signal. When this hum mixes with the distorted audio signal, a non-musical distortion is created at low levels. To some players, this low-level, non-harmonic distortion adds a bit of realism to the amp model. |
|
Ripple |
Controls how much AC ripple interacts with your tone. Power amp circuits will sometimes let a little bit of rectified 120Hz hum (that the power supply filter caps can’t quite fully remove) into the audio signal when the power supply is being pushed hard. Much like Hum, Ripple provides a bit of non-musical distortion to the power amp at distorted settings. |
|
Bias |
Adjusts the bias of the power amp tubes, altering tonality and distortion characteristics. |
|
Bias X |
Short for “Bias Excursion.” Determines how the power amp tubes’ voicing reacts when pushed hard. Set low for a tighter feel. Set high for more tube compression. This parameter is highly reactive with the Drive/Gain and Master settings. |
|
Z PrePost |
Determines the location of speaker impedance characteristics in the power amp, primarily due to negative feedback. Higher values mean the effects of the interaction appear at the output of the power amp (Post) and lower values mean more of the effect is fed back to the input of the power amp (Pre). |
|
Hype |
The Stadium Agoura Amp models were designed as accurately as possible to sound like the original amplifiers they are based on. However, this may not always be optimal for every situation. For example, in cases where you might want to tighten the low end, smooth the high end, or achieve a more modern tone and feel. Depending on the amp and/or amp settings, increasing Hype may subtly or dramatically adjust various behind-the-scenes parameters to make the amp sound and feel smoother, fuller, punchier, tighter, and/or more forgiving, but at the expense of accuracy. See the following video for a quick demo. |
