Helix Stadium has a few different Loopers: Deluxe, 1 Switch, and Shuffling Looper, each of which is available in Mono and Stereo versions. A Looper block can exist anywhere on either Path 1 or Path 2—one Looper block per preset, maximum. The Looper records to Stadium’s internal memory, with the following maximum loop recording times.
|
Looper Model |
Maximum Loop Time (Full Speed) |
Maximum Loop Time (Half Speed) |
|---|---|---|
|
Deluxe Looper (Mono) |
120 seconds |
240 seconds |
|
1 Switch Looper (Mono) |
120 seconds |
240 seconds |
|
Shuffling Looper (Mono) |
60 seconds |
n/a |
|
Deluxe Looper (Stereo) |
60 seconds |
120 seconds |
|
1 Switch Looper (Stereo) |
60 seconds |
120 seconds |
|
Shuffling Looper (Stereo) |
30 seconds |
n/a |
Important! If you load a different preset while looping, loop playback/recording will stop unless the preset you select next includes the same type of Looper block (the same Deluxe, 1 Switch, or Shuffling Looper type, and the same Mono or Stereo type), and the Looper block exists on the same path in both presets.
Your recorded loop is not saved with the preset and is cleared from memory once you power off your Stadium device.
Adding a Looper Block
-
From the Home > Edit screen, tap an empty area on a path where you want to add the Looper block. Categories appear in the inspector.
-
Press [>] (or swipe the category buttons) and tap the Looper category button. The Model List opens (see below).
-
Tap the desired item to load it. Alternatively, double-tap the desired item to load it and close the Model List.
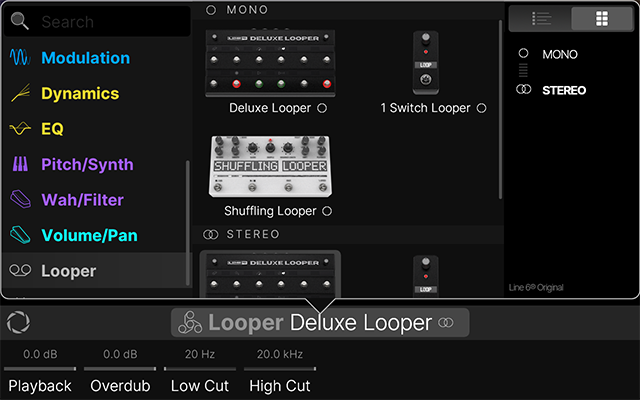
Note that Looper types are available as Mono or Stereo, selectable in the right sidebar. If stereo loop playback is not required, or if you’ll be placing mono blocks after the Looper in your signal flow, it is best to choose a mono Looper. Once the Looper block is added, a Stomp mode footswitch assignment is created to access the Looper (also see Footswitch Modes).
Please take a look at the section below for details on each Looper model type.
Tips: Command Center > Looper Commands allow you to customize your Stomp Mode footswitches further to easily trigger multiple Looper functions for a Looper block—see Looper Commands. You can also control the Looper remotely via MIDI—see MIDI CC.
Deluxe Looper
The Deluxe Looper utilizes a dedicated footswitch mode for full-featured control of loop recording and playback functions.
Tip: If you import a Helix/HX preset that includes a 6 Switch Looper block, its looper is automatically converted to a Deluxe Looper.
Deluxe Looper Parameters

Deluxe Looper Footswitch Mode
-
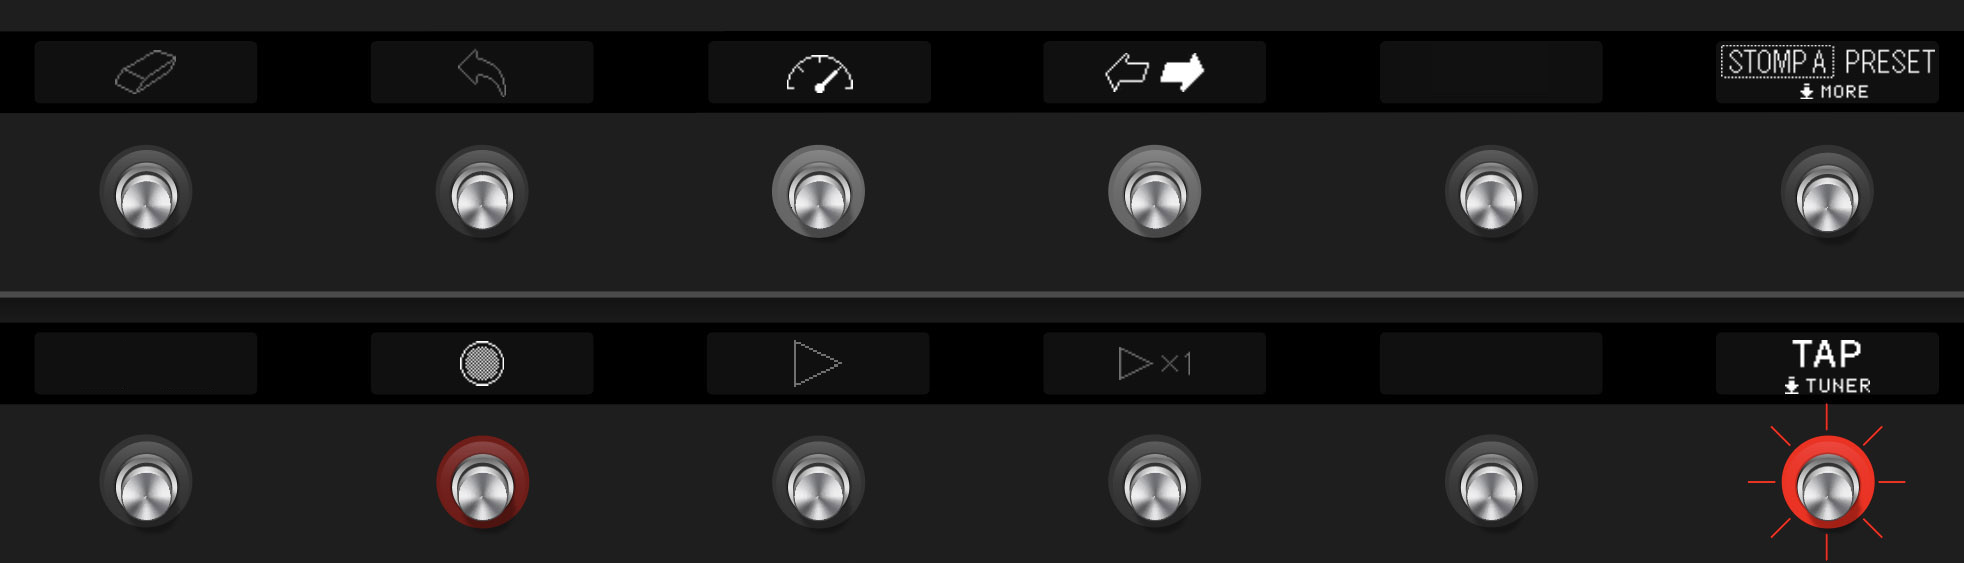
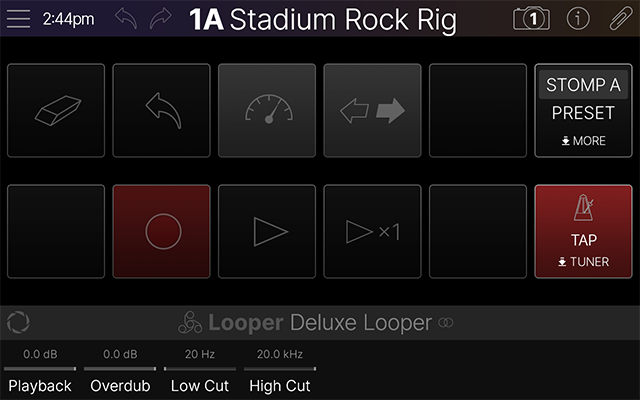
From Stomp A or Stomp B footswitch mode, press the Deluxe Looper switch. Deluxe Looper Footswitch mode appears (see below).
If no loop has yet been recorded (or the loop has been cleared), the device’s switch LED rings appear dark and its footswitch labels are dimmed. The Speed and Reverse switches can be "pre-engaged" prior to recording your loop if desired.
*Note: On Helix Stadium XL ![]()
Deluxe Looper - Simple Tutorial
To follow, we’ve provided a quick example for using the Deluxe Looper to get you up and going on the marvels of Looping. Of course, the number of possibilities for how you combine and utilize all the features is practically endless, but you’ll get the idea. For the following steps, we’re using all the factory default settings for the Looper parameters.
-
From Stomp A or Stomp B footswitch mode, press the Deluxe Looper switch. On Helix Stadium, press Home until you see Home > Play view.
-
Count yourself in and press FS8 (Record) on the downbeat of a measure to start recording.
-
Record four measures of chords or a riff for a rhythm, then press FS9 (Play/Stop) on the downbeat of what would be the fifth measure to stop recording. Your loop automatically exits recording and starts playing.
-
You’ve now recorded a loop that you can play along with to your heart’s content. Adjust the Playback parameter (Knob 1) to set the loop playback volume as desired. Go to the next step if you want to overdub some riffs on top of your loop.
-
-
Press FS9 (Play/Stop) to start loop playback. Once you’re ready for your big moment, step on FS8 (Overdub) as the loop plays to enter Overdub record mode and go wild for a solo for four bars.
-
If you’re really feeling fancy, you can keep the overdub running after the first loop cycle and record a second layer for a doubled solo.
-
-
Press FS9 (Play/Stop) at the end of your four bars to exit Overdub, and your loop will keep playing—now featuring both your rhythm and solo parts.
-
Keep repeating the last two steps to add additional overdub layers as desired.
-
If you mess up an overdub, press FS2 (Undo) once to delete the most recent overdub while retaining your original loop.
-
-
To delete the entire recorded loop, press FS1 (Clear).
Additional Deluxe Looper Tricks
-
Press FS3 (Half Speed) and you’ll hear the whole thing at half speed.
-
Press FS4 (Forward/Reverse) and you’ll hear everything playing backwards, and still at half speed.
-
As the loop plays, press FS8 (Overdub) and lay down some more guitar. Press FS9 (Play/Stop) to stop overdubbing and play the whole shebang, and then press FS4 (Forward/Reverse). Now the loop is playing forward again, and the last part you recorded is backward in relation to everything else.
-
Press FS3 (Half Speed) and playback returns to normal speed. You can imagine where a half hour of this kind of thing could get you.
-
At any time, press FS10 (Play 1x) to play the entire loop once from its start. Or, for fun, you can tap FS10 fast and repeatedly to keep re-triggering it for stuttered playback.
-
Remember that looping doesn’t need to be limited to guitar parts! Connect a mic and capture vocals or any type of instrument or noise you can think of to add to your loops.
1 Switch Looper
The 1 Switch Looper offers simplified Loop recording and playback, all from a single Stomp mode switch.
-
Add a 1 Switch Looper block to your preset. If not already assigned, assign it to a Stomp mode switch.
-
Press the 1 Switch Looper switch. The LED lights red, indicating the loop is recording.
-
Press the 1 Switch Looper switch again. The LED lights green, indicating the loop is playing back.
-
Press the 1 Switch Looper switch again. The LED lights amber, indicating the loop is in overdub mode. Subsequent presses of the switch toggle between play and overdub mode.
-
While the Looper is in play or overdub mode, press and hold the switch for 1 second. The most recent recording is undone. Holding the switch again will redo the recording.
-
Quickly double-press the 1 Switch Looper switch. Playback/recording stops, and the LED lights white, indicating a loop is in memory.
-
While Looper playback/recording is stopped, press and hold the switch for 1 second. The most recent recording is deleted, and the LED lights dim white.
Tip: Intended to be quick and simple, the 1 Switch Looper offers fewer functions via its single switch than the Deluxe Looper (such as 1/2 Speed, Reverse, etc.). However, all the functions available for the Deluxe Looper can also be accessed by assigning Command Center > Looper commands to Stomp switches. As long as the current preset includes a Looper block of any type, Looper command switches will control the looper. This effectively lets you create a “custom” layout of Looper switches within Stomp A and/or Stomp B footswitch modes. See Command Center - Looper Commands.
1 Switch Looper Parameters

Shuffling Looper
The Shuffling Looper is a distinctly different animal from the other Loopers. Part looper, part sampler, part performance instrument—the Shuffling Looper chops up your recorded loop, randomizes the slices, and gives you control over reordering, octave shifting, reversing, repeating, and more.
Before starting, select the Shuffling Looper block within the Home > Edit screen and observe and adjust the Looper parameters as desired (see the following table of Shuffling Looper parameter descriptions).
-
Add a Shuffling Looper block to your preset. If not already assigned, assign it to a Stomp mode switch.
-
Turn Knob 1 (Slices) to set the number of slices your loop will be chopped into.
-
Press the switch to begin recording. The LED lights red, indicating the loop is recording.
-
When done recording your loop, press the switch. The LED lights green, and the sliced loop sequence starts playing immediately.
-
During playback, adjust the Shuffling Looper knobs. See Shuffling Looper Parameters below.
-
Want to change it up? While the loop is playing, press the switch to randomize its slice sequence.
-
Quickly double-press the Looper switch. Playback/recording stops, and the LED lights white, indicating a loop is in memory. Press again to restart.
-
While the loop is playing or stopped, press and hold the switch. The recording is deleted, and the LED lights dim white.
Tip: Try assigning an expression pedal to the Shuffling Looper parameters for even more creative control!
Shuffling Looper Parameters
