The 8-inch color touchscreen is your primary portal to creating presets and songs in Helix Stadium. The Home View is the main screen for building and editing your presets. Additional screens, including the Main Menu, Matrix Mixer, Tuner, Preset Info, Preset Clip, and Global EQ are covered in the following subpages.
If you ever get lost, press the Home button to return to the main Home > Edit screen.
*Important! One fundamental difference between Helix Stadium XL and Helix Stadium is how footswitch labels are displayed on the device. On Stadium XL , footswitch labels are displayed on the device’s Scribble Strips. On Helix Stadium, footswitch labels are displayed on the Home > Play screen for each footswitch mode.
Both the Stadium XL and Stadium device types offer the same Home > Edit screen. On Helix Stadium, press the Home button to toggle between Home > Edit and Home > Play views. Please refer to the following Home > Play section for details.
Home > Edit
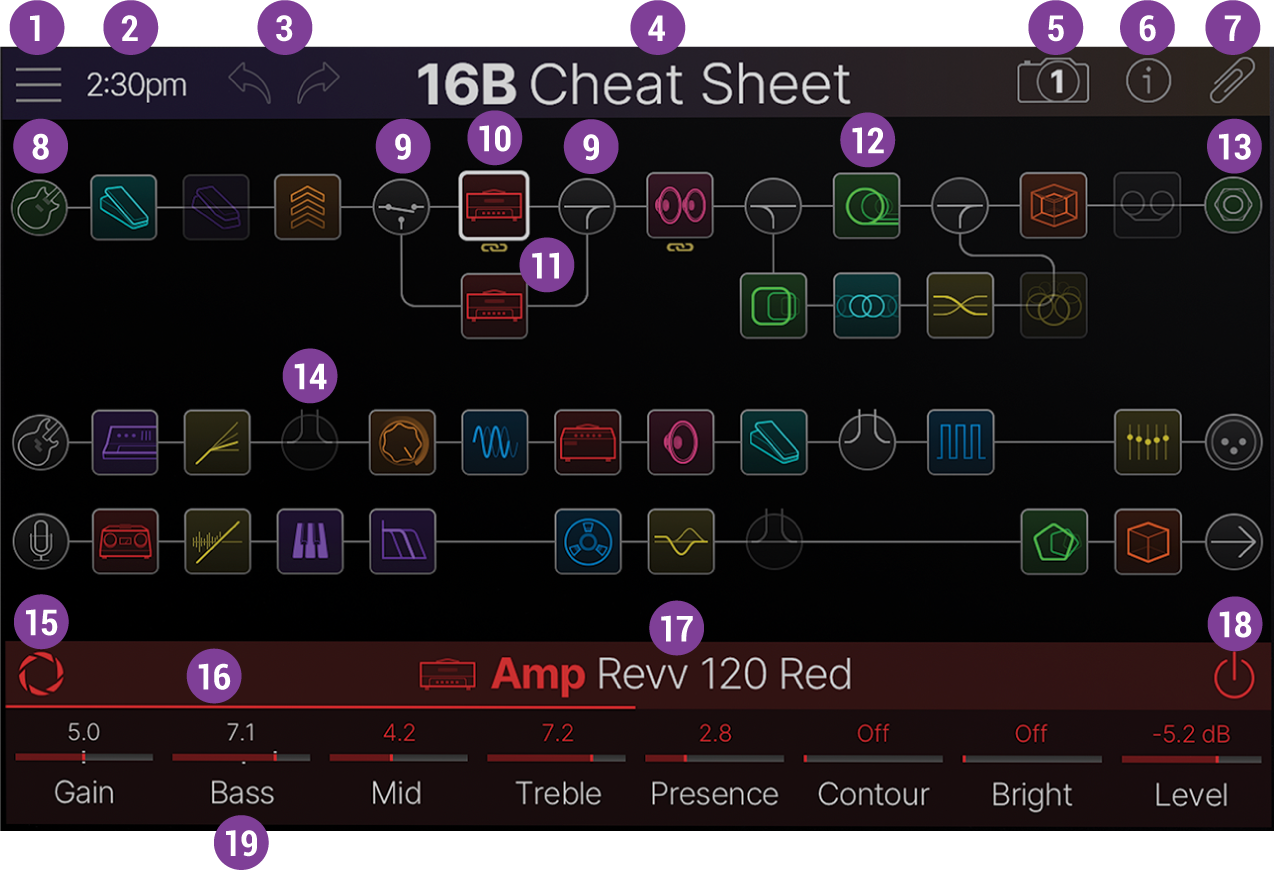
The Home > Edit screen features the main signal flow display, where you can add and arrange blocks, edit block parameters, and configure routing. Be sure to check out the Creating and Editing Tones and other linked pages below for additional details.
Home > Edit view
Tip: You can adjust the main display’s brightness from Global Settings > Displays > Main LCD Brightness. 😎
Main Menu: Tap to open the Main Menu. Here you can choose from several common commands or screens, such as creating a new preset, opening the Bypass/Control, Global Settings, Command Center screens, and more. Please refer to the Main Menu page.
Clock/Stopwatch: Tap to open the Clock/Stopwatch panel to adjust the clock settings and start/stop/reset the stopwatch.
Undo/Redo: Tap the left arrow to undo the most recent edit. Tap the right arrow to redo the most recent edit.
Preset Number/Name: The current preset’s bank/preset number and name are displayed here. Tap to open the Preset List.
Snapshot Panel: Tap the Snapshot button to open the Snapshot panel where you can select any of the current preset’s snapshots 1~8, as well as manage them. See Snapshots for details.
Preset Info: Tap to open the Preset Info panel. All factory presets include tips on how to use them best. Freely type in info for your own presets, like guitar/pickup/playback system used, creative controller assignments, tips/tricks, self-affirming platitudes, taco recipes, etc. See Preset Info for details.
Preset Clip: For factory presets, tap to open the Preset Clip panel. Every factory preset includes a unique dry guitar or bass riff so you can hear it in context; also known as the “Ohhh, I’ve been chugging with 7-string EMGs through a country preset designed for a single coil Tele. That’s why I thought this preset sucked” feature. See Preset Clipfor details.
Input Block: Each signal flow path includes an Input block at the left, which you can tap to select its source input (Instrument, Mic, Return, etc.). The input block turns green when an input signal is received and red when the input is too high, causing clipping.
Split and Merge Blocks: A Split block can be added within Path 1A or Path 2A to create a parallel “B” split signal path. A Merge block can be added to the right of a Split block to return the parallel B path back to the A path, as shown above. Also see Input, Output, and Mix blocks.
Tip: Split and Merge blocks open up a huge range of possibilities for various signal flow configurations. Please see Signal Path Routing.
Selected Block: Tap any Amp, Cab, Effect, Input, Output, Split, or Merge block to select it; its border appears with a thick white outline and its parameters appear in the Inspector along the bottom of the screen. In the above image, the Amp block is the currently selected block. When you tap the currently selected block, its Action panel appears, offering options such as Copy, Paste, Assign to Switch, and more. Also, see The Blocks pages.
Link Indicator: The gold “link” icon is displayed below an Amp and Cab block (when selected) to indicate that the Cab’s Amp>Cab Link option is enabled, where the Cab block automatically loads a matching speaker cab whenever the Amp block’s model changes. Amp>Cab Link is enabled by default but can be turned off from the Cab’s Focus View.
Effect Block: An Effect Block can be added to any path, and its model can be selected from any effect model category.
Output Block: Each signal flow path includes an Output Block at the right end. The Output block turns green when the path’s signal is received and red when the level is too high, causing clipping.
FX Loop Block:FX Loop Blocks let you dynamically insert your favorite external stompboxes (or rack effects) into any location in your tone.
Focus View: Tap to open the block’s Focus View. Focus view varies depending on the selected item. For example, when an amp or effect block is selected, its Focus view lets you slide your finger around the screen to morph between five distinctly different variations of that amp or effect. When a Cab block is selected, its Focus view lets you drag the mic’s position relative to the speaker. When an EQ > Parametric, Tilt, 10 Band Graphic, or Cali Q Graphic block is selected, its Focus view lets you slide EQ bands around the screen.
Inspector: The Inspector displays parameters for the currently selected block that correspond with the knobs below the display. Blocks with more than eight parameters will have multiple pages of parameters. Swipe the Inspector left or right, or press Page Left or Page Right for more parameters. The thin line above the parameters indicates the current page.
Model Name: Tap the model name to open the Model List, where you can browse, audition, and select a model for the block. Alternatively, turn the lower knob to scroll through available items for the selected block.
Block Bypass: Tap to bypass and enable the selected block, independent of its assigned stomp footswitch.
Parameter: If the parameter is assigned to a controller or snapshot, small white nodes indicate the controller’s minimum and maximum range values. Tap any parameter in the Inspector to open its Parameter panel. This enables touch control of the parameter value, numerical entry, min/max controller adjustment, shortcuts, and even tells you what the parameter does. Also, see Creating and Editing Tones.
Shortcut: Tap and hold anywhere within the Inspector to toggle between the main Home > Edit screen and the Bypass/Control screen.
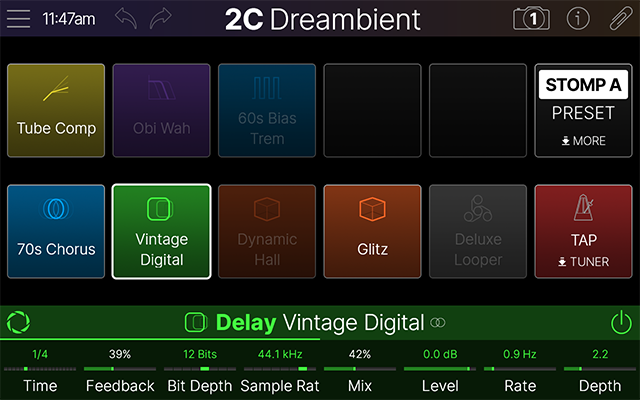
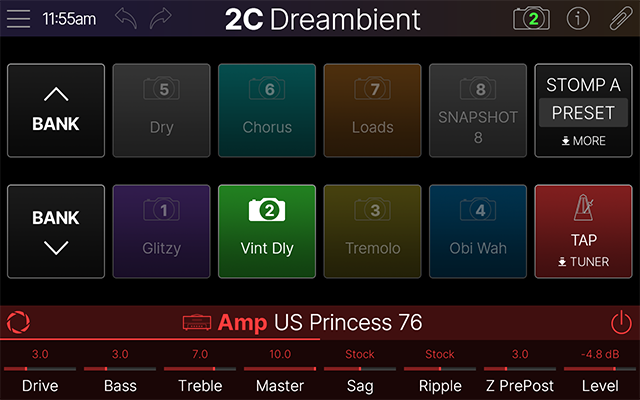
Home > Play View (Helix Stadium Only)
Because it’s missing Helix Stadium XL’s scribble strip OLEDs above each footswitch, Helix Stadium includes Home > Play view to display footswitch labels on the main display, as shown below. Press the Home button to toggle between Home > Edit and Home > Play views. Please refer to the Footswitch Modes section for details.
Stomp A Footswitch mode
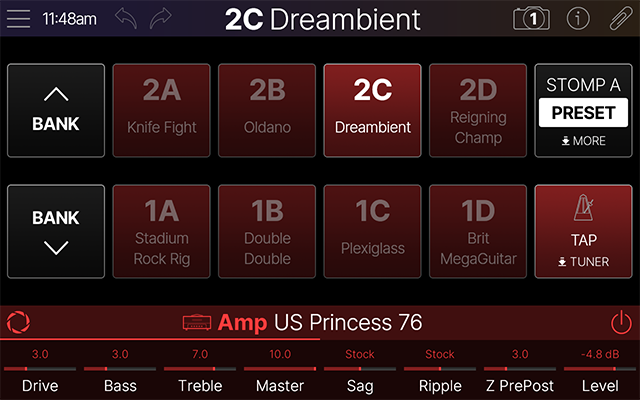
Preset Footswitch mode
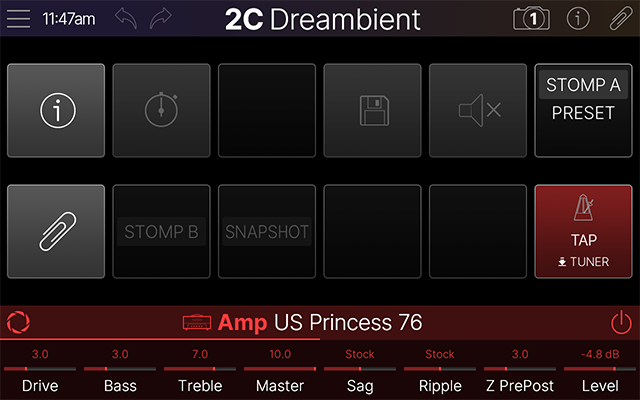
More Footswitch mode
Snapshot Footswitch mode
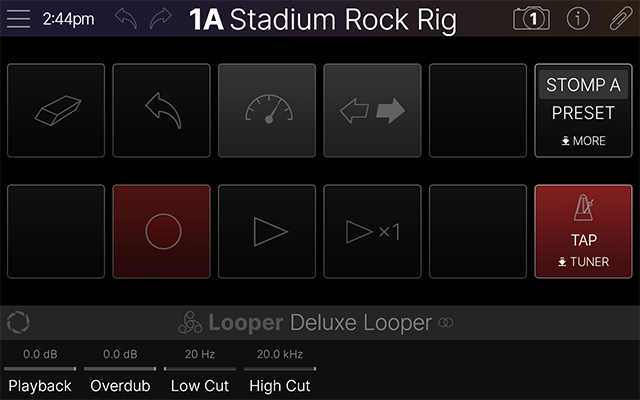
Deluxe Looper mode
The Song View Screen
Note: The Song View features are still in development and will be available in a future firmware update for Helix Stadium. For the latest details, please visit the Line 6 website’s Helix Stadium product page.