Helix Stadium’s Home View - Edit screen allows you to quickly and easily construct all types of signal routing configurations, many of which would be very difficult, if not impossible, to create with an old-school pedalboard, cables, and splitter boxes! Here, we show you how to utilize mono and stereo, Split and Merge, and Input & Output block settings for various routing configurations. Check out the following video for an introduction to the many Signal Flow features.
Block Order and Stereo Imaging
First, it is helpful to understand how mono and stereo routings work in the Helix Stadium environment. Most Stadium’s Effect models have selectable Mono and Stereo subcategory versions (as well as Legacy subcategory versions—more about these below). When an Effect block is selected, its model type is indicated by the symbol to the right of the model name at the top of the Inspector: Mono ![]()
![]()
-
All Paths in the Home View screen include two audio channels (left and right) from Input to Output.
-
Even if you mix mono and stereo blocks on a Path, both audio channels are processed, allowing you to follow a mono effect with a stereo effect and achieve a stereo output from the Path.
-
If you add a Split block to create parallel Paths, each parallel Path (e.g., 1A and 1B) still includes two audio channels, allowing you to use mono or stereo blocks on either.
-
If you connect only the L/MONO jack of Stadium’s 1/4” or XLR Output pairs, your signal is collapsed to mono at the output.
-
-
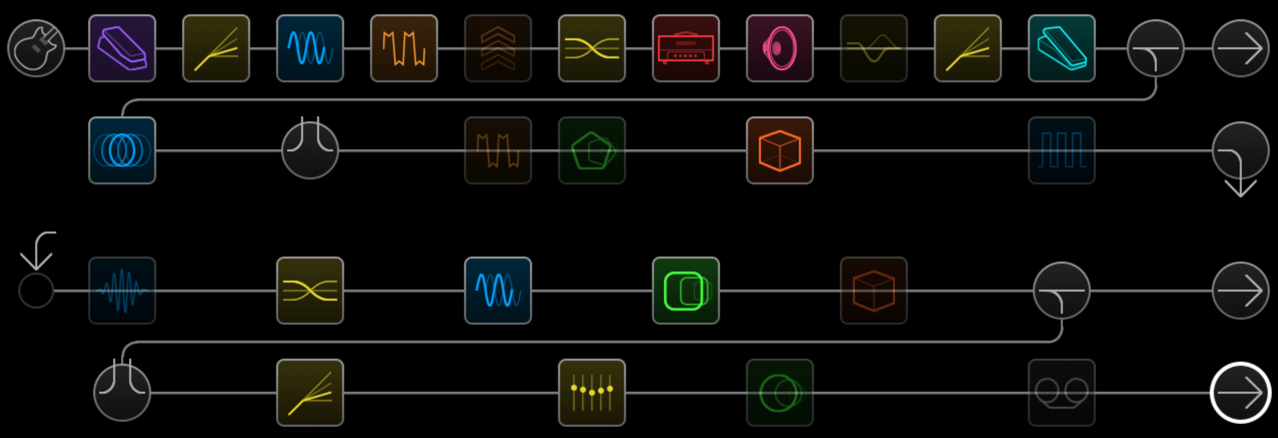
All Amp, Preamp, and Poly effects blocks are mono-only, so any stereo signal sent into these block types will be collapsed to mono. As such, it’s a good idea to add only mono blocks before these mono-only blocks on the same Path. For example, the following simple tone is created using mono effects before the amp (a mono Wah and Distortion), which are fed into an Amp and Cab. After the cab, stereo effects (stereo Modulation, Delay, and Reverb) are used to create a stereo output at the Output block.

-
Adding a mono effect block will collapse any preceding stereo signal on the same Path to mono. For example, adding a mono effect to the right of the Reverb in the above example would collapse the stereo Reverb block’s output to mono.
Note: Cab blocks are unique in that their internal signal routing differs depending on whether only one or both of their Cab slots are in use. Therefore, if you happen to place a stereo Effect block immediately before a Cab block, the following behaviors apply:
-
When only one slot is in use with a Cab model or IR, the block sums its incoming signal to mono input and offers stereo output.
-
When both slots are in use with Cab models or IRs, the block offers stereo input and stereo output.
-
For a full stereo tone, you can use all stereo effect models, add a Split block, and add an Amp, Preamp, and Cab on each of the split parallel paths. Use the Split block’s Pan settings to dial in your preferred stereo balance between the parallel Paths. See the following Routing Examples for more about this type of thing.
-
If you’re only ever connecting Helix Stadium to a single, external guitar amp, mono powered speaker, or P.A. system, there is really no need to use stereo models at all.
-
In addition to Mono and Stereo subcategory effect models, there are also Legacy effect models, which are indicated with the Legacy symbol

-
Legacy Distortion, Dynamics & Pitch/Synth effects are mono
-
Legacy Modulation & Delay effects vary in that some are mono, some stereo, and some mono-in/stereo-out. Adjusting the effect’s Mix parameter can narrow the stereo image that is fed into it.
-
Legacy Filter and Reverb effects are stereo.
-
Serial vs. Parallel Routing
For many tones, a simple serial (one stereo path) signal flow is more than adequate. A single path accommodates up to 12 blocks. For example, a (mono) Volume pedal, Wah pedal, Amp, Cab, (and stereo) Reverb, and Looper can be added to a single Path, and many gigs or even entire tours have been successfully completed with less! Of course, there is still room (and typically enough DSP resources) for also adding Distortion, Modulation, and Delay, and additional effects on a single, serial Path.

Tip: Note that several Preset Templates are already included, offering different signal path routing and input/output configurations to get you started creating your own presets. Please see Creating A New Preset for details.
Adding Split Paths
A split, parallel (two stereo Paths) signal flow can be used to create more sophisticated tones. This lets one split the signal into two stereo Paths, process them separately, and mix them back together. For this example, we’ll split our simple, serial Path tone to utilize a Reverb and Delay in parallel.
-
Tap the existing Reverb block and drag it downward until you see a Path B (the lower Path) appear, then drop the Amp block on the new Path B to move it there. You’ll see that this automatically adds a Split and Merge block, allowing Path B to split off and rejoin Path A (the upper Path).
-
Once Split and Merge blocks are added, they can optionally be dragged left and right on Path A to be repositioned as desired.
-

-
Tap in Path A between the Split and Merge blocks and select a stereo Delay from the Model List to add it there. Now you have the stereo Delay and Reverb in parallel, where each processes the incoming Amp signal separately and is blended back together before being sent to the Looper and output.

-
Optionally, tap the Split block and change to a different Split type, and/or adjust its Balance for routing to each Path A and B. Likewise, tap the Merge block and adjust its Pan for how the Path A and B stereo signals are blended back together.
Tip: In the above example, if you’re panning the Cab block’s settings and want to maintain the full Left/Right balance to be fed all the way through both Paths A and B, adjust the Split and Merge blocks' A and B Pan settings full Left and full Right.
-
Create Multiple Splits: Simply drag another existing block down to create an additional Split/Merge Path and add the desired blocks on Paths A and B to achieve the desired parallel and serial routing.
-
In this example, we’ve created one Split to use two different Distortions and a Dynamics block in parallel, then rejoined to go into an Amp and Cab, then into another Split to use Mod + Reverb and Delay blocks in parallel, rejoined to a common output.
-

Tip: You can also add Split or Merge blocks manually by tapping in the desired empty location on Path A and tapping the Split 

Merging Multiple Split Parallel Paths
If you’ve created more than one Split, parallel path, you can optionally “merge” them into one parallel path by dragging and dropping the Split block of the latter onto a position within the earlier path. (Or, if you clear the Split block, it will merge with the preceding split path to its left.) When prompted, tap YES to confirm.


Once you’ve got the hang of creating split, parallel paths, you can employ them for all types of useful configurations, as follows.
Use 2 Amp Blocks in Parallel
This allows you to use the Split and Merge parameters to blend just the right amount of each Amp. In this case, we’ve placed the Cab after the Merge block so that both amps' signals are fed to the same Cab (where you can use up to two Cab models or IRs and adjust their pan and other settings individually).

Create a 1 into 2 Routing
Add an Amp, Cab, and desired effects on Paths A and B, tap and drag the Merge block of an existing split Path downward to give Path B its own separate Output block. In the following example, your single source input enters a Volume and Wah, then is split into two completely separate Amp, Cab, and Effect chains, each with the ability to send to two different external outputs.

Create a 2 into 1 Routing
Add an Amp, Cab, and desired effects on Paths A and B, tap and drag the Split block of an existing split Path down to Path B to give it its own individual Input block. In the following example, your two source inputs (an Instrument for Path A and Return for Path B) each have their own “pre” Effects, Amp, and Cab, and are then rejoined and fed into a Delay, Reverb, and single stereo Output block.

Create Two Independent Parallel Paths
Expanding on the previous configurations, you can drag both the Split and Merge blocks of an existing split Path down to Path B to create two independent parallel Paths. (Or, if you clear the existing Split and Merge blocks, they will convert to Path B Input and Output blocks, respectively.) This allows you to optionally set each Input block to a different source (Instrument, Mic, Return, etc.) and to individual Output block destinations.

Note: Using two Amp blocks, plus Effects, can quickly consume the available DSP for Path 1. But remember, this is only half of your tone. You still have Paths 2A and 2B to play with! See the next section.
To delete the entire Path B, double-tap on either the Path B Input or Output block and select Clear Block. This will delete the entire Path B and all its blocks.
Create Multiple Input Paths
Another benefit of creating true parallel paths is that it provides up to 4 individual signal flows, each with its own input source. For example, the following configuration includes an Instrument 1 input on Path 1A for a guitar, an Instrument 2 input for a bass ( ![]()
Tip: Use the included “Gtr+Bass+Vox+Keys” template for a new preset, preconfigured with multiple input paths and blocks—see Creating A New Preset.

Serial Path Routing
As mentioned at the start of this page, a single path offers 12 block locations. But if the 12 blocks are not enough, you can extend to path B to create a single, large “super serial” path, doubling the capacity to 24 block locations.
-
Add a Split and Merge block to Path 1A.
-
Tap and drag the Merge block down to Path 1B. A duplicate Output block is created.
-
Move the Split block to the right so that it is the last processing block on Path 1A.
-
Select the Output block on Path 1A and turn Knob 2 (Level) all the way down. That way, you’re only hearing Output 1B.
Now you can add up to 11 blocks on Path 1A (the Split block uses one block location) and up to 12 more blocks on Path 1B (DSP resources permitting).

Combining Paths 1 and 2
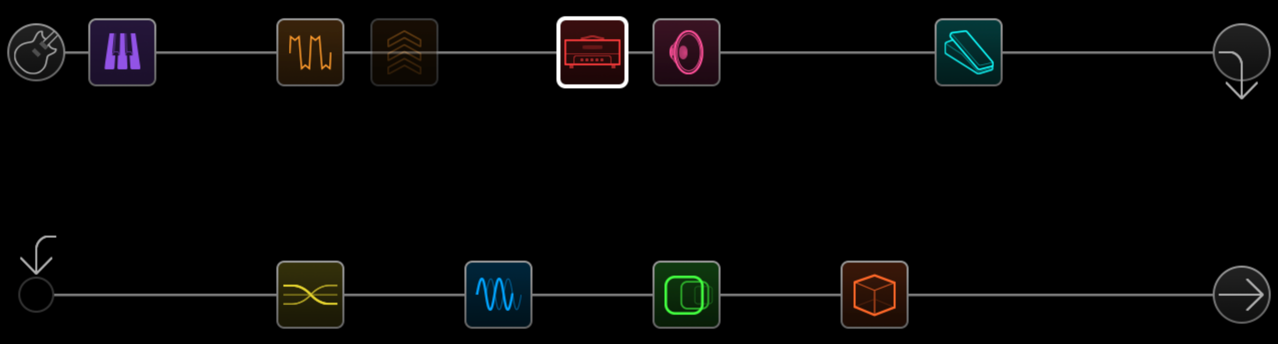
A very useful serial configuration is to add your “pre” Effects, Amp, and Cab on Path 1 and all “post” Effects on Path 2. This setup typically balances the DSP usage across the two Paths, allowing you to use many combinations of models on each before running out of available DSP.
In the following example, an Instrument input is fed into Path 1A’s Pitch Shifter, Distortion, Boost, Amp, Cab, and Volume pedal, with the Path 1 output set to Path 2A to be further processed by an EQ, Modulation, Delay, and Reverb, and to the Path 2A stereo output block.
Of course, if this still isn’t enough, you could always duplicate the above Super Serial routing on both Paths 1 and 2 and route Path 1B’s output block to Path 2A for one gigantic serial tone with up to a whopping 48 block location capacity (DSP resources permitting).
Tip: Use the included “Super Serial” template for a new preset, preconfigured with combined paths and blocks—see Creating A New Preset.