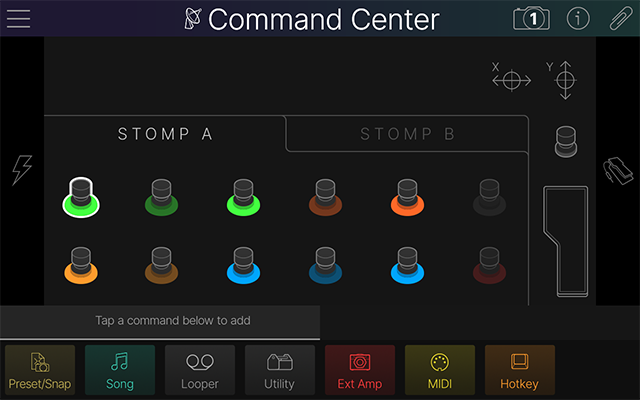
Helix Stadium also just so happens to be a world-class master remote control for your entire touring or studio rig. Any of its Stomp A and B footswitches (onboard or externally-connected), expression pedals (onboard or externally-connected), external triggers or contact microphones, or even its XY controller can be used to send a variety of messages to external gear—or even Helix Stadium itself! The source determines the type of available messages and includes:
-
MIDI CCs to change the presets in external effects pedals, guitar amps, synths, drum machines, or even other multieffects
-
MIDI notes to trigger the sounds in synths, keyboards, samplers, or drum modules
-
External Amp switching to change the channel or turn reverb on and off on a guitar or bass amplifier
-
QWERTY keystrokes over USB to control practically any software in your computer (example: sending a spacebar message to start and stop your DAW, Spotify, YouTube, etc.)
-
Custom preset or snapshot footswitch layouts on Stomp A and B modes, even alongside your blocks
-
Custom looper layouts on Stomp A and B modes, even alongside your blocks
-
Custom song transport layouts on Stomp A and B modes, even alongside your blocks
-
A handful of utility functions (such as Quicksave, Mute All, and Stopwatch Start/Stop/Reset) on Stomp A and B modes, even alongside your blocks
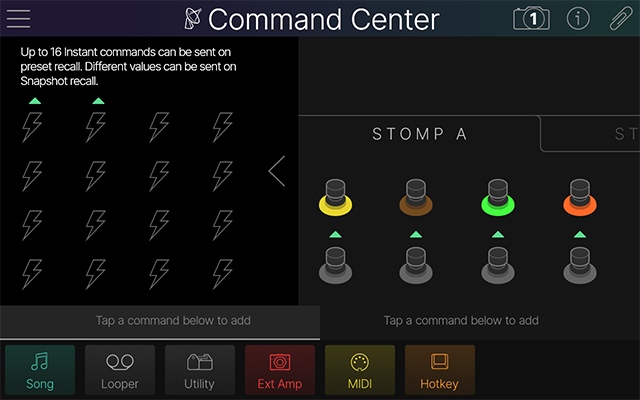
In addition, each preset has up to 16 “Instant 
Note: Due to the slight differences in available Expression and Control features between Helix Stadium XL ![]()
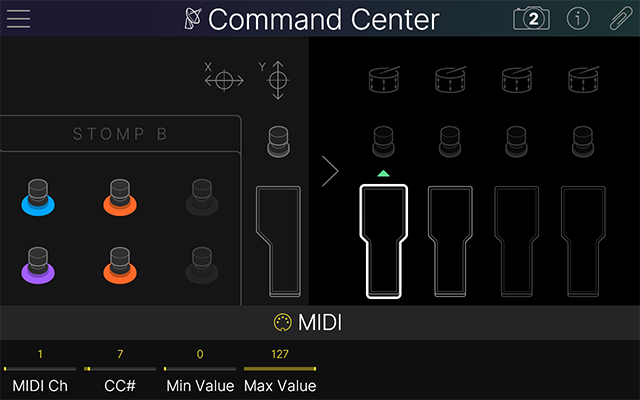
Assigning a Command
-
Tap the main Menu icon


-
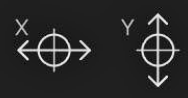
Tap the footswitch, pedal, or X or Y Controller axis


*Note: External triggers, switches, and expression pedals are only available if selected from Global Settings > Switches/Pedals > Control A (Tip), Control B (Ring), Control C (Tip), and/or Control D (Ring). By default, Control A (Tip) is set to EXP Pedal A, and Control B (Ring) is set to EXP Pedal B.
-
Tap a colored box in the inspector to choose the command type for the selected source (see below). The command’s parameters appear in the inspector.
-
Not all command sources can send the same types of commands
-
A turquoise triangle

-

-
Turn Knobs 1~8 to adjust the command’s settings.
-
Stomp A and B switches, the EXP toe switch, external switches, and triggers display two tabs in the inspector (below). To create a second command, tap the right tab and repeat steps 3 and 4 above.
-
Each of the two commands allows an Action (Action 1 and Action 2, respectively) to be assigned for the switch: Press, Release, Hold, or Toggle (or for triggers, Strike or Toggle).
-
If the first command's action is set to Toggle, the second is locked to Toggle and grayed out. This lets you configure something like a MIDI CC on/off assignment to a switch, where the same CC number is used for each message with two different CC values, such as 0 and 127.
-

Using the Parameter Panel
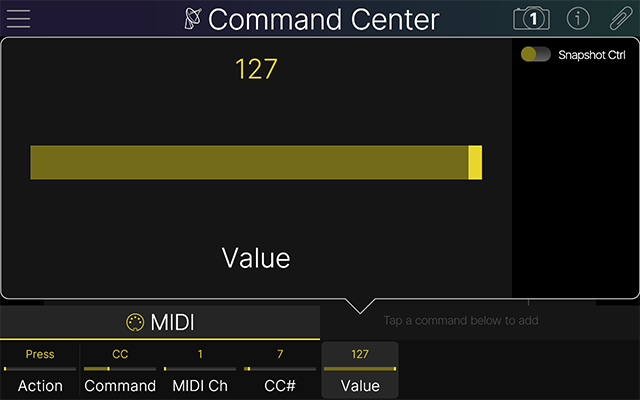
Once you’ve selected a command category, optionally tap directly on a controller parameter within the Inspector to open it within the Parameter panel for easy editing.
-
Snapshot Ctrl: Enable the switch to have the parameter’s value stored with the preset’s snapshots and sent when recalling snapshots—see the next section.
Snapshot Control of Commands
Just as block parameters on the home screen, command parameters can also be enabled for snapshot control. When enabling snapshot control for a command parameter, the value can change per snapshot. (Action and MIDI > Command parameters cannot be assigned).
By default, snapshot control of command parameters is disabled. To enable it:
-
To enable snapshot control of a command parameter, press and turn the parameter’s knob. Its value turns white (below left). Alternatively, tap the parameter to open the parameter panel, and in the sidebar, tap the Snapshot Ctrl toggle

Note: An Instant
Source Controller Types
The type of available messages is determined by the source. Also see the Commands section below.
|
Controller |
Supported Commands |
Notes |
|---|---|---|

Stomp A and Stomp B switches |
Support assignment of all command types. Up to two commands can be assigned per Stomp switch. Note: Command Center assignments cannot be made to FS6 (Mode) or F12 (TAP). |
These are the physical footswitches on your Stadium device. Assignments can be made on both the Stomp A and Stomp B mode switches. |

Expression Pedals |
Support assignment of MIDI CC commands only. One command can be assigned per pedal. |
Helix Stadium XL Helix Stadium supports up to two external expression pedal controllers. Note that you’ll need to set the respective Global Settings > Switches/Pedals > Control A~D jack to “EXP In” for each connected pedal. |

Toe Switch - |
Supports assignment of all command types. Up to two commands can be assigned. |
This is the switch that is toggled via the Helix Stadium XL |

X-Axis and Y-Axis |
Support assignment of MIDI CC commands only. One command can be assigned for each of the X-Axis and Y-Axis controllers. |
These allow you to use the Stadium |
|
Instant 1~16 |
Support assignment of all command types except Preset/Snap and Utility. |
Instant Commands are transmitted automatically when a preset is recalled and, optionally, when a snapshot is recalled (assuming the parameter’s Snapshot Control is enabled in the Parameter Panel). |

External Stomp Switches A/B External C/D Switches - |
Support assignment of all command types. Up to two commands can be assigned per switch. |
Much like Stomp A and B Footswitches, external switches can be assigned to any Command Center commands. |

Triggers A/B Triggers C/D - |
Support assignment of all command types. Up to two commands can be assigned per switch. |
Typically used to send MIDI commands to trigger drum hits or sample playback, but can be assigned to two of any command types. |
Commands
Preset/Snap Commands
Preset/Snap commands are supported by all sources other than instant commands, expression pedals, and X/Y controllers, and are often used to map presets or snapshots to Stomp A and B switches.

-
When Preset or Snapshot type Commands are selected, additional options are available to choose the target Preset/Snapshot.
-
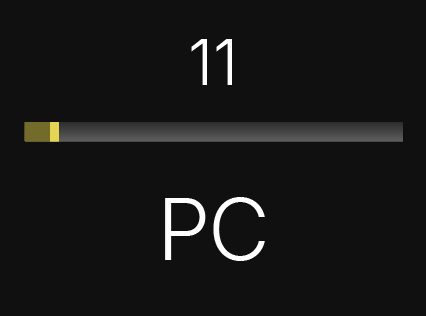
When the Preset command type is selected, you can choose the Setlist (via Knob 3) and the Preset within that Setlist (via Knob 4).
-
When the Snapshot command type is selected, you can choose the desired Snapshot via Knob 3.
-
When assigned to a Stomp A or B footswitch, the Stomp Mode footswitch label displays the preset’s or snapshot’s number and name.
-
Song Commands
Song Commands are still in development and will be available in a future firmware update for Helix Stadium. For the latest details, please visit the Line 6 website’s Helix Stadium product page.
Looper Commands
Looper commands are supported by all sources other than expression pedals and X/Y controllers and are often used to map Looper functions to Stomp A and B switches. Although from Instant commands, they can also be used to automatically engage a looper function when recalling a preset or snapshot.

Utility Commands
Utility commands are supported by all sources other than Instant commands, expression pedals, and X/Y controllers, and are often used to map select More mode functions to Stomp A and B switches.

Ext Amp Commands
Ext Amp commands are supported by all sources other than expression pedals and X/Y controllers and are used to change the channel or turn the reverb on and off in your external amp.
Note: Configuring an Ext Amp assignment also requires that the respective Global Settings > Switches/Pedals > Control A~D jack setting is set to “Ext Amp” to allow the jack to route the command signal out.

Important! Send Ext Amp commands only to amplifiers that utilize “short-to-sleeve” footswitch inputs. Connecting to any other sort of input could cause permanent damage to both your amp and Helix Stadium! If you’re unsure whether your amp has short-to-sleeve inputs, please contact the manufacturer.
Helix Stadium’s ability to control external amp channel, reverb, and/or tremolo switching has been tested with many popular amps and heads. Unfortunately, this does not guarantee compatibility with all products. Depending on the channel switching jack’s circuitry in the guitar amp used, the Ext Amp function may not operate as expected.
Click to show/hide External Amp Command settings....
|
Parameter |
Description |
|---|---|
|
Action |
Selects the action for which the switch’s assigned command is executed: On Press, on Release, when Holding the switch down, on the Strike of a trigger, or as a Toggle between two values. |
|
Select |
Selects the Stadium control output jack and conductor connection on which the Ext Amp toggle command is sent. Choose “Tip” or “Ring” to send the Ext Amp switch signal out only to this respective conductor of the TRS output jack. Choose the “A and B” (or “C and D” |
|
State |
Appears for Instant commands only. Determines whether recalling the preset (or, if snapshot control is enabled, recalling the snapshot) changes the state of the signal sent to the amp—open or close. |
|
Wait |
Appears for Instant commands only. Determines how long Helix Stadium waits after a preset recall (or if snapshot control is enabled, after a snapshot recall) before the command is sent. |
MIDI Commands
MIDI commands can be assigned to a source depending on the MIDI Command type selected (see Notes in the table below).
Note: By default, MIDI type Command Center messages are transmitted via the 5-pin MIDI OUT and USB MIDI OUT simultaneously. You can customize MIDI behaviors using the Global Settings > MIDI options.

Hotkey Commands
Hotkey commands are supported by all sources other than expression pedals and X/Y controllers. QWERTY hotkeys (computer keyboard shortcuts with or without modifiers, such as Shift, Control, Option/Alt, and Command) can be sent to your Mac, PC, or iOS device via USB, letting you control virtually any DAW, YouTube™, Spotify®, looping software, DJ software, lighting software, and more.
Hotkeys can be assigned to any Stomp A or B footswitch—or Instant command, where they’re automatically sent upon preset recall (or if assigned to snapshot control, snapshot recall). Although you can edit commands from Helix Stadium’s UI, it’s much easier to type in the hotkey keystrokes from the Helix Stadium app.

Command Center > Action Panel
-
On the Command Center screen, tap the selected source. Its Action Panel appears:

-
Copy Command: Copies the command (or for dual commands, both) to the clipboard for pasting onto a different source, even in a different preset.
-
Copy All Commands: Copies all commands in the preset to the clipboard. This is useful for opening a different preset and then using Paste All Commands to apply the full set of copied commands to it.
-
Paste Command/Paste All Commands: After you’ve used the Copy Command to copy an individual controller’s commands, select the desired target controller (within the same or different preset) and tap Paste Command. Note that only commands supported by the target controller can be pasted. After you’ve used the Copy All Commands to copy an entire preset’s set of Command Center assignments, load the desired target preset, select any controller within the Command Center window to display the Action panel again, and select Paste All Commands. All commands are pasted into the new preset.
Using Paste Command or Paste All Commands will overwrite existing assignments for the selected target controller(s).
-
Clear Command: Select any controller that includes one or two command assignments. If the controller contains two command assignments, tap the command’s Inspector tab for the assignment you wish to clear first. Tap the controller to display the Action panel, and tap Clear Command to remove the selected command assignment only. Repeat, if desired, to remove the remaining command.
-
Clear/Reset All: Clears all Command Center assignments from all sources in the current preset.
-
Label/Color: (Selectable for any Stomp A or B Footswitch controller.) Lets you relabel any Stomp A or B Stomp Footswitch Mode label and LED color. See the next section.
Customizing a Command’s Label and Color
Double-tap an assigned Stomp A or Stomp B controller within the Command Center screen to display the pop-up Action menu (see preceding section).* Here you can customize a Stomp Mode footswitch’s assignment label and/or LED ring color.
-
Tap the selected Stomp A or Stomp B source. The Action panel opens.
-
Tap Label/Color. A keyboard appears. Enter the new label.
-
Tap the desired color swatch. Auto matches the default color for the footswitch LED, and Off disables the LED.
-
When finished, tap
*Note: Preset/Snap, Looper, and Utility commands do not allow custom labels or colors.