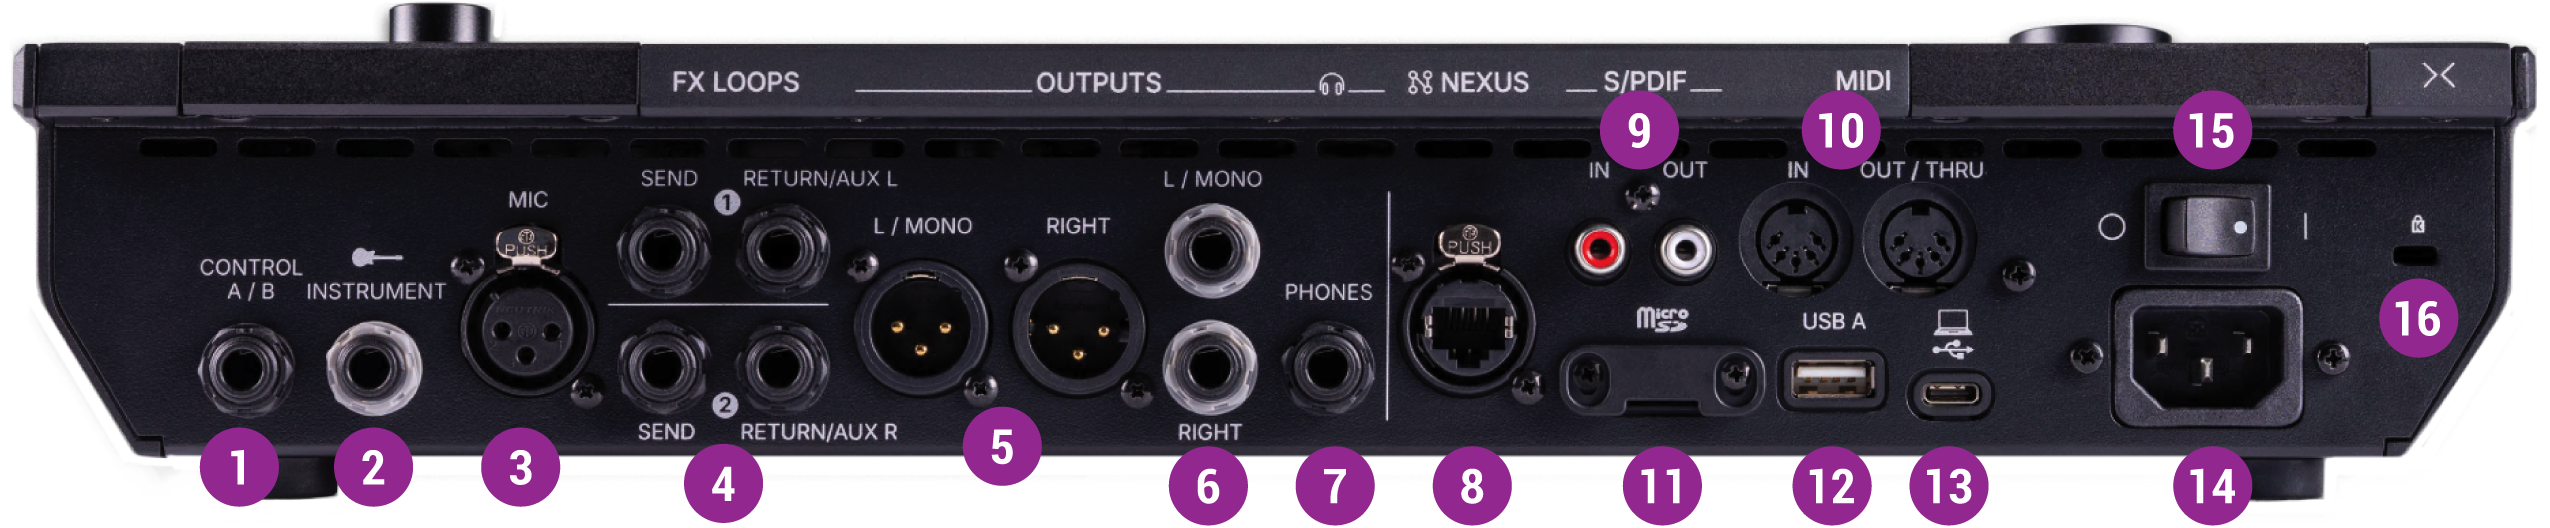
The rear panel of your Helix Stadium XL or Helix Stadium device is where all Input and Output connections are made for instruments, amplifiers, external effects, controllers, and more. All connections are described below.
Caution - It might get loud! Always turn the Volume for the respective output(s) counterclockwise to minimum before making connections to external gear and headphones to avoid encountering loud bursts of audio 🤯 . Exposure to high volume levels can potentially cause hearing damage or harm to your equipment.
The Rear Panel Connections
The Helix Stadium XL Rear Panel
The Helix Stadium Rear Panel
Tip: Refer to the following Setup Examples page for diagrams illustrating the connection of Helix Stadium in various configurations.
CONTROL A/B and CONTROL C/D: Connect any combination of up to four (Helix Stadium XL , using CONTROL A/B and CONTROL C/D) or two (Helix Stadium, using CONTROL A/B) expression pedals, external momentary footswitches, or drum triggers/percussion pads for control of parameters and functions. These jacks can also act as external amp control outputs. See Bypass/Controller Assignments.
INSTRUMENT INPUT(S): Connect your instrument(s) here. Use the Input Settings to configure Input Impedance, Pad, Trim, Noise Gate, and more.
Helix Stadium XL can connect two mono or one stereo instrument, with or without Stereo Link active. RETURN 1, 2, 3, and/or 4 can be used for additional instrument inputs.
Helix Stadium can connect one mono instrument, but its RETURN 1 and/or 2 can be used for additional instrument inputs.
MIC In: Plug your microphone in here for processing your vocals or recording to your computer via USB. This XLR jack provides 48V phantom power for studio condenser mics and a variable low cut filter. Phantom power and Mic Gain are both off by default, and are accessible via the Global Settings > Ins/Outs screen. Use the Mic Input Settings to adjust Trim, Low Cut, and Gate options.
FX LOOPS 1 & 2 and 3 & 4: These 1/4" ins and outs can be used as FX loops for inserting external stompboxes into your tone or as additional inputs and outputs for connecting keyboards, drum machines, mixers, and other gear. They can also be used to facilitate 4-Cable Method (or 7-Cable Method for stereo setups) with your favorite guitar or bass amplifiers.
RETURNS 1 & 2 on Helix Stadium, and Returns 3 & 4 on Stadium XL can be repurposed as always-on Aux Inputs to monitor the Front Of House mixer or other analog sources, unprocessed by the current preset. See Send, Return, and FX Loop Blocks.
XLR L/MONO and RIGHT Out: Use balanced XLR cables to connect to your studio gear, or the house mixer, PA, or FRFR speaker(s) when playing live. When using a mono playback system, connect only the LEFT/MONO XLR jack; Helix Stadium automatically sums both the left and right signals to the L/MONO output. Press the top panel XLR output button and turn the Volume knob to adjust.
1/4” L/MONO and RIGHT Out: Use 1/4" instrument cables to connect to your guitar amp, pedals, powered speaker, or other playback system. For mono signals, only connect the L/MONO out. Press the top panel 1/4” output button and turn the Volume knob to adjust.
PHONES Out: Connect stereo headphones here. Press the top panel Phones output button and turn the Volume knob to adjust.
NEXUS™: Connect one or more Line 6 Nexus peripherals (sold separately) for I/O expansion and control. Please check the Helix Stadium product page for release dates and availability.
S/PDIF IN and OUT: Connect 75-Ohm coax (RCA) cables here for digital connection with audio interfaces and other studio equipment.
MIDI IN and OUT/THRU: Connect 5-pin MIDI cables to send and receive MIDI Program Change, CC, Note, and other messages with external MIDI gear. Helix Stadium responds to MIDI for controlling most parameters and functions; see MIDIfor details. It can also act as a powerful MIDI controller—see Command Center.
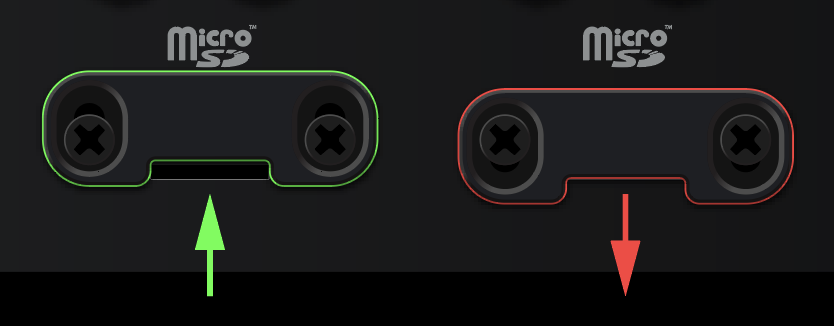
microSD™ Card: The included microSD card (under the security panel) is used for Song track playback, saving and restoring full state backups, and more. It can be swapped out for a larger capacity card, but new cards must be formatted before use; see microSD Card. To access the card:
Using a smaller Philips head screwdriver, slightly loosen the two screws (but don’t remove them!) and slide the panel up toward the S/PDIF jacks (below left).
Push the card in with your thumbnail and release; the card ejects a bit so you can grab it. Re-tighten the screws while the panel is in either position—unlocked (up) or locked (down).
microSD card security panel unlocked (left) and locked (right)
USB A: Connect a USB Ethernet-to-USB A adapter (sold separately) to connect to a network for internet access (as an alternative to using Stadium’s built-in Wi-Fi)—see Wi-Fi, Ethernet, and Bluetooth Connectivity.
USB-C®: Connect to a macOS or Windows computer to use Helix Stadium as a multi-in/out, 24-bit audio interface, with DI, re-amping, and MIDI functionality built right in.
AC In: Connect the included IEC cable to a grounded AC outlet to power the device. The included IEC cable includes a ferrite clamp.
Power Switch: Toggle the switch to the up position (Stadium XL) or right position (Stadium) to power the device on. It’s alive!
Security Lock: Connect a Kensington® security cable (sold separately) to secure Helix stadium to a heavy-duty stand, table leg, fire hydrant, large tree, or your neighbor’s pet giraffe. See kensington.com.