Helix Stadium
Breadcrumbs

The Song Screen

Important! If you haven’t yet loaded songs into Helix Stadium, read Creating a Song in the Helix Stadium App first!

  1. Press the Song The Song View button button. The Song screen appears.

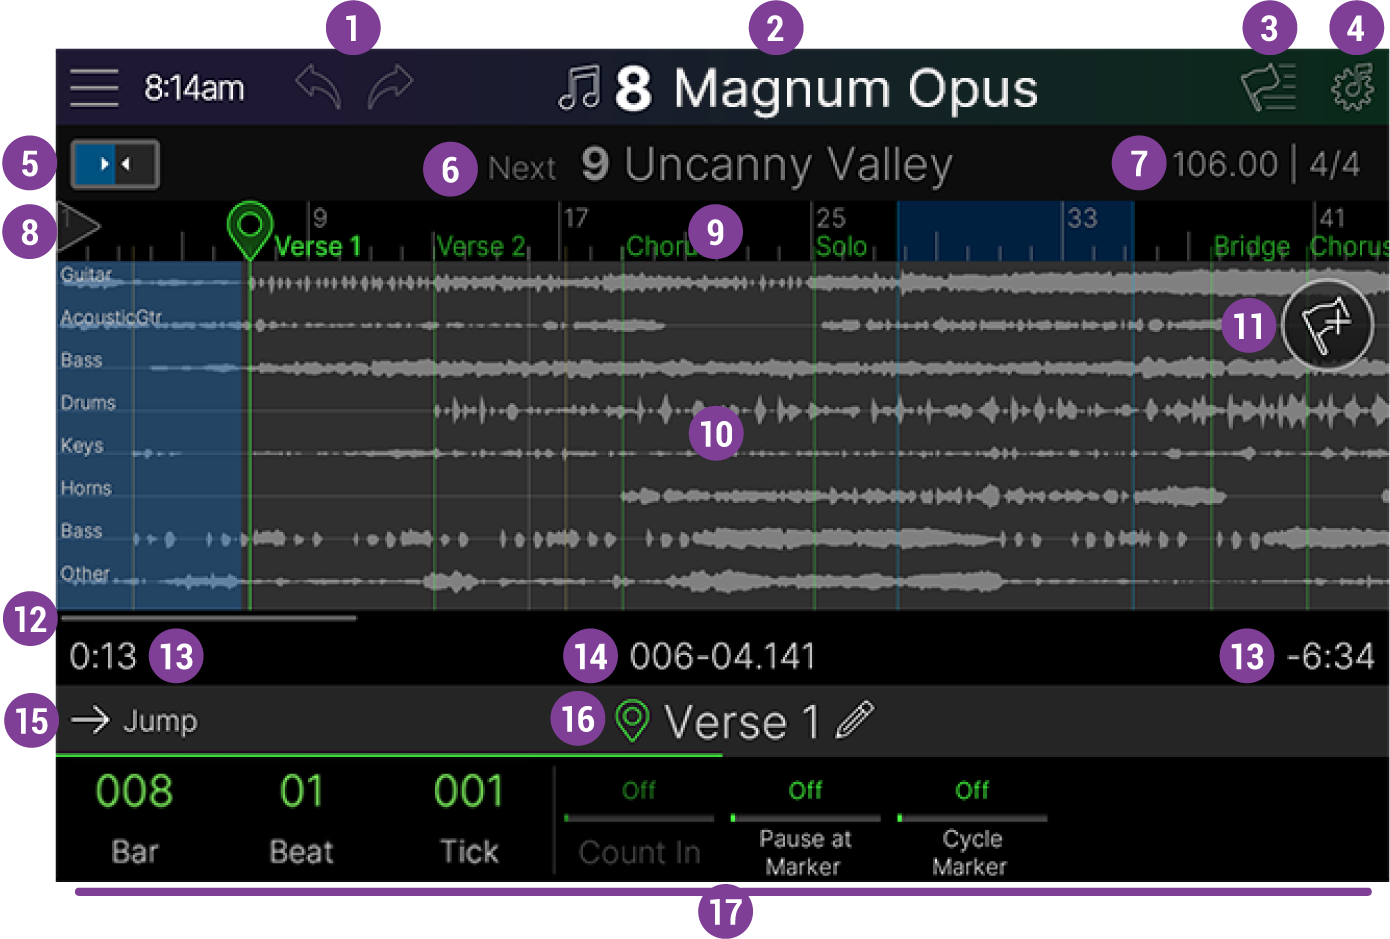
  2. Tap the song name in the header to open the Song List and double-tap a song to load it. The song appears in Song view, as shown below:

SongView_Annotated.png
Song view

Item 01 Undo/Redo: Tap the left arrow to undo the most recent Song view edit. Tap the right arrow to redo the most recent edit. If there's nothing to undo or redo, the arrows appear dim.

Item 2 Song Number/Name: The currently loaded song’s number and name are displayed here. Tap to open the Song List screen, where you can access and manage all your saved songs and playlists. See the Song List page.

Item 3 Flag List: Tap the Flag List button Flag List Button.png to open the Flag List, where you can reference, manage, and rename the current song’s flags. See the Flags.

Item 4 Song Settings: Tap the Settings button Song Settings Button to open the Song Settings screen, where you can rearrange tracks, adjust individual track “Trim” levels, and other settings for the current song. See Song Settings.

Item 5 Chase Button: When on (bright), the visible area of your song follows and centers the current playhead position within the display. When disabled (grayed out), the playhead may scroll off the side of the visible area. See Chasing the Song.

Item 6 Next Song: Displays the next (upcoming) song in the current playlist The Next Song Indicator . If the current song is the last (or only) song in the current playlist, No Next Song indicator appears.

  • Cue Panel: When a song or marker is cued, the Cue Panel appears below the header and displays the cued song or marker (as shown below). See Performing Songs for details.

Cue Panel - Marker.png
Cue Panel

Item 7 Tempo/Time Signature: Displays the tempo and time signature at the current song’s playhead position. Every song has one Start flag that sets the initial tempo and time signature. Note that you’ll need to manually enter the Start flag’s tempo and time signature values for the ruler and click to match those of your song audio files accurately. If the song contains tempo or time signature changes, additional Time flags can be added. See Flags.

Tip: You can also tap the Tempo/Time Signature area to display Tempo and Time Signature parameters in the Inspector.

Item 8 Start Flag: Every song includes one Start flag at Bar 001, which sets the song’s initial tempo and time signature. Tap the Start flag on the ruler to view its parameters in the inspector. Every song also includes an End flag (not pictured)

Item 9 Ruler: Shows the song’s time divisions (in bars, beats, and ticks [240 ticks per beat]). Tap the ruler above one of the flagpoles (thin vertical lines) to select a flag; its parameters appear in the inspector.

Item 10 Track Field: Up to eight audio files appear here. Tap the field to jump the playhead to that location in the song. Swipe left or right to scroll the track field. Use two fingers to “pinch” or “spread” the song field to horizontally zoom out or in.

Item 11 Add Flag: Tap the Add Flag button Add Flag Button ; available flags appear in the Inspector. Drag one of these colored boxes up to the flag field to add a flag; alternatively, tap the box to add a flag at the playhead’s location; its parameters appear in the Inspector. See Adding Flags.

Item 12 Song Scrollbar: The length of the line here represents the visible area of the song; if the song is fully zoomed out, the scrollbar disappears.

Item 13. Time Elapsed and Time Remaining: The Time Elapsed value (at left) displays how long the song has played (in minutes and seconds). Time Remaining (at right) displays how much time the song has left (in minutes and seconds). Tap either indicator to open the Transport Panel.

Item 14. Playback (Bars/Beats/Ticks): Displays how far the song has elapsed (in bars, beats, and ticks [240 ticks per beat]).

  • Tap anywhere on this time indicator row to open the Transport Panel (shown below). Tap the X in the upper left corner to close it. See Performing Songs.

TransportPanel.png
Transport Panel

Item 15. Jump: Tap to jump to the currently selected flag's location. (Turn the Lower Knob to select a flag.)

Item 16. Flag Icon and Name: The current flag’s name is shown here; some flags can be renamed. Tap (or press the Lower Knob) to open the Flag List.

Item 17 Inspector: Displays parameters for the currently selected flag. Note that each flag type offers different parameters and functions. See Adding Flags.

Saving a Song

When you create a new Showcase song and transfer it from the Helix Stadium application to your Helix Stadium hardware, it’s automatically saved as the last song in the SONG LIBRARY list. When you make changes to a song in the Helix Stadium Song screen (add/edit/remove flags, rename/reorder tracks, change tempo, etc.), you’ll want to save it to retain your changes.

Quick-Saving a Song

Important! Note that, once you edit and save changes to a Song, those changes are also reflected for all “alias” playlist instances of the song. Likewise, deleting a song from the SONG LIBRARY folder will remove all alias instances of the song from playlists.

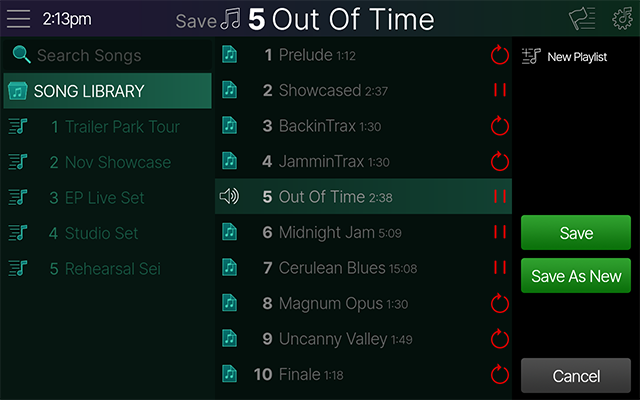
Probably the most common case is that you’ve made some edits to one of your songs, and you want to save it within its current SONG LIBRARY location to retain your changes. From any song screen, press the Save button The hardware Save button twice.

Manually Saving a Song

  1. Press the Save button The hardware Save button . The Save Song screen appears (see below).

SaveSongScreen.png
Save Song screen
  • If you keep the current song’s location as the one highlighted in the Song Save list, The Save button appears in the sidebar. Tap The Save button to save your changes. (This is essentially the same as doing a Quick-Save, as described above.)

  • If you want to create a unique copy of the current song with your edits included, tap The Save As New button . Type in a unique name for the new song and tap The Done button .

  • Alternatively, you can click on an existing song in the Save Song list to permanently overwrite it. Once you tap on an existing song in the list, the Save button changes to The Save - Overwrite button . A dialog box appears, warning you that the destination location’s song will be permanently overwritten (along with any of its aliases in other playlists). If you’re okay with this, tap Yes, Overwrite.

Song Settings

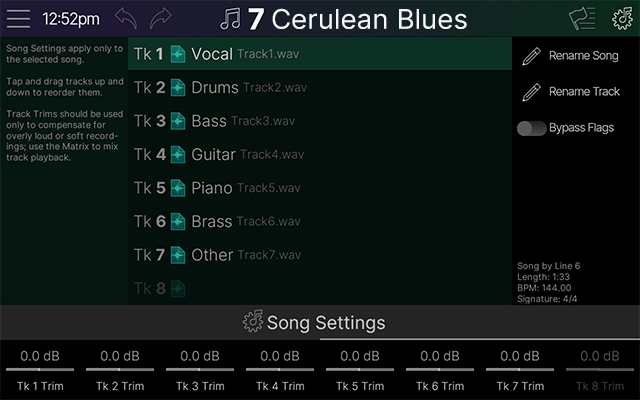
Tap the Song Settings icon Song Settings Button in the header to open Song Settings:

Song Settings.png
Song Settings

Reorder the Song’s Tracks

Tap and drag any track up or down to reorder it. Your track order in the Song Settings window appears that way in both the main Song screen and individual track channels in the Matrix Mixer.

Tip: It’s a good idea to try and keep the track order consistent across your songs. For example, drums always on track 1, bass always on track 2, guitar on track 3, black metal screeching on track 4, nose flute on track 5, etc.

  • To Rename the Song: Tap The Rename Song command , enter your new song name, and tap The Done button when complete.

  • To Rename a Track: Tap to select the desired track. Tap Sidebar_RenameTrack.png , enter your new name, and tap The Done button .

  • To Bypass or Enable Flags: By default, flags are enabled (this switch is set to its left position
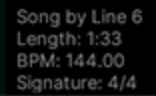
 Bypass Flags switch - flags enabled state ). Toggle Bypass Flags on to non-destructively disable all flags (note that Start, End, and Time flags always remain enabled). Bypassing flags is useful for temporarily disabling them during playback.

  • Song Info: Sidebar_SongInfo.png Read-only text at the bottom of the sidebar displays details about the current song: Length (in minutes:seconds), initial BPM (Beats Per Minute), and initial time signature.

Song Settings

All song settings are displayed in the Inspector. Note that there are multiple pages of settings—swipe the Inspector left/right to access all of them.

Click to show Song Settings...

Parameter

Notes

Track 1~8 Trim Settings

Trims the level of each audio track independently of the Matrix Mixer’s Track 1~8 faders, to compensate for extremely soft or loud files. Normally, these should be left at 0.0dB.

Shift Downbeat

Adjusts the Time Ruler to ensure the Downbeat starts on beat 1 if it is not properly aligned. For example, if your song is in 4/4 but the beginning of the song has a two-beat pickup before the downbeat, set this to -2 Beats.

Note: Be sure to save your song to retain all settings changes.