Helix Stadium supports MIDI control via external MIDI DIN (the good ol' 5-pin connection) for a myriad of functions, including preset selection, block bypass, real-time parameter control, Matrix Mixer control, MIDI Clock sync, and more. Additionally, MIDI is transmitted and received via Stadium’s USB-C using the options within your Stadium device’s Global Settings > MIDI settings.* Stadium’s MIDI Clock can be enabled or disabled using the Global Settings > Tempo/Click > Receive MIDI Clock and Send MIDI Clock options.
*Note: For USB MIDI operation when connected to a Windows® computer, you must download and install the Helix Stadium ASIO® driver, available from http://line6.com/software. (This driver is automatically installed with the Helix Stadium application, v1.2 and later, installation on Windows.)
No driver installation is necessary for MIDI functionality with macOS computers or mobile devices.
In this chapter, we’ll cover external remote MIDI control of Helix Stadium functions. Many of Stadium’s Global functions are pre-configured with MIDI CC commands, and block bypass and most block parameters can be custom-assigned either manually or via MIDI Learn and stored per preset. Refer to the lists of all Global MIDI CC mappings in the following sections.
Tip: Helix Stadium is also highly functional as a MIDI controller device, allowing you to configure and send many types of MIDI (and other) commands to your external gear via 5-pin MIDI DIN or USB. See Command Center.
Preset and Snapshot Recall via MIDI
MIDI can be frustrating enough as it is without having to slog through a manual to figure out what messages your particular device needs to change presets or snapshots. Conveniently enough, Helix Stadium provides handy helper text to tell you exactly which MIDI messages recall the current preset and snapshot.
-
From the Home > Edit screen, tap the Preset name in the header to open the Preset List (below left). Alternatively, tap the Snapshot icon to open the snapshot panel (below right). The small text in the sidebar displays the required MIDI messages for recalling the current preset and snapshot from external MIDI devices or software. In the illustrations below:
-
The 3 Practice List setlist is recalled with a CC32 (bank select) message of 7
-
The 2D Simple Jack preset is recalled with a PC (program change) message of 7
-
The 1—INTRO snapshot is recalled with a CC69 message of 0
-
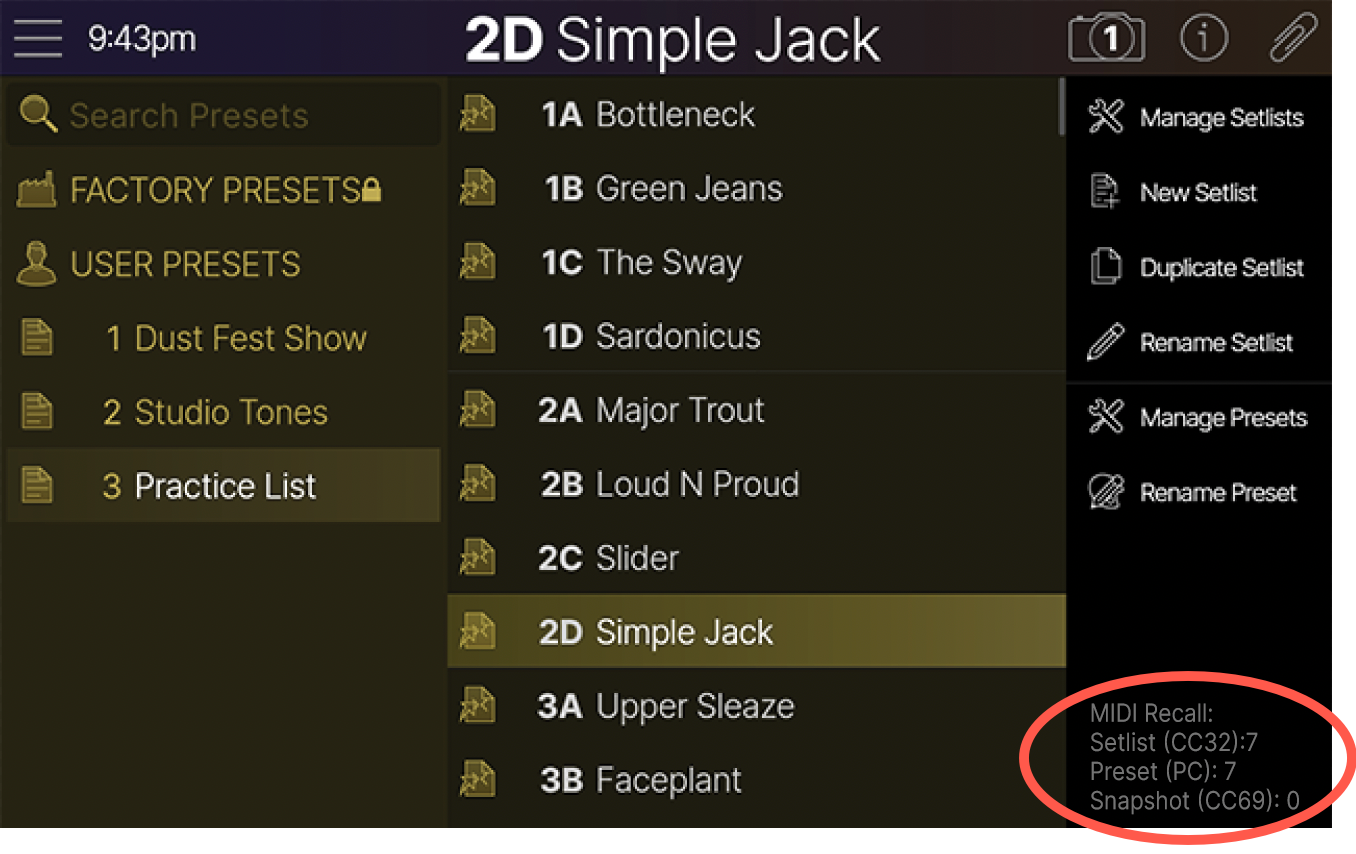
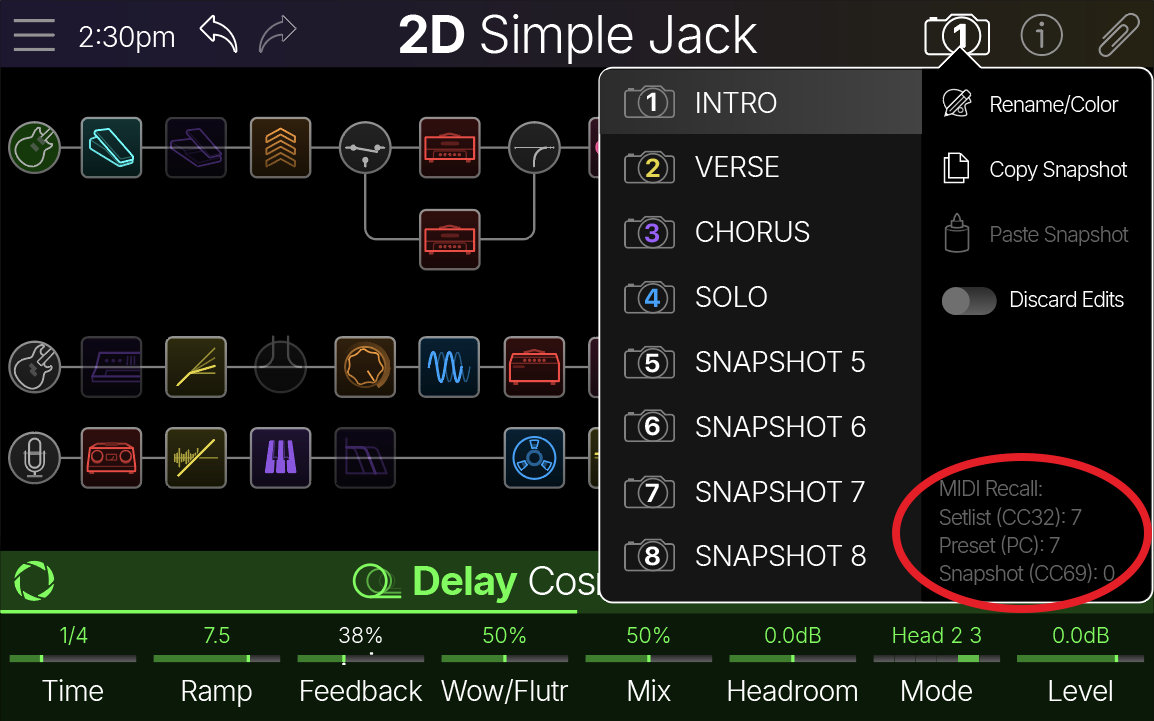
In most cases, you do NOT need to send a CC32 message every time you recall a preset—just send the PC message. The exceptions are if you want to select a preset in a different folder or setlist—or, in the case of the USER PRESETS folder (as it contains 512 preset locations), if you want to select a preset in a different group of 128 presets. In this case, send the folder/group/setlist’s CC32 message first, followed by the preset’s PC message.
Snapshots work in a similar way. To change snapshots in the same preset, just send the corresponding CC69 value (0 for Snapshot 1, 1 for Snapshot 2, 2 for Snapshot 3, etc.)—no need to send CC32 or PC messages.
Bank and Program Change List
|
Bank |
CC32 Value |
PC Value |
Preset Locations Preset numbers change depending on Global Settings > Preferences > Preset Numbering: |
||
|---|---|---|---|---|---|
|
1A-128D |
0-511 |
1-512 |
|||
|
FACTORY PRESETS |
0 |
0-XXX |
1A ~ XXX |
0 ~ XXX |
1 ~ XXX |
|
USER PRESETS |
1 |
0-127 |
1A ~ 32D |
0 ~ 127 |
1 ~ 128 |
|
2 |
0-127 |
33A ~ 64D |
128 ~ 255 |
129 ~ 256 |
|
|
3 |
0-127 |
65A ~ 96D |
256 ~ 383 |
257 ~ 384 |
|
|
4 |
0-127 |
97A ~ 128D |
384 ~ 511 |
385 ~ 512 |
|
|
Your Setlists |
5-127 |
0-127 |
1A ~ 32D |
0 ~ 127 |
1 ~ 128 |
Note: When navigating saved Presets from the Helix hardware (Upper Knob, preset footswitches, Preset Up/Down, etc.), Helix Stadium automatically transmits a MIDI Program Change message to its MIDI DIN and USB MIDI Outs, corresponding to the selected preset. If you’d prefer Helix Stadium not automatically transmit PC messages, turn Global Settings > MIDI > Send MIDI PC off.
Please note that “Empty” presets in the USER PRESETS folder or a Setlist that have not yet been saved do not transmit a MIDI PC message when selected. Likewise, Empty presets cannot be recalled via MIDI PC unless they have been saved first.
MIDI Clock
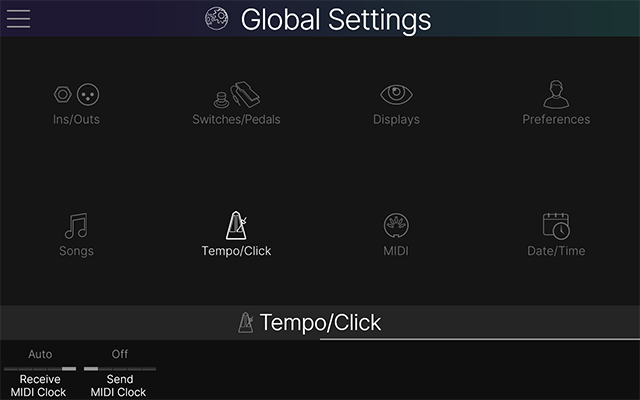
Helix Stadium can receive and send MIDI Clock via its MIDI DIN In/Out as well as via USB for tempo sync with external devices and software. MIDI Clock Send and Receive can be enabled and globally configured within the Global Settings > Tempo/Click options.
-
Receive MIDI Clock: Receive MIDI Clock via MIDI In or MIDI USB In (or both) to synchronize Helix Stadium’s time-based effects (such as delay and modulation) to external DAW software, drum machines, keyboard workstations, or other modelers. Note that the Helix Stadium TAP footswitch flashes blue when receiving MIDI Clock.
-
Receive MIDI Clock is set to Auto by default, so Stadium’s tempo will automatically sync to MIDI Clock when received via USB-C or MIDI In.
-
-
Send MIDI Clock: Transmit MIDI Clock to MIDI Out or MIDI USB Out (or both) to synchronize the tempo of external pedals, rack gear, and software to the current Helix Stadium TAP Tempo or Song Tempo. (Note that the TAP Tempo vs Song Tempo behavior is determined by the Global Settings > Tempo/Click > Follow Song Tempo setting.)
MIDI CC
Helix Stadium has the potential of reserving so many specific MIDI CC messages, so we’ve configured things so that each function type requires its own dedicated MIDI Channel, as listed below. Note that you can change the MIDI Channel for each using the Global Settings > MIDI > Channel options.
-
Global functions, such as bank select, snapshot select, looper functions, emulation of knobs, pedals, etc. are accessed on MIDI Channel 1 by default.
-
Bypass/Control functions, which include block bypass states and parameters, are all custom assignable and are accessed on MIDI Channel 2 by default.
-
Matrix Mixer functions. Each Matrix Mixer output layer (1/4”, XLR, and Phones) is accessed on its own channel (channel 3, 4, and 5 by default, respectively) allowing independent control for each layer.
Global CCs
Click to display the Global CCs
Pedals, Footswitches, and Knobs
|
MIDI CC# |
Value |
Function |
|---|---|---|
|
1 |
0-127 |
Emulates EXP 1 Pedal |
|
2 |
Emulates EXP 2 Pedal |
|
|
3 ~ 6 |
-- |
Reserved for potential future use |
|
7 |
0-127 |
XY Controller, X-Axis (0 = bottom of the screen) |
|
8 |
XY Controller, Y-Axis (0 = left edge of the screen) |
|
|
9 |
0-34* |
Emulates pressing a top panel button, pressing a More Mode switch, or tapping an onscreen icon: 0=Home View, 1=Song View, 2=Amp, 3=Save Screen, 4=XY Open/Close, 5=<PAGE, 6=PAGE>, 7=Matrix 1/4" Open/Close, 8=Matrix XLR Open/Close, 9=Matrix Phones Open/Close, 10=Undo, 11=Redo, 12=Preset Down, 13=Preset Up, 14=Preset List Open/Close, 15=Preset Info Open/Close, 16=Info Scroll Up, 17=Info Scroll Down, 18=Info Zoom In, 19=Info Zoom Out, 20=Preset Clip Open/Close, 21=Stopwatch Start/Stop, 22=Stopwatch Reset, 23=Click On/Off, 24=Mute All On/Off, 25=Focus panel Open/Close, 26=Song List Open/Close, 27=Flag List Open/Close, 33=Song Settings Open/Close, 34=Tuner Open/Close *Note: Values 28~32 have no assigned function. |
|
11 ~ 35 |
-- |
Reserved for potential future use |
|
36 |
0-127 |
Emulates Toe Switch (alternates switch state on each send of any value) |
|
37 |
0-6 |
Footswitch Mode (0=Stomp A, 1=Stomp B, 2=Preset, 3=Snapshot, 4=Combo, 5=Unassigned, 6=Transport) |
|
38 |
0-127 |
Emulates Knob 1 |
|
39 |
Emulates Knob 2 |
|
|
40 |
Emulates Knob 3 |
|
|
41 |
Emulates Knob 4 |
|
|
42 |
Emulates Knob 5 |
|
|
43 |
Emulates Knob 6 |
|
|
44 |
Emulates Knob 7 |
|
|
45 |
Emulates Knob 8 |
Transport Control
Tip: Playlists and songs can be recalled via MIDI CC, and Stadium makes it really easy to see what messages to send. From Song view, tap the song's name to open the Song List. The MIDI CC messages used to recall the current playlist and song are displayed at the bottom of the right sidebar:
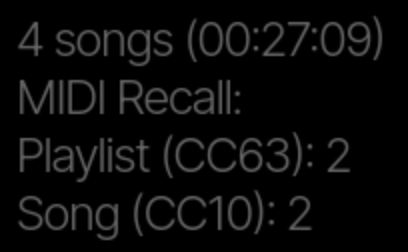
MIDI Recall Info
-
Playlist: CC63, values 0-127 (SONG LIBRARY is value 0; each subsequent playlist is value 1-127)
-
Song: CC10, values 0-127
|
MIDI CC# |
Value |
Function |
|---|---|---|
|
10 |
0-127 |
Cues a song within the current Playlist (0=first song, 1=second song, 2=third song, etc.) |
|
63 |
Selects a Playlist and cues its first song (0=the main SONG LIBRARY folder, 1=Playlist 1, 2=Playlist 2, etc.) |
|
|
46 |
Cues a Marker flag within the current song (0=song’s Start flag, 1=Marker 1, 2=Marker 2, etc.) |
|
|
47 |
Return to Zero (any value) |
|
|
48 |
0-63: Clear Cycle (or, create a Cycle between markers) 64-127: Cycle Enable/Disable |
If a Cycle exists, 0-63 will clear it. If no Cycle currently exists, one will be created between existing Markers and/or Start/End flags Values 64-127 act like pressing Stadium’s Cycle switch; that is, it sets the in and out points. |
|
49 |
0-63: Previous Song 64-127: Next Song |
Cues the Previous/Next Song |
|
50 |
0-63: Previous Marker 64-127: Next Marker |
Cues the Previous/Next Marker type flag |
|
51 |
0-127 |
Toggles Play/Pause (first CC received toggles the current state); starts playback of a cued song or marker |
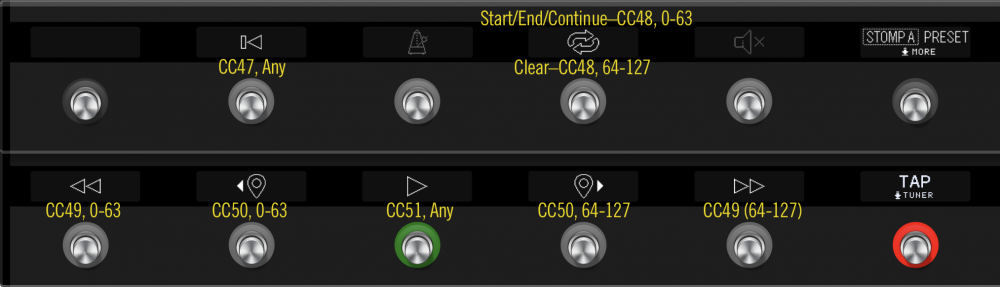
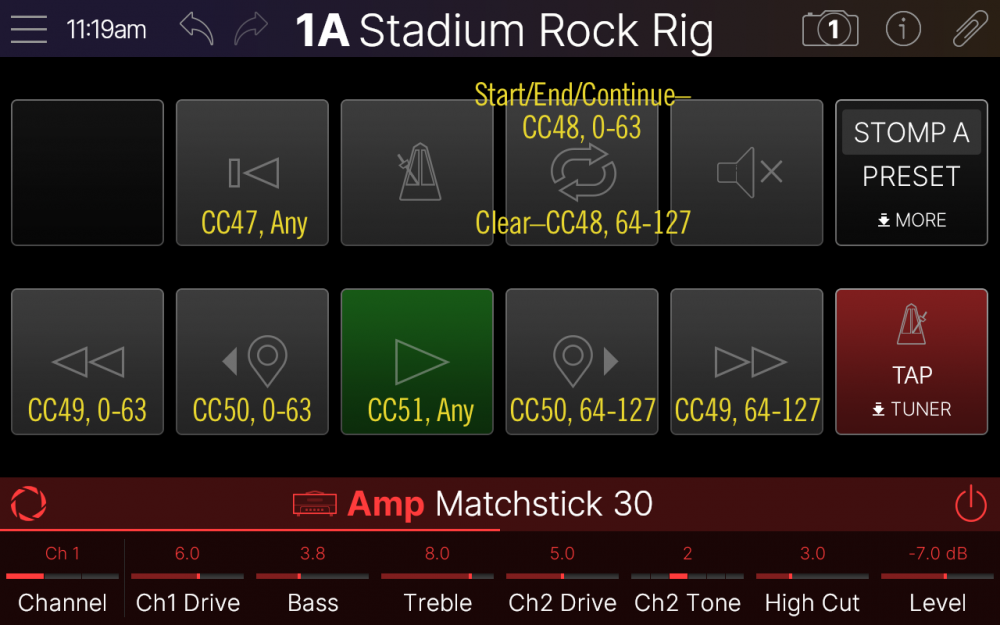
The following images show how the above MID CCs correspond to Stadium’s Transport footswitches:
Looper Control
|
MIDI CC# |
Value |
Function |
|---|---|---|
|
52 |
0-127 |
Clear Loop |
|
53 |
Undo/Redo |
|
|
54 |
0-63: Full, 64-127: Half |
Full/Half Speed |
|
55 |
0-63: Forward, 64-127: Reverse |
Forward/Reverse |
|
56, 57 |
-- |
Reserved for potential future use |
|
58 |
0-63: Overdub, 64-127: Record |
Record/Overdub |
|
59 |
0-63: Stop, 64-127: Play |
Play/Stop |
|
60 |
0-127 |
Play Once |
|
61 |
-- |
Reserved for future use |
|
62 |
0-63: Off, 64-127: On |
Looper block on/off; for the Deluxe Looper, also enters Looper footswitch mode |
Additional Controls
|
MIDI CC# |
Value |
Function |
|---|---|---|
|
32 |
0-127 |
Setlist select: the FACTORY PRESETS setlist always responds to value 0, and the USER PRESETS setlist responds to values 1 through 4, with subsequent setlists (your created setlists) responding to value 5+ |
|
64 |
64-127 |
Tap Tempo |
|
69 |
0-7: Snapshot select, 8: Next snapshot, 9: Previous snapshot |
Snapshot select (8=Next snapshot, 9=Previous snapshot) Tip: Set the Global Settings > MIDI > Send Snapshot CC option to "On" if you want Helix Stadium to automatically send the respective CC69 value to MIDI Out |
|
71 ~ 102 |
-- |
Reserved for potential future use |
|
128 |
0-63: Skinny jeans, 64-127: Lip ring |
Helix Stadium replaces all your social media thumbnails with photos from your emo phase |
Bypass/Control CCs
Bypass/Control MIDI CCs, such as for any block’s bypass and control of block parameters, are user-assignable. Use the Bypass/Control screen’s MIDI CC and MIDI Learn options to create your own custom MIDI CC assignments. Bypass/Control CCs are saved per preset.
-
To assign block bypass to a MIDI CC, see Quick Stomp Bypass Learn Assign.
-
To assign parameter control to a MIDI CC, see Quick Controller Assign.
Note: By default, Bypass/Control type functions are set for MIDI Channel 2. You can set a different MIDI Channel from Global Settings > MIDI > Bypass/Control MIDI Channel. You should always choose a different MIDI Channel than the ones used for Global or Matrix Mixer CC functions.
Matrix Mixer CCs
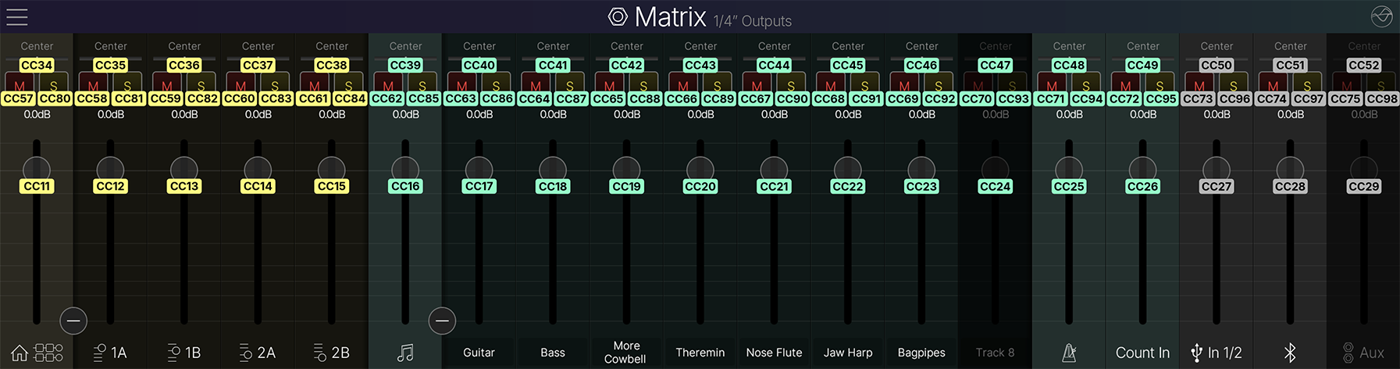
All Matrix Mixer controls are accessed using the pre-configured CCs listed in the following table.
Note: Each mixer layer has its own dedicated MIDI channel (these channels can be changed using the respective Global Settings > MIDI > Matrix MIDI Ch options):
-
Matrix 1/4” layer default is MIDI Ch 3
-
Matrix XLR layer default is MIDI Ch 4
-
Matrix Phones layer default is MIDI Ch 5
You may, however, assign two (or all three) Matrix layers to the same MIDI channel, at which point their levels, pans, mutes, and solos respond to the same incoming MIDI CC. For example, you could control specific channels on both the 1/4” and Phones outputs by assigning both Matrix layers to the same MIDI channel, but leave the layers themselves unlinked so you can control their output levels (and/or different channels) separately.
Click to display the Matrix Mixer CCs...
-
Level CCs respond to values 0-127
-
Pan rCCs respond to values 0 (100% Left) ~ 64 (Center) ~ 127 (100% Right)
-
Mute and Solo CCs respond to any value 64 or above, and toggle their state
-
Clear Solo CC (globally clears all enabled Solo controls in the current layer) responds to any value 64 or above
|
Channel |
Level |
Pan |
Mute |
Solo |
Clear Solo |
|---|---|---|---|---|---|
|
Home (All Paths) |
CC11 |
CC34 |
CC57 |
CC80 |
|
|
Path 1A |
CC12 |
CC35 |
CC58 |
CC81 |
|
|
Path 1B |
CC13 |
CC36 |
CC59 |
CC82 |
|
|
Path 2A |
CC14 |
CC37 |
CC60 |
CC83 |
|
|
Path 2B |
CC15 |
CC38 |
CC61 |
CC84 |
|
|
Song (All Tracks) |
CC16 |
CC39 |
CC62 |
CC85 |
|
|
Track 1 |
CC17 |
CC40 |
CC63 |
CC86 |
|
|
Track 2 |
CC18 |
CC41 |
CC64 |
CC87 |
|
|
Track 3 |
CC19 |
CC42 |
CC65 |
CC88 |
|
|
Track 4 |
CC20 |
CC43 |
CC66 |
CC89 |
|
|
Track 5 |
CC21 |
CC44 |
CC67 |
CC90 |
|
|
Track 6 |
CC22 |
CC45 |
CC68 |
CC91 |
|
|
Track 7 |
CC23 |
CC46 |
CC69 |
CC92 |
|
|
Track 8 |
CC24 |
CC47 |
CC70 |
CC93 |
|
|
Click |
CC25 |
CC48 |
CC71 |
CC94 |
|
|
Count In |
CC26 |
CC49 |
CC72 |
CC95 |
|
|
USB In 1/2 |
CC27 |
CC50 |
CC73 |
CC96 |
|
|
Bluetooth In |
CC28 |
CC51 |
CC74 |
CC97 |
|
|
Aux In |
CC29 |
CC52 |
CC75 |
CC98 |
|
|
All Matrix Channels |
|
CC103 |
|||
Or, here are the CCs laid out on the Matrix Mixer for another reference…