
By default, adding an Amp block with an Amp model automatically adds a matching cab block to ensure you attain the complete sound of a physical amp and speaker cabinet. Unlike in the world of physical amplifiers, Helix Stadium Native makes it easy to audition a multitude of classic and modern speaker cabs, with swappable mics and numerous parameters to tweak them further. You can also load Cab IRs (Impulse Responses) with or in place of Stadium’ Native's Cabs, as covered on this page. A Cab block consists of any two of the following:
-
Guitar Cab Model
-
Bass Cab Model
-
IR (Impulse Response)
Cab blocks are unique in that they can include two models, which also determines the block’s mono or stereo functionality:
-
When one Cab or Cab IR is loaded, the Cab block sums its incoming signal to mono.
-
When two Cabs or two Cab IRs (or one of each) are selected in a single Cab block, the Cab block is stereo in and stereo out.
-
Also see the Signal Path Routing page for tips on mono/stereo routing.
Tip: For the complete, up-to-date lists of all Amp, Cab, and Effect Models included in Helix Stadium products, along with the original gear they are based on, please see Helix Stadium Models on the Line 6 website.
Note that the Helix Stadium Native Intro version includes a subset of the Amp, Cab, and Effect models of the complete version. Please see the Helix Stadium Native License Versions section.
See the US Registered Trademarks List. All product names used in this document are trademarks of their respective owners, and neither Yamaha Guitar Group nor Line 6 is associated or affiliated with them. These trademarks appear solely to identify products whose tones and sounds were studied by Line 6 during sound model development.
Hybrid Cabs from Original Helix Native/Helix/HX
Helix Stadium Native does not include the older Hybrid Cab models from the original Helix Native plugin and Helix/HX devices (pre-version 3.50). When loading an original Helix Native/Helix/HX preset into Helix Stadium Native, any Hybrid Cab blocks are automatically converted to a new Cab. They may sound better right from the get go, but note that they will likely sound different.
Selecting a Cab or Cab IR
By default, when you add an Amp block and select an Amp model within it, a Cab block is automatically added to its right, and the “matched” Cab appears in the left tab of the Cab block. To disable this behavior, from the Model List, set the Add Cab Block switch to its off (left) position, as shown below. Also, see the Amp & Preamp Blocks page.

Note: Amp Clone blocks do not offer the Add Cab Block option. If you are using an “Amp” type Clone (captured from an amplifier signal without a speaker cab simulation or IR), you’ll want to manually add a Cab block following the Amp Clone block for a complete amp and cab tone.
Adding a Cab Block Manually
A Cab block includes two cab “slots,” which are selectable at the top right of the Cab’s Edit Panel.

-
In the Model Browser, select the Cab category in the left column.
Note: Up to four Cab blocks can be added to a path (up to eight per preset). Optionally, you can set Settings > Hardware Compatibility Mode to “Off” to remove this limit (but note that the preset will not be compatible with Helix Stadium devices).
-
Click the GUITAR CAB, BASS CAB, or CAB IR button

-
For a Guitar or Bass Cab Model, choose the desired model from the middle column list.
-
For a Cab IR, click the <EMPTY> IR File Selector box at the top of the Edit Panel. (Note that you’ll need to have added IR files to the designated IRs folder for them to appear in the IR File list—see the following Cab IRs section.)
-
-
To add a second Cab or Cab IR to the block, click on the right cab tab on the header of the Cab Edit Panel, and repeat the above steps.
Note: It is only possible to select NO CAB for the right Cab slot.
-
Once a Cab model or IR is added to the block, click on its respective left or right slot in the Edit Panel to access its parameters. See the following lists Cab Model and Cab IR Parameters.
-
Right-click on any parameter slider/knob/switch in the Edit Panel for its Action menu options, such as resetting the parameter to its default, creating automation, MIDI Control, or Snapshot Control assignment, and more. Please also see Creating and Editing Tones.
-

Focus View for a Cab Block
Click on the Focus View button 
-
When a Cab model is selected, the Focus View provides a handy graphical editor, as shown below. Click and drag the Mic to set its Position and Distance relative to the Cab speaker, just as you would in the studio. Click the 0°/45° toggle to set the mic Angle. These parameters, along with all other Cab parameters, can also be adjusted within the sliders/knob in the Edit Panel.

-
When an IR is selected, the Focus View provides a frequency plot for the selected IR file for reference, as shown below. The IR parameters can be adjusted within the sliders/knob in the Edit Panel. Please see the Cab IRs section below for more about using IRs. Also, see the Focus View page.
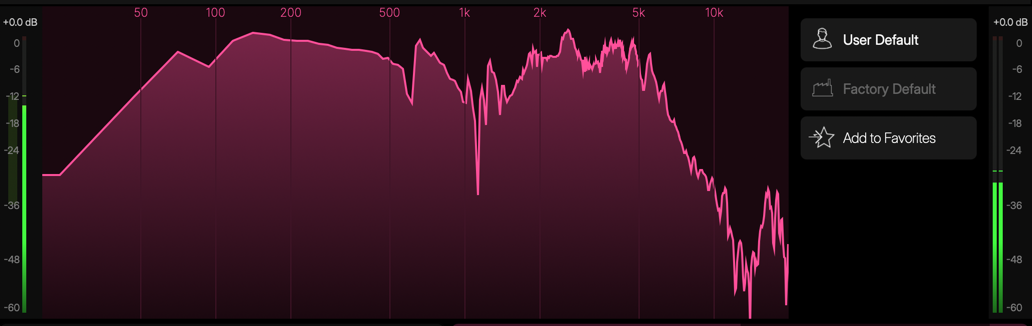
The following options appear in the sidebar of the Cab block Focus View
-
User Default: If you find yourself constantly re-tweaking your commonly-used Cabs the same way, click User Default to save the Cab’s settings as its new defaults, so it always shows up the way you want. See Creating User Defaults.
-
Factory Default: If you’ve stored User Default settings for the selected Cab model or Cab IR, click Factory Default to return it to its original default settings for all future uses.
-
Add to Favorites: Once a Cab block is configured to your liking, add it as a Favorite to easily recall it from the Favorites category, with your saved settings intact for future presets. See Favorites.
-
Amp>Cab Link (For Cab models only - An Amp block containing an Amp Clone is not linked): When enabled (the default), changing an Amp model will automatically recall a “matched” cab for the left tab of its linked Cab block. When a “linked” Amp and Cab are added to the signal flow, a gold “chain” icon appears beneath them to indicate the link when the Amp or Cab block is selected, as shown below. When off, changing the Amp model does not affect the Cab block.

Note: The Amp>Cab Link switch is only active when you add the Amp & Cab with the Amp Model List’s Add Cab Block toggle. Note that Amp>Cab Link is also not active when an Amp or Amp+Cab Clone is selected in the Amp block.
The Cab block’s right tab Cab model remains unchanged when Amp>Cab Link is enabled unless you also have Cab>Cab Link enabled (see the next item).
-
Cab>Cab Link (For Cab models only): Click the switch to “on” (right position) to link both sides of a Cab block. When on, changing the left cab automatically loads the same cab on the right.
-
Changing the right Cab does not affect the left Cab.
-
Cab IRs
Instead of Cab models, you can load one or two Cab IRs to a Cab block. Impulse Responses, or “IRs” are mathematical functions representing the sonic measurements of audio systems (in this case, speaker cabinet and mic combinations)—resulting in very short audio files that can then be loaded into an IR loader to provide a virtual recreation of the entire system—cabinet, speaker, mic, and perhaps even some post-processing like EQ.
Adding IRs for Helix Stadium Native
IRs can be purchased from numerous online vendors, typically offering a wide assortment of guitar and bass amp speaker cabinets with various speaker types and mic options.
Helix Stadium Native supports IRs in WAV (.wav) file format. Regardless of the source WAV file’s length, sample rate, bit depth, and mono/stereo format, Cab IRs are processed internally as 2048-sample, 48kHz, 32-bit float, mono files.
More About IRs…
IR (.wav) files supported by Helix® Stadium, Helix®, HX®, POD® Go devices, as well as Helix Native and Metallurgy® software, are also compatible with Helix Stadium Native. (Note that IRs [.hir type files] purchased from the Line 6 Marketplace are not supported in Helix Stadium Native at this time.)
Your IR files must first be added to your Helix Stadium Native designated IRs folder on your computer to allow them to appear in the plugin’s Model Browser. By default, this folder is at Documents > Line 6 > Helix Stadium Plugin > IRs, but you can change this to a different folder via the plugin’s Settings.
When loading a preset that was saved with an IR file that does not currently exist in the pluign’s IR folder, the Cab block’s IR File Selector will appear as “Unresolved” 
Loading IRs in a Cab Block
Once you’ve copied or moved IR files into the designated Helix Stadium Native - IRs folder (as covered in the preceding section), you can select, audition, and load an IR using the Model Browser.
-
With a Cab block added to your preset’s Signal Flow and selected, click the IR subcategory button, then click to select IR in the model list column.
-
Click on the <EMPTY> File Selector field in the desired Cab Slot and select the IR file you want to load from the pop-up file list, as shown below.
-
Enter an IR name in the Search field

-
Click an IR once to audition it; the file list window remains open. Click an IR twice to load it and close the list window.
-
Tip: You can manually create your own folders within the designated IRs folder using the Finder (macOS) or File Explorer (Windows®) apps, and move your IR files to organize and manage them as desired. Folders appear at the top of the IR file list window; click on a folder to display its contents. Use the options at the top right to navigate your folders in the file list window:
-
Click the Back Folder button

-
Use the Folder Select menu

-
Click the View buttons

(Note that the same File List window layout and controls are also used for the Preset Browser and Clone File selection.)

-
When an IR is selected in the list, there are a few options available at the bottom of the list window:

Options are available at the bottom of the window
-

-

-

-
As with a Cab model, once an IR is added to the block, click its left or right tabbed slot in the Edit Panel to access its parameters. See the following list of Cab IR Parameters.
-
Right-click on any parameter slider/knob/switch in the Edit Panel to access its Action menu commands.
-
Click the Focus View button
-
-
To remove an IR: Click the Clear button at the right of the IR File Selector to return to the “<EMPTY>” IR state, as shown below. Click the IR File selector again if you wish to select a different IR, or choose the Guitar Cab or Bass Cab category in the Model Browser and load a Cab model in the Cab slot.

Cab Model and Cab IR Parameters
Cab models and Cab IRs each offer their own set of parameters in the Edit Panel when selected, as shown in the following tables.
Cab Model Parameters
|
Cab Parameter |
Description |
|---|---|
|
Bypass |
Click |
|
Mic |
Selects the mic pointed at the cabinet. (Guitar and Bass cabs have different sets of mics available. Mic selection can have as big an impact on your tone as tweaking the Amp’s tonestack or even applying an EQ block, so experimentation is key here. |
|
Position |
Sets the lateral location of the mic in relation to the speaker cone, from the center of the speaker to the edge. The “Cab Edge” value may appear in a different location depending on the selected cab. |
|
Distance |
Sets the distance of the mic from the speaker. Choose from 1.00” to 12.00” in 1/4” increments. |
|
Angle |
Sets the angle of the mic relative to the front of the speaker cabinet. 0 degrees is pointing directly at the speaker; 45 degrees is pointing off-axis. |
|
Low Cut |
Applies a low cut (high pass) filter, letting you remove all audio below a certain frequency. May be useful in removing undesirable low end rumble. |
|
High Cut |
Applies a high cut (low pass) filter, letting you remove all audio above a certain frequency. May be useful in removing high end harshness. |
|
Level |
Sets the overall level of the Cab. Use to adjust level against the other side of the Cab block. |
|
Pan |
Controls the panning of the Cab between the left and right channels. For stereo setups, the Cab block can sound much wider if the two sides are panned opposite of one another (“Left 100” and “Right 100”). Note: It is best to keep this set to Center when using a single Cab or when mono output is desired. |
|
Delay |
Delays the signal slightly to purposely impart a bit of phase incoherence or, at higher values, increase the Cab block’s apparent stereo width (or, at extreme values, a bit of doubling effect). A little goes a long way here. When set to “Auto” (all the way left, before 0.0 ms), it approximates the delay through the air when changing the mic Distance parameter. For most use cases, however, we recommend leaving Delay set to “0.0 ms.” |

Cab IR Parameters
|
Cab IR Parameter |
Description |
|---|---|
|
Low Cut |
Applies a low cut (high pass) filter, letting you remove all audio below a certain frequency. May be useful in removing undesirable low end rumble. |
|
High Cut |
Applies a high cut (low pass) filter, letting you remove all audio above a certain frequency. May be useful in removing high end harshness. |
|
Polarity |
Inverts the polarity of the signal. Using two Cab IRs from different 3rd party vendors or trying to blend a Cab with a Cab IR can sometimes result in a thin or anemic sound. Try setting Polarity to “Inverted” to see if it helps. |
|
Delay |
Delays the signal slightly to time-align with the other side of the Cab block (helping to avoid phase issues). It can also be used to purposely impart a bit of phase incoherence or at higher values, increase the Cab block’s apparent stereo width. A little goes a long way here. |
|
Mix |
Controls the blend between the incoming “dry” signal and the Cab IR-processed “wet” signal. At 0%, no IR is heard; at 100%, no dry signal is heard. Normally, this should be left at 100%. |
|
Level |
Sets the overall level of the Cab IR. This can be handy for balancing the level with the other Cab or Cab IR in the Cab block. |
|
Pan |
Controls the panning of the IR between the left and right channels. For stereo setups, the Cab block can sound much wider if the two sides are panned opposite of one another (“Left 100” and “Right 100”). |