
The Focus View is a dedicated, real-time “XY” controller screen that offers simplified editing options for the selected model. The Focus View offers various options based on the current model type, as covered on this page.
Tip: Helix Stadium devices include a Focus View touchscreen to provide this functionality. Please check out the video below for an overview and tips for using the Focus View on Stadium devices. Then, consult the sections on this page for Helix Stadium Native’s Focus View details.
Amp, Preamp, and Effect Models
For Amp, Preamp, and most Effect models, Focus view offers an XY control that allows you to quickly adjust multiple simultaneous parameters by click-dragging to its five descriptively titled “Zones” on the screen. Each model’s pre-configured zones consist of combinations of parameters that morph as you click and drag the “Lens Icon” cursor between them.
Tip: Using the Focus View first can be a quick and easy way to dial in the overall settings of any amp or effect, which you can then fine-tune using the individual Edit Panel parameters.
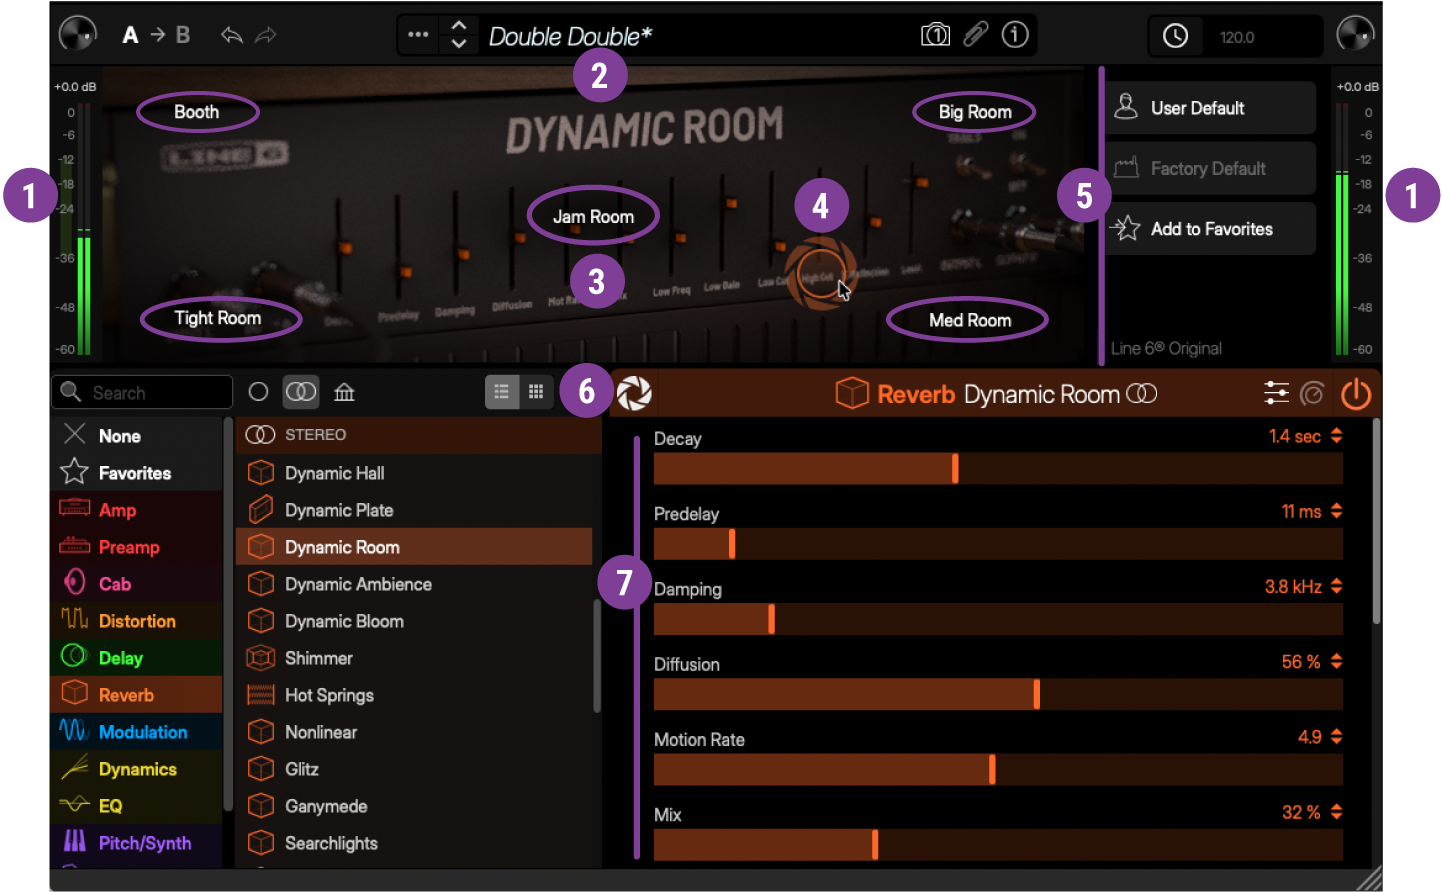
-
Level Meters: The plugin’s Input (left) and Output (right) meters continue to measure the plugin’s input and output signals in real time while the Focus View is displayed. When a Dynamics - Compressor and Gate type model’s Focus panel is open, a gain reduction meter appears at the left—see Dynamics below.
-
Zones: Descriptive labels appear in each of the four corners and the center of the screen, indicating each zone and its corresponding sonic character. Each zone includes a different pre-configured combination of parameter values. As you drag the lens icon, you’ll hear the sound morph as the parameter values change between the zone settings. Note that the center is the “home” zone, which contains the default factory parameter settings for the selected model.
-
Model Image: The main view of the screen displays a detailed image of the original gear the model is based on.
-
Lens Icon: Click and drag the lens icon toward the desired zone to adjust the settings.
-
Sidebar Options:
-
User Default: Once you’ve configured desirable parameter settings for the current model, you can assign them to be the User Default settings for the model, so that these are the initial default settings whenever you load the model in any preset. (Existing instances of this model in other presets are not affected.) Additionally, refer to Creating User Default Settings.
-
Factory Default: This option is selectable if you’ve enabled the User Default feature; selecting this will clear your custom User Default and return the model to use its original Factory Default settings when you next use the model.
-
Add to Favorites: Once you’ve configured desirable parameter settings, set the preferred model bypass state, and assigned bypass and control assignments, tap this option to add a Favorite of the model, which will then be conveniently available within the Model Browser’s Favorites category. See the Favorites section for more info.
-
“Based On” Information: The read-only text at the bottom of the sidebar informs you of the specific gear on which the current model is based.
-
-
Focus View Button: With the desired block selected, click the Focus button

-
Parameters: The Edit Panel continues to display all parameters for the currently selected model when Focus View is enabled. You’ll see the parameter sliders/knobs adjust in real-time while dragging the Lens Icon. You can also manually adjust the Edit Panel’s individual parameters to further dial in your sound.
Amp and Preamp Focus View
The Focus View for an Amp or Preamp is similar to that for an Effect model.* All the same descriptions in the preceding sections also apply to editing an Amp or Preamp’s settings.

*Note: Amp and Preamp Model Lists also include Clone type blocks, which offer their own Focus View window. See the Clones section below for details.
Cab and Cab IRs
For Cab models, the Focus View offers a graphical Mic position editor that lets you visually adjust the mic’s position, distance, and angle relative to the current Cab’s speaker (shown below on the left). Amp>Cab Link and Cab>Cab Link switches are also available in the sidebar for optional Cab block behaviors. When a Cab IR is loaded, its frequency plot is displayed, and its sidebar options are available (shown below on the right). Please see the Cab Block > Focus View section for details.


Clones
The Focus View for any Clone block (Amp, Amp+Cab, Preamp, or Distortion type Clone) displays the currently loaded Clone file’s metadata screen, where you can view the Clone file’s info. Note that the metadata text in this screen is not editable; it is optionally entered by the Clone’s creator during the capture process, as covered in the Clones section, and is saved individually with the Clone file, providing descriptive reference information.

The above image shows a Distortion-type clone’s Focus View. Amp+Cab, Preamp, and Distortion type Clones' Focus View offer the same features and parameters. The sidebar of the Focus View offers the same User Default, Factory Default, and Add to Favorites commands for Clones as for other Amp and Effect blocks (see descriptions above).
EQs
For EQ models (excluding the Acoustic Sim model), Focus View provides a graphic or parametric editor for the respective EQ types, as shown below. Click and drag the EQ band controls in the Focus View panel to make your adjustments.


Dynamics
For any Dynamics - Compressor or Gate-type effect, a yellow Gain Reduction meter appears in the panel, providing a real-time visual reference of the amount of input signal attenuated by the current settings.
