
Ready to jump in? The following steps will help you add an instance of the Helix Stadium Native plugin to a host DAW application's audio track to get you up and running.* You will find the Helix Stadium Native plugin within your host DAW application's plugin insert menus, along with all other audio effects plugins. The initial steps in any host DAW application are as follows.
-
Create a Session or Project in your DAW host application.
-
Create at least one audio track.*
Depending on your host DAW, it may offer options for “mono” or “stereo” audio tracks, or just a single audio track type that can record or import either mono or stereo audio. Either way, the Helix Stadium Native plugin can be added to the effects insert of your track.
-
Record some unprocessed “dry” guitar into the audio track, or import an existing audio file into the track for playback.
-
Insert an instance of Helix Stadium Native on this track by selecting it from the host DAW track's effects insert menu. To follow, we've provided examples on several popular host DAW applications.
*Note: The following steps show how to use Helix Stadium Native as an “insert effect” on an Audio type track in a DAW host application. Helix Stadium Native can also similarly be inserted on Aux, Bus, Effect, and Instrument-type tracks in most DAW host applications that offer them. Some hosts, such as Pro Tools® and Logic Pro, require plugins like Helix Stadium Native to be inserted on an Instrument-type track if you want to configure the plugin to receive MIDI input for control of its parameters and/or Sidechain input.
Steinberg Cubase
The Cubase® application is offered for both macOS & Windows®. Cubase supports the VST®3 plugin format on both. These steps are essentially the same for the Steinberg Nuendo® application.
-
Select your audio track within the Cubase project. Within the track's Inspector at the left of the track (or within the Cubase Mixer window's channel strip for this track), click on one of the slots' menus in the Inserts section.
-
In the Effects menu, choose Line 6 > Other > Helix Stadium Native. Note that Cubase offers both mono and stereo track types. You can simply choose the Helix Stadium Native plugin, and it will conform to your Cubase track type. Helix Stadium Native plugin appears in the Effects Insert window.

-
Turn your monitoring system to a low level, then choose a factory preset from the plugin's Preset List and hit Play to hear the results.
Apple Logic Pro
Logic Pro is an extremely popular host DAW for macOS. It supports the Apple Audio Units (AU and AUv2) plugin format.
-
Select your audio track within the Logic Pro project. Within the track’s Inspector channel strip (or within the Logic Pro Mixer window’s channel strip for this track), click on the Audio FX track effects insert menu.
-
In the FX window, choose the Audio Units (AU) plugin format type and select Line 6 > Helix Stadium Plugin.

-
Note that Logic Pro offers both mono and stereo track types, which means you’ll have different sub-options depending on your insert track’s type:
-
If inserting on a mono track: Choose either Mono (the plugin output is summed to mono) or Mono->Stereo (the plugin’s output is stereo).
-
If inserting on a stereo track: Select the Stereo option here, which provides stereo in/out processing. The Dual Mono option inserts two mono instances of the plugin (each accessed via the L and R buttons at the top of the plugin window). Each mono instance processes the stereo track’s left and right channels independently, which can quickly consume a lot of CPU, so we don’t recommend using it.
-
-
Turn your monitoring system to a low level, then double-click a factory preset from the plugin’s Presets tab and hit Play to hear the results.
Avid Pro Tools
The Avid® Pro Tools® application is available for macOS & Windows. It supports the Avid AAX plugin format.
-
Select your audio track within your Pro Tools project. Within the track header at the left of the track (or within the Pro Tools Mixer window’s channel strip for this track), click on one of the slot’s menus in the Inserts section.
-
In the plugin menu, choose Helix Stadium Native. Note that Pro Tools offers both mono and stereo track types. Therefore, you’ll have different sub-options depending on your track’s type, as shown below.
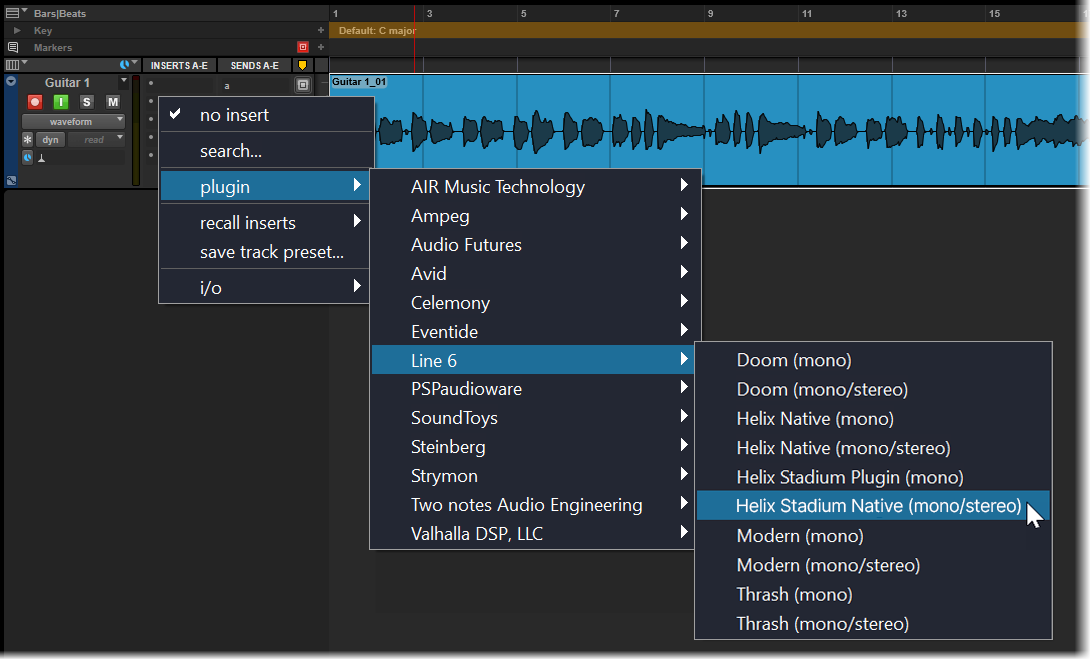
-
If inserting on a mono track (as shown above): Choose either mono (the plugin’s output is summed to mono) or mono/stereo (the plugin’s output is stereo, assuming the track is routed to a stereo output).
-
If inserting on a stereo track: Only a stereo option is offered here, which provides stereo in/out processing. (Note that Pro Tools does offer a dual mono option for some plugins, but this is not supported by Helix Stadium Native.
-
Turn your monitoring system to a low level, then double-click a factory preset from the plugin’s Presets tab and hit Play to hear the results.
Tip: Most host DAWs also allow you to insert plugins on Send, Bus, or Aux track types. Host DAWs differ slightly in how they name and describe these track types. But their main purpose is to let you insert a single instance of your plugin and route the Output or Send from any number of audio tracks to it to process them with the same effect. This is the preferred way to process multiple tracks, since a single instance of your plugin uses less CPU than inserting an instance on each audio track! Please refer to your host DAW’s documentation for details.
Once you insert an instance of Helix Stadium Native and load a preset, the preset’s contents are displayed within the Signal Flow Window, with model menus, parameters, and automation control options available within the plugin’s Automation & Controller tab view.
This allows you to load & customize any of the provided factory presets, create your own presets, configure automation controller assignments, manage presets & Impulse Responses, as well as back up all your tones to your computer. Even better, all your saved creations can be transferred between the Helix Stadium Native plugin and the free Helix Stadium application, allowing them to be used on a Helix Stadium device as well. See Presets for details.
Live Input Monitoring
Another benefit of audio effects plugins is the ability to monitor your input signal through the plugin inserted on the track. This allows you to dial in the desired tone in Helix Stadium Native and hear your guitar (or other track input) processed in real time. Once you hit record, only your “dry” D.I. guitar signal is actually recorded into the track, which provides the huge benefit of completely changing the plugin settings right up until you do a final mix-down of the DAW project!
Note: Activating the track’s input monitoring is also necessary for using the Helix Stadium Native Tuner.
Live Input Monitoring is a feature of your host DAW application and is typically implemented as follows. This example uses Steinberg Cubase—Each host DAW is slightly different, so be sure to consult your DAW application’s documentation for details.
-
Configure your audio track’s input options to receive input from whatever physical input your guitar (or desired instrument) is plugged into.
-
Insert Helix Stadium Native on the track, as described in the previous section.
-
Set the track’s Record Arm button to “on” so that the track receives audio input. See image below.
-
Activate the track’s “Input Monitoring” feature. This is typically a button found near the Record Arm button. This feature allows the live track input to be routed through the DAW track and all plugins inserted on it. (In some host DAWs, it is unnecessary to also activate the Record Arm just to hear the input signal.)

Note: When using your track’s “Input Monitoring” feature, you’ll want to be sure to disable any “Direct Monitoring” signal on your audio interface (many interfaces offer an optional function that routes your input signal directly to its outputs, without going through the DAW software). This way, you’ll hear only the input signal fed through the Helix Stadium Native plugin. See your audio interface’s documentation for details.
-
Now, when you strum your guitar, you should hear your signal through the track with the Helix Stadium Native processing applied. Hit the Record button and try a pass at recording your performance. Upon playback, experiment with further tweaks to the plugin settings!
About Latency
Since this input signal is being fed round-trip, into your audio interface, through the DAW software, and back out your audio interface’s outputs, it is subject to some amount of “latency.” Latency is the time between plucking a note on your guitar and hearing it through your monitoring system. Latency is primarily a function of your audio interface, host DAW software, and your computer’s recording capabilities. You can generally achieve the lowest latency by reducing the buffer size in your DAW's audio interface driver settings. Please see your DAW’s documentation for details.
Optimizing the Input Level
The level of the input signal entering the Helix Stadium Native plugin can affect the overall gain and saturation of your tones; therefore, it is essential to “gain stage” accordingly. Helix Stadium Native amp & effect models are designed to receive “Instrument” level input signals, much like plugging an electric guitar directly into the same type of amp or effects pedal we modeled. The plugin automatically conforms to the track's input format and provides a matching mono or stereo Input Meter, as shown below. The following are several tips for achieving the optimal signal level.

Input Meter - mono input

Input Meter - stereo input
-
When recording “dry” electric guitar (or bass), use an audio interface with a “Hi-Z” or “Instrument” input.
-
To monitor your input signal level (or the playback level of any clips within your track), reference the Input Level meter within the plugin.
-
The Optimal Input Range Indicator (the lighter-shaded area on the left meter scale, indicating the -36 dB to -12 dB range) provides a guideline for setting your input level.
-
The multi-color Input Meter also provides guidance. Basically, strive to keep your input level at the top of the green range, and avoid the lower dark green (signal is too low) and the red (signal is too high). Please also see the Input and Output Levels and Meters section.
-
If your audio interface offers input-level adjustment, it is typically best to set it there for optimal level. If needed, adjust the plugin’s Input Level knob to fine-tune the level. The plugin’s Input and Output Level knobs' settings are saved per preset.
-
If your guitar has active or especially high-output pickups, enable your audio interface or preamp’s input “pad,” if available.
-
Clipping, as indicated when the red Clip Indicator at the top of the meter lights up, should always be avoided on both the plugin’s input and output.
-