
Enable the Automation/Controller button 
This page provides an overview of the Automation/Controller panel and its options for managing parameter automation and snapshot assignments. Please refer to the MIDI Control page for details on MIDI Learn and other alternatives for creating MIDI assignments.
-
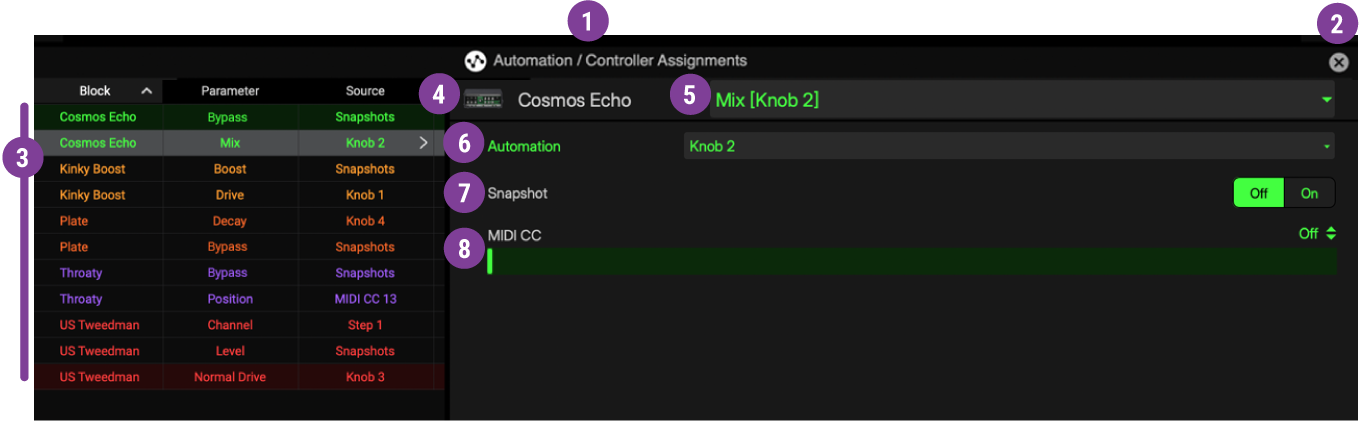
Automation/Controller Panel Title: This title is displayed when the panel is enabled via the toolbar button
-
Panel Close: Click to close the Automation/Controller Panel, returning to the Edit Panel display.
-
Assignment List: The left pane displays all existing parameter automation, MIDI, and snapshot control assignments for the current preset, listing the parent Block, the assigned Parameter, and the controller Source (Knob, Switch, Step, Snapshot, or MIDI CC types). When you select an assignment in this list, its editable settings appear in the Inspector pane to the right.
-
Inspector Pane: Displays the settings for the currently selected block or the currently selected assignment in the list at the left.
-
Selected Block Indicator: Displays the icon and name of the currently selected block (or the parent block of the currently selected assignment in the list at the left).
-
Target Parameter Menu: Select the desired parameter for creating an assignment or for editing the parameter’s existing assignment settings.
-
Automation Source Controller Menu: Select the source controller for the selected parameter’s assignment. Depending on the parameter type selected, the option in this menu will include Knob, Switch, or Step-type controllers. Please see the following Automation Assignment section for details.
-
Snapshot Control On/Off: Select On to enable Snapshot Control for the selected parameter.
-
MIDI CC Assignment: Choose the desired CC number to create a MIDI control assignment for the selected parameter. Set to Off for no MIDI control.* See the MIDI Control page for details.
*Note: Some DAW hosts, such as Pro Tools® and Logic Pro, require that a plugin be inserted on an “Instrument” type track rather than an Audio track for receiving MIDI Control input. Please refer to your DAW software documentation.
Hardware Controller Assignments
If you are importing a preset exported from a Helix Stadium XL or Helix Stadium device, the preset may include hardware-specific bypass and controller assignments (such as EXP Pedal or Footswitch types). These hardware-based bypass and controller assignments are not functional within Helix Stadium Native, but are retained in the preset for compatibility with the hardware devices. To display them in the Automation/Controller - Assignment List for reference, choose the Show assignments option in the Settings > Hardware Compatibility > Show hardware bypass/controller assignments menu (by default, this option is set to Hide assignments).
These assignments appear with a hardware icon at left and are dimmed (see below) since they are not editable in Helix Stadium Native, but you can clear them via the Clear Assignment commands from the preset within each assignment’s right-click menu.

Note: Undo/Redo does not track actions performed in the Automation/Controller Assign tab.
About Plugin Parameter Automation
Helix Stadium Native supports your host DAW application’s features to read, write, and edit parameter automation, where the DAW can control the plugin’s parameter values over time using editable track envelopes. Practically any Helix Stadium Native block’s parameters can be automated, as can the plugin’s Input and Output Level knobs and snapshots.
Most DAWs also allow you to record parameter automation in real-time, where you enter an automation “write” mode and changes to the selected plugin parameters are recorded and displayed on the track as adjustable envelopes. This allows all these parameter changes to be played back (using the host’s track “read” mode option) and incorporated into your project’s mixdown.
Host DAW applications typically allow you to access the list of automatable parameters for a plugin via an automation parameter menu specific to the audio, instrument, or aux track where you have inserted the plugin. Each host DAW software offers parameter automation options slightly differently—please refer to your host’s documentation.
Automation Assignment
Since Helix Stadium Native can include numerous parameters (depending on how many Amp & Effects blocks you add within your preset), it uses a set of assignable Source controllers for mapping each parameter you want to automate. To follow are the “automatable” Helix Stadium Native controllers and parameters that will appear in your host DAW application’s plugin automation menus.
-
Knob 1-16 Controllers: For assigning “variable” type controls, such as a Delay’s Mix or an Amp’s Drive parameter.
-
Switch 1-16 Controllers: For assigning switch type parameters with 2 states, such as a block’s Bypass/Enable, or an Amp’s Bright/Normal switch.
Note: When assigning a block’s Bypass to a Switch controller, the upper “On” position value in your DAW’s automation lane represents the block as enabled, and the lower “Off” position as the block bypassed.
-
Step 1-16 Controllers: For assigning parameters that offer between 3 to 13 individual options, such as a Compressor’s Ratio, or a Reverb’s Room Size parameter.
-
Large Step 1-16 Controllers: For assigning parameters that offer between 14 and 25 individual options, such as a Delay’s Note Sync parameter.
-
Additional “Fixed” Controllers: These Helix Stadium Native parameters require no automation assignment and automatically appear in the host’s Automation Parameter menus: Snapshot, Input Level, Output Level, and Master Bypass. (Note that some host DAW applications also offer their own “fixed controllers” within their automation menus that are also usable with Helix Stadium Native plugin, such as a Wet/Dry Balance or a plugin window Bypass.)
Note: The following steps for creating Automation assignments are specific to the Automation/Controller Assign tab. Automation assignments can alternatively be created directly on a parameter’s slider or knob within the Edit tab. Please see the Edit Tab > Creating Assignments section. Once an assignment is created, it can be edited in either panel.
Creating an Automation Assignment
Before you can utilize your DAW host’s track automation for a Helix Stadium Native parameter, it is necessary to first assign the desired parameter to an automation Knob, Switch, Step, or Large Step-type controller in the plugin (see descriptions of these controller types in the preceding section).
Automating a Parameter:
-
Add and select a Simple Delay and select its block in the signal flow. In this example, we will configure its Mix parameter for automation.
-
Click the Automation/Controller button
-
In the Automation/Controller panel, click on the Target Parameter menu to see all of the Simple Delay’s parameters—select the Mix parameter in the menu.

-
Click the Automation/Controller menu and select the desired “Knob” controller to which you want to assign your selected target parameter. We will select Knob 1.*
*Note: As described above, for variable parameters such as Mix, Feedback, Volume, etc., the Automation/Controller menu offers Knob 1-16 controllers. For switch parameters, the menu offers Switch 1-16 controllers. For multi-option parameters, the menu offers Step 1-16 or Large Step 1-16 controllers for parameters with many options.

-
The assigned block, parameter name, and Source controller are displayed in the Assignment List pane at the left, as shown below.
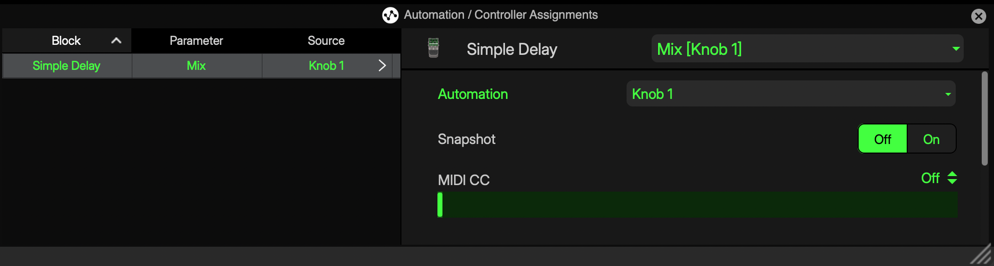
Note: Only one parameter can be assigned to any one Knob/Switch/Step automation controller at a time—choosing a controller with an existing assignment will replace the existing assignment. Or, choose None to remove an existing assignment.
-
Now, access your host DAW app track’s automation parameter menu and select the Helix Stadium Native Knob 1-assigned (Simp Dly:Mix) parameter to automate it.*

*Note: In some DAW hosts, the assigned Knob/Switch/Step source controllers appear in their Automation Parameter menus with the assigned parameter’s name. For example, in the Cubase images above, the source controller appears as “Simp Dly:Mix.” In other DAW hosts, the source controller may appear just as “Knob 1.”
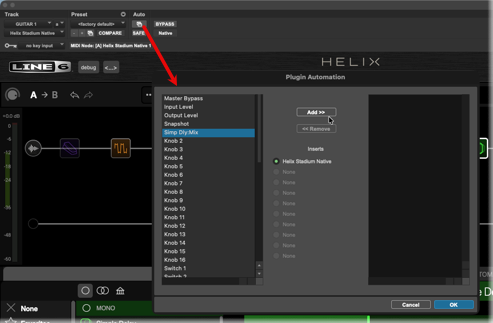
In Pro Tools, it is also necessary to open the plugin window header’s Plugin Automation Enable dialog and manually “Add” each plugin parameter you want to appear in the track’s parameter automation menu, as shown below.
-
An envelope line appears for the Simp Dly:Mix parameter on the track (your host app may require that you toggle an option to display it). Adding edit points and adjusting this envelope will now directly adjust the Simple Delay’s assigned Mix parameter.

Repeat these steps to configure other Knob, Switch, or Step controllers to create additional automation assignments for parameters in other Amp, Cab, Effect, or Mix blocks.
Automatic Controller Reassignment
In most cases, if you change the model in the current block to a different model of the same category, the Automation assignment will automatically assign to the same parameter for the new model. For example, in the above steps, we’ve assigned the Simple Delay model’s “Mix” parameter to Knob 1. If the block’s model is changed to another delay, such as the Transistor Tape model, its Mix parameter is automatically assigned to the Knob 1 Automation controller.
Tip: Alternatively, to configure a block’s Enable/Bypass switch automation assignment, you can right-click directly on the block within the Signal Flow, or right-click on the model’s Bypass button within the Inspector pane - Edit tab panel, and choose a Switch 1-16 controller from the Automation menu, as shown below.

Automating Snapshot Changes
Snapshots allow you to store a number of settings, such as block bypass, parameter values, tempo values, and more, and then recall all snapshot-assigned settings simply by loading the respective snapshot via the plugin’s Snapshot menu. Helix Stadium Native also lets you automate snapshot loading in real-time. Use the following steps to manually configure a snapshot automation assignment.
-
Access your host DAW app track’s automation parameter menu and select the Helix Stadium Native - Snapshot option. (Unlike block parameters, the Snapshot parameter does not require assignment to a Knob/Switch/Step Source controller.)

-
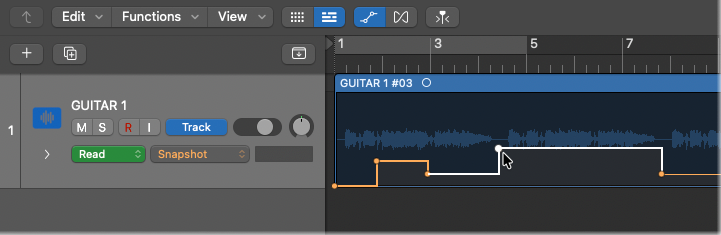
A “Snapshot” automation envelope line is added on the track (your host app may require you to toggle an option to display it). Adding edit points and adjusting this envelope allows you to choose the Snapshot index number you wish to load.
Writing Parameter Automation
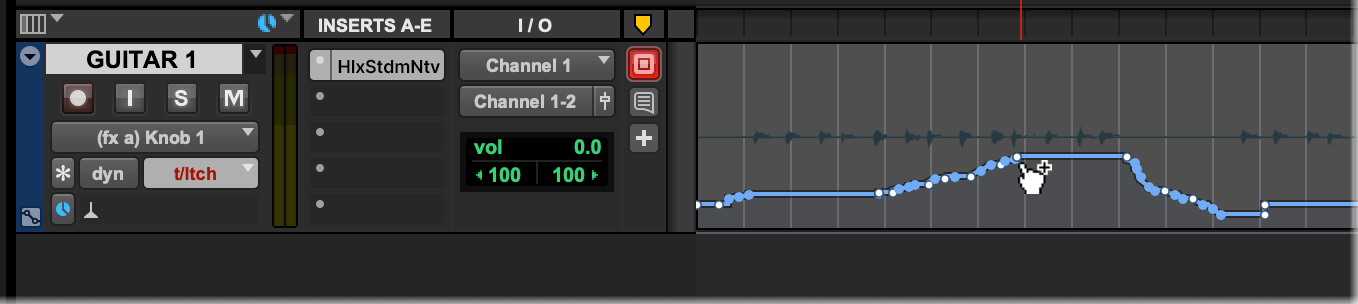
Most host DAW apps provide several “Read/Write” track automation modes, which typically appear as a set of options on the track (Off, Read, Write, Latch, Touch, etc.).
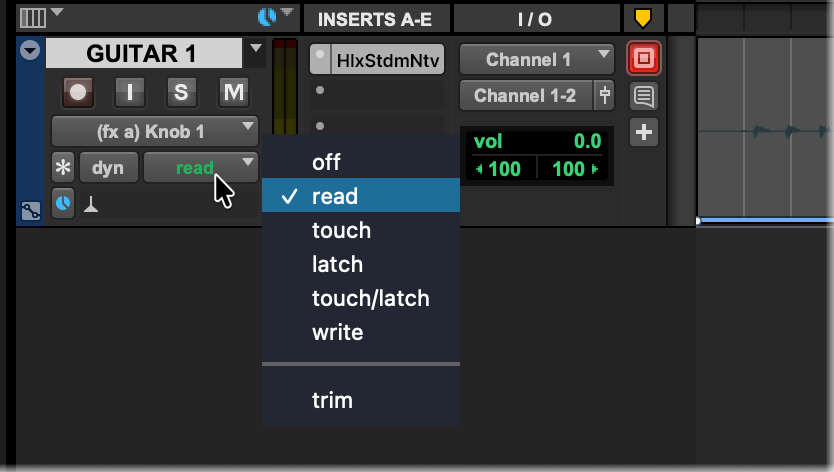
When set to Read (typically the default): The track will actively “play back” the automation envelope settings, and when set to “Off,” it will ignore the automation envelope.
When a Write option is set as active on the track: Play the track and manually adjust any Helix Stadium Native switch or slider within the plugin’s Edit Panel that includes an automation controller assignment, and your moves are recorded to the track in real time. The parameter’s envelope on the track has been edited with the adjustments you made. You can manually drag individual edit points to further edit the envelope after playback stops.
Note: Automation Assignments are saved with each preset. When Helix Stadium Native-saved presets are imported into Helix Stadium devices (via the Helix Stadium application), Automation Assignments are removed because they are not supported on the hardware. Snapshot and MIDI CC assignments are retained in the presets and are functional on the hardware.